Upload a Bulk Import File
Eclipse PPM administrators can use Bulk Import to create numerous Projects or Resources all at once, preventing them from having to manually create them one-by-one in the application. Instead, they will upload a CSV import file that contains a list of Projects/Resources along with Project/Resource details.
Once the import file has been created, it can be uploaded into Eclipse PPM to add multiple Projects or Resources at the same time.
Before You Start: Users will require the "Bulk Import" permission from an Application Policy to access the Bulk Import page. Also, an import file will have to be created before it can be uploaded into Eclipse PPM. See Create Bulk Import File for more information.
To import Projects or Resources via Bulk Import:
-
Select the Administration icon from the Navigation Menu:
Click thumbnail to enlarge.
-
Select Bulk Import from the "Other" menu:

-
Use the drop-down menu in the "Step 1" window to determine what you would like to import into Eclipse PPM (Projects or Resources):

-
Select the Upload File button:

-
Use the file explorer window that appears to select your CSV import file.
Tip: If you do not have an import file yet, see Create a Bulk Import File for help.
-
Click on any yellow Invalid buttons to see which fields in the row need attention:

-
Correct any of the problematic fields (outlined in red) by scrolling horizontally through the table and directly clicking on them:
Click thumbnail to play.
Note: Once all of the problematic fields in a row are corrected, the "Result" column will be labeled Valid:

-
(Optional) Repeat steps 4-7 to add another import file to the bulk import.
-
(Optional) Select the Add Record button to manually add another Project or Resource to the table:

Note: This will add another row to the table:

Administrators can use this row to manually add details to the new Project or Resource. -
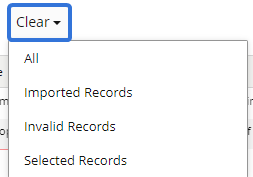
(Optional) Select the Clear drop-down menu to remove rows from the table:

-
All: Every row will be erased from the table.
-
Imported Records: Rows with Projects/Resources that have already been successfully imported into Eclipse PPM will be erased from the table.
-
Invalid Records: Rows that have been labeled Invalid in the "Result" column will be erased from the table.
-
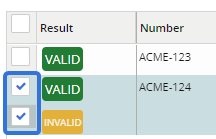
Selected Records: Rows with selected checkboxes will be erased from the table:

Tip: Selecting the checkbox in the column header will automatically select all of the items in the table. However, All can be selected from the menu to remove all items from the table
-
-
Select the Import button to import the Valid Projects or Resources into Eclipse PPM:

After selecting Import, Eclipse PPM will attempt to add the listed Project or Resources that are labeled Valid into the application. It will not attempt to add any rows that are labeled Invalid.
Items that are successfully added to Eclipse PPM will be labeled Imported in the "Result" column:

Items that were labeled Valid but were not successfully added to Eclipse PPM will be labeled Error in the "Result" column. Administrators can click directly on the red Error button to see what the problem is:

Once these problems are corrected in the table, the Import button can be selected again to retry.
