Timesheet Configuration Options
Using the "Options" drop-down menu, Eclipse PPM users can focus on certain Projects and/or tasks. The Timesheet can be customized to include or exclude completed tasks, summary tasks, Project assignments, and assigned operational activities.
Note: When Eclipse PPM users first access their Timesheet, they will need to select one of the four Loading Preferences before anything else. Users will not be able to see the "Options" menu until they choose one:
This page covers the following configuration options:
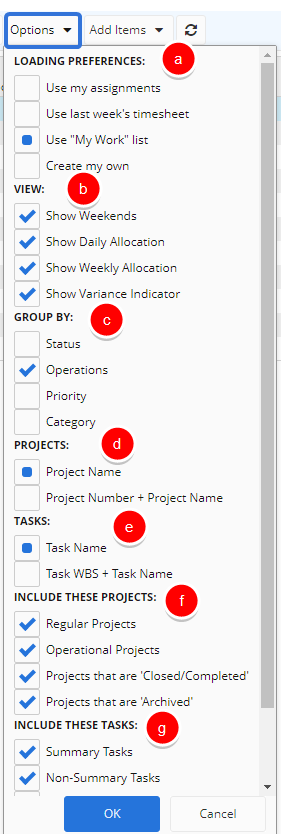
a. Loading Preferences
The Loading Preferences section of the "Options" menu allows you to decide how your Timesheet loads upon opening. You can select one of the following options:
-
Use my assignments: Build your timesheet by loading your current Projects and Tasks. This option displays Projects and Tasks that the resource is assigned to.
Note: When this preference is selected, the user's Projects and Tasks will only refresh when the Timesheet is visited by the user, not an impersonator. Impersonators might not be looking at an up-to-date Timesheet if the user has not visited the Timesheet in a while. See Enter Time for Another User for more information on Timesheet impersonation.
-
Use last week's timesheet: Build your timesheet by fetching items from the week prior to the selected week's timesheet. When effort to compile the correct collection of tasks and projects has already been done for the prior week, this is the quickest solution to repeat the activity list for the following week.
-
Use "My Work" list: Build your timesheet by loading projects and tasks from the My Work list on your Home page.
Tip: Projects outside of system criteria can be manually added to My Work from Project Menu.
-
Create my own: Build your timesheet for the selected week manually by searching for items. This option provides the ability to create a custom list of tasks and projects to record time against. Selecting this option allows users to navigate to a search screen where they can search for the projects and tasks from the All Projects and operations and All Tasks lists.
b. View
Selecting / deselecting the checkboxes in the View section of the "Options" drop-down menu allows you decide how your Timesheet will appear. You can select and deselect the following options:
-
Show Weekends: Displays weekend dates.
-
Show Daily Allocation: Displays Actual and Allocated time columns for each day.
-
Show Weekly Allocation: Displays Actual and Allocated time columns for each week.
-
Show Variance (only available if "Show Weekly Allocation" is selected): Displays the "Actual Time vs. Allocated" indicator in the weekly Actual column. Selecting this option will display a green, red, or yellow color on each cell of the Actual Totals column to indicate the variance between the total Actual Time and the total Allocated time for the week. The variance is calculated by dividing the Actual Time by the Allocated Time and multiplying the result by 100:
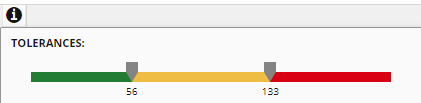
Note: The variance thresholds (pictured above) can be changed by an Eclipse PPM administrator. See Manage Organization Details for more information.
c. Group By
The Group By section of the "Options" drop-down menu determines the order of the Projects on the Timesheet. You can select one of the following options:
-
Status: The Projects will be organized in the Timesheet based on their statuses.
-
Operations: The Projects will be organized in the Timesheet based on whether or not they are marked as "Operations".
-
Priority: The Projects will be organized in the Timesheet based on their Priority.
-
Category: The Projects will be organized in the Timesheet based on their Category.
d. Projects
The Projects section of the "Options" drop-down menu allows you to include Project numbers along with each Project name. You can select one of the following options:
-
Project Name: The Project / Task column will display only the Project name for each Project. The Projects will be organized alphabetically by name.
-
Project Number + Project Name: The Project / Task column will display both the Project number and the Project name for each Project. The Projects will be ordered by Project number.
e. Tasks
The Tasks section of the "Options" drop-down menu allows you to include Task WBS number along with each Task name. You can select one of the following options:
-
Task Name: The Project / Task column will only display the Task Name for each Task.
-
Task WBS + Task Name: The Project / Task column will display both the Task WBS number and the Task name for each Task.
f. Include These Projects
This section of the "Options" drop-down menu allows you to determine which Projects will be displayed on the Timesheet. You can select or deselect any of the following options:
-
Regular Projects: Projects that are not Operations will be displayed in the Timesheet.
-
Operational Projects: Projects that are Operations will be displayed in the Timesheet.
-
Projects that are 'Closed/Completed': Projects with a "Closed/Completed" Status Type will be displayed in the Timesheet.
Note: Administrators can change the name of Eclipse PPMStatus Types. However, this option will not reflect the new name.
Note: This filter works retroactively through the Timesheet. For example, if a Project has a "Completed" status, it will not appear anywhere in the Timesheet if this box is deselected, even in weeks when the Project was still in progress. Deselecting this box will totally remove "Closed/Completed" Projects from the entire Timesheet.
-
Projects that are 'Archived': Projects with an "Archived" Status Type will be displayed in the Timesheet.
Note: Administrators can change the name of Eclipse PPM Status Types. However, this option will not reflect the new name.
g. Include These Tasks
This section of the "Options" drop-down menu allows you to determine which Tasks will be displayed in your Timesheet. You can select or deselect any of the following options:
-
Summary Tasks: Tasks that have been checked as "Is Summary" will be displayed in the Timesheet if they have not been filtered out by any of the other checkboxes.
-
Non-Summary Tasks: Tasks that have not been checked as "Is Summary" will be displayed in the Timesheet if they have not been filtered out by any of the other checkboxes.
-
Tasks with 0h allocated (this week): Tasks without any allocated time to the Resource during the current week will be displayed in the Timesheet.
Note: De-selecting this checkbox will not cause the "Project Time" row to disappear even if it does not contain any allocated time.
-
Tasks that are 100% complete: Tasks that are 100% complete will be displayed in the Timesheet.
Note: This filter works retroactively through the Timesheet. For example, if a Task has been marked 100% complete, it will not appear anywhere in the Timesheet if this box is deselected, even in weeks when the Task was still in progress. Deselecting this box will totally remove completed Tasks from the entire Timesheet.
Note: De-selecting this checkbox will not cause the "Project Time" row to disappear even if it is 100% complete.
-
Tasks from non-current work plans: Tasks from Work Plans aside from the current one will be displayed on the Timesheet.