Project Executive Summary Report
The Project Executive Summary report contains an overview of key performance indicators and liabilities for a selected group of Eclipse PPM Projects. It provides concise and easily-digestible information that will likely be valuable to Project stakeholders. It can be exported in a PDF file or a Microsoft Excel spreadsheet.
Tip: This report is well-suited to be sent or presented to senior executives, Project owners, and/or high-level decision makers upon request.
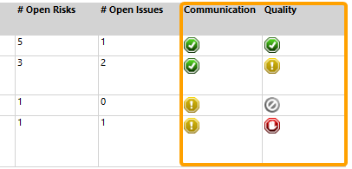
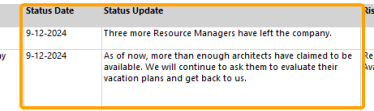
The "Project(s)" section of the report displays basic data about the current state of each Project, including its schedule, Status Update, Work Plan, Risks, Issues, and Health Indicators.


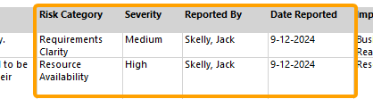
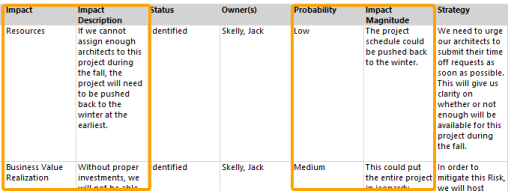
The "Open Risk(s)" section of the report displays data about the current state of each open Risk on each Project, including its Status Update, identification information, assessment information, and planned mitigation strategy.


The "Open Issue(s)" section of the report displays data about the current state of each open Issue on each Project, including its Status Update, classification information, and response strategy.


Eclipse PPM users can run the Project Executive Summary report from the Reports page.
To run the Project Executive Summary report:
Before You Start: Projects and their data will only be included in the report if the user running the report has the "Portfolio / Approval View" permission on at least one of the Project's Policies. Consider this before tasking an Eclipse PPM user with running this report.
-
Select the Reports icon
 from the Navigation Menu.
-
Select Project Executive Summary from the list of Eclipse Reports.

-
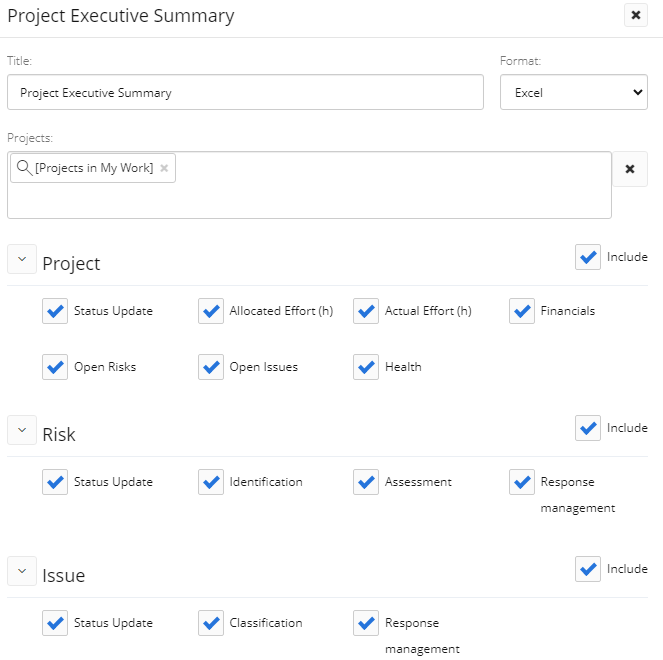
Use the "Project Executive Summary" window to customize your Project Executive Summary report.
-
Title: Enter a custom name for your Project Executive Summary report. This name will be displayed at the top of the report.
-
Format: Determine whether the report will be downloaded as a PDF file or a Microsoft Excel file.
Note: If PDF is selected, it is usually easier to use the "Two Page View" to read the report.
-
Projects: Select which Projects will be included in the report by typing in the name of a Project or Project filter and selecting it from the drop-down menu. Repeat this until all of your desired Projects and filters have been added.
Note: These are the same Project filters that can be found on the Project Search page. From here, users can create their own custom Project filters that can be used in the report.
Note: A message will appear if the selected filter(s) will result in no Projects being included in the report.
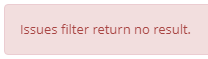
This could be the result of selecting a filter (or multiple) that does not include any Projects. It could also occur if the user running the report does not have permission to view any of them. -
Project: Use the checkboxes to determine which Project data will be displayed in the report.
-
Include: Select this checkbox to include the "Project(s)" section of the report.
-
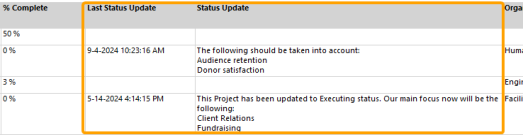
Status Update: Select this checkbox to include the "Last Status Update" and "Status Update" columns in the report.
-
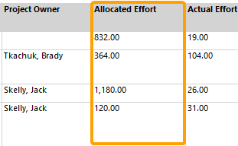
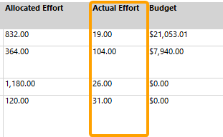
Allocated Effort (h): Select this checkbox to include the "Allocated Effort" column in the report.
-
Actual Effort (h): Select this checkbox to include the "Actual Effort" column in the report.
-
Financials: Select this checkbox to include columns for "Budget", "Total Expenditures", "% Budget Utilized", and "EAC".
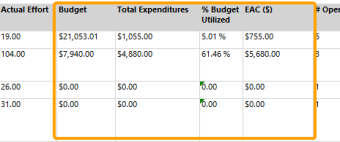
Tip: Scroll to the bottom of the Project Executive Summary report for a description of EAC.
-
Open Risks: Select this checkbox to include the "# of Open Risks" column.
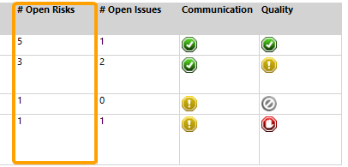
Note: Only Risks with an "Open" Status Type will be included in this tally. Administrators can see which Status Types are open by viewing the Risk Statuses page.
-
Open Issues: Select this checkbox to include the "# of Open Risks" column.
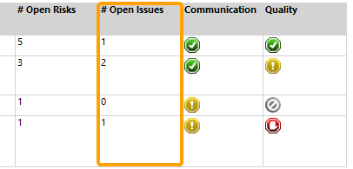
Note: Only Issues with an "Open" Status Type will be included in this tally. Administrators can see which Status Types are open by viewing the Issue Statuses page.
-
Health: Select this checkbox to include columns for Health Indicators that have been added to the Projects in the report.
-
-
Risk: Use the checkboxes to determine which Project Risk data will be displayed in the report.
-
Include: Select this checkbox to include the "Open Risk(s)" section of the report.
-
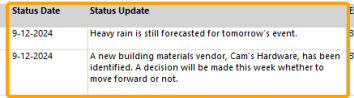
Status Update: Select this checkbox to include the "Status Date" and "Status Update" columns in the report.
-
Identification: Select this checkbox to include the "Risk Category", "Severity", "Reported By", and "Date Reported" columns in the report.
-
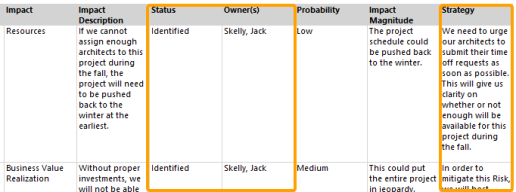
Assessment: Select this checkbox to include the "Impact", "Impact Description", "Probability", and "Impact Magnitude" columns in the report.
-
Response management: Select this checkbox to include the "Status", "Owner(s)", and "Strategy" columns in the report.
-
-
Issue: Use the checkboxes to determine which Project Issue data will be displayed in the report.
-
Include: Select this checkbox to include the "Open Issue(s)" section of the report.
-
Status Update: Select this checkbox to include the "Status Date" and "Status Update" columns in the report.
-
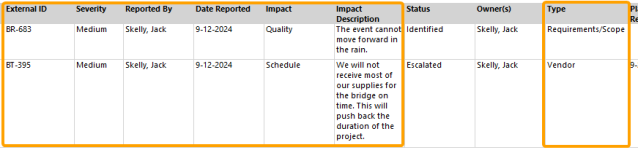
Classification: Select this checkbox to include the "External ID", "Severity", "Reported By", "Date Reported", "Impact", "Impact Description", and "Type" columns in the report.
-
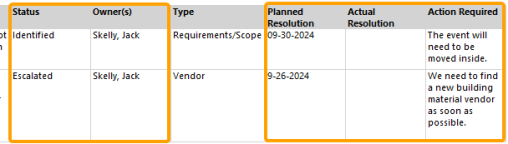
Response management: Select this checkbox to include the "Status", "Owners", "Planned Resolution", "Actual Resolution", and "Action Required" columns in the report.
-
-
-
Select the Run button.

After selecting Run, the report will automatically download onto your device in your selected format.