Configuration Tool
The telephony gateway is configured using the InGenius Configuration Tool. This section provides an overview of the Configuration Tool user interface.
Note: This section is not applicable to Genesys Cloud
The Configuration Tool is divided into the following tabs:
Configuration Tab
The Configuration tab consists of the following:
The following section describes the functionality of each of the two sub-tabs, as well as maintenance options including Loggers and Email Alerts and Configuration Backups.
General Sub-Tab
The General sub-tab of the Configuration Tool displays current gateway information configured during the initial install of the InGenius gateway.
The Summary area displays an overview of the settings selected on the other configuration tabs.
The HTTPS Service Configuration fields use the Fully Qualified Domain Name (FQDN) of the server, along with the desired port for HTTP Service traffic.

This URL is required when configuring a telephony gateway in the Admin App.
InGenius requires a 3rd party certificate for the server to validate the FQDN for HTTPS traffic. Bind or unbind the server certificate to validate the FQDN for HTTPS traffic on the required port. For more information on setting up a certificate for InGenius refer to Certificate Management.
Note: An icon appears on the port if it is blocked. Click on the icon to add a firewall rule.
Telephony Sub-Tab
The Telephony sub-tab of the Configuration Tool allows you to configure your telephony system connection.
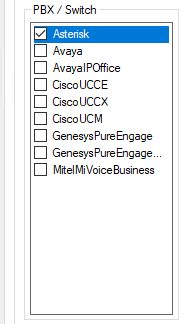
Enable the connection between the phone switch and InGenius. Select your telephony system from the list to display the settings for that phone system.
Phone System Settings
View the gateway profile configuration steps for your telephony system below:
Asterisk
To configure the Asterisk gateway profile:
- Select the Asterisk checkbox on the left-hand side of the Configuration Tool. This brings up Asterisk connection information.
-
Fill out the following information accordingly:
- Server: Server name or IP address.
- Port: Asterisk AMI port.
- If the Asterisk connection is a secure connection (sslenable=yes in the manager.conf on the Asterisk server), select the Secure Connection checkbox. Ensure the server port is set to the sslbindport that is specified in the manager.conf on the Asterisk server.
- If the Asterisk connection is a not secure connection, the port needs be set to the value specified in the general section of manager.conf.
- To have the server accept all certificates regardless of whether there is an error validating them, select the Accept All Certificates checkbox. A warning is reported in the server log if an invalid certificate has been accepted.
- Fill out the following information accordingly:
- Username: as specified in manager.conf.
- Secret: as specified in manager.conf.
- Test your connection to the Asterisk server using the Test button. Asterisk connectivity is confirmed when the Connected, Logged In, Checked AMI Permissions, and Disconnected options are selected. An X in any of the check-boxes indicates an Asterisk server connection misconfiguration. Review the user configuration data and confirm the Asterisk server AMI settings.
- Select your Channel Driver; either SIP or PJSIP (Asterisk version 13 or greater).
SIP Auto Answer Tab
Navigate to the SIP Auto Answer tab for this section.
To enable Agent Auto Answer:
- Select the Enable checkbox beside the phone models you are using.
To have the answer button appear inside of InGenius:
- Configure Auto Originate on the Asterisk switch. Modify the Asterisk configuration by editing extension.conf. Append the file with the following information:
Settings for SIP Channel Provider (Asterisk version 16):
[ice-clear-auto-answer]
exten => s,1,NoOp("Clear auto answer macro")
same => n,ExecIf($["${ICE-AUTO-ANSWER-HEADER}" != ""]?SIPRemoveHeader(${ICE-AUTO-ANSWER-HEADER}))
same => n,Return()


[ice-originate-auto-answer]
exten => _autoX.,1,ExecIf($["${ICE-AUTO-ANSWER-HEADER}" != ""]?SIPAddHeader(${ICE-AUTO-ANSWER-HEADER}))
same => n,Dial(SIP/${EXTEN:4},,U(ice-clear-auto-answer))


[ice-clear-auto-answer-and-dial]
exten => _.,1,NoOp("Clear auto answer")
same => n,Gosub(ice-clear-auto-answer,s,1)
same => n,ExecIf($["${ICE-CONTEXT}" != ""]?Dial(Local/${EXTEN}@${ICE-CONTEXT}))
Settings for PJSIP Channel Provider (Asterisk version 16):
[PJSIP-ice-originate-auto-answer]
exten => _autoX.,1,Dial(PJSIP/${EXTEN:4},,b(PJSIP-set-auto-answer-headers^sub^1))

[PJSIP-set-auto-answer-headers]
exten => sub,1,Set(PJSIP_HEADER(add,Call-Info)=answer-after=0)
exten => sub,2,Set(PJSIP_HEADER(add,Alert-Info)=<http://127.0.0.1>\;info=alert-autoanswer\;delay=0)
same => n,Return()

[PJSIP-ice-clear-auto-answer]
exten => s,1,Set(PJSIP_HEADER(remove,Alert-Info)=)
same => n,Return()

[PJSIP-clear-auto-answer-and-dial]
exten => _X.,1,Gosub(PJSIP-ice-clear-auto-answer,s,1)
same => n,Goto(default,${EXTEN},1)
Avaya
Primary Application Enablement Services (AES)
Enter the connection information for what you set up during installation in the AES of your Avaya Aura Communications Manager.
- Address: The address of your AES.
- Port: The port of your AES (default 4721).
- Username: The username of the account to access your AES.
- Password: The password of the account to access your AES.
- Connection manager (CM): The server name of your Avaya Aura Communications Manager.
- Use secure connection: Allows InGenius server to communicate with AES across a secure connection.
- User certificate: This is the certificate on the InGenius server which allows it to be identified by AES.
- Server common name: Server common name for authentication on the primary server.
Note: The server name is case sensitive. It must match the name used on the AES server.
Secondary AES
InGenius allows you to configure a secondary AES server in case the primary fails to connect.
Testing
Once the configuration settings have been filled in, click Test to ensure that you can successfully connect. If the test fails, an error message with details about what’s causing the connection error will be displayed.
Agent Setup
Agent
- Enabled: When checked, this will enable agent functionality with InGenius.
- Unified Login: When checked, end users will be presented with a unified login screen that will enable agents to log in to both an extension and their agent ID simultaneously.
- EAS Enabled: When checked, this will force agents to log into the group(s) to which they belong. If unchecked, agents will have the ability to select the group they wish to log into.
- Stop monitor on log out: This will automatically disconnect the InGenius UI from monitoring the device if the user logs out of Avaya agent.
- Prompt for password on login: Prompt the user for their password when they log into Avaya agent.
- Prompt for password when starting monitor: Prompt the user for their password when they start InGenius UI monitoring a device.
Note: InGenius Customer Care does not suggested enabling the Unified Login settings as it can cause unexpected behavior.
Work Modes
- Login: Select the state option(s) you would like your agents to be able to use when signing into their call queues.
- Auto In
- Manual In
- After call work
- Aux work
- Ready: Select the option(s) you would like displayed for agents when changing from Not Ready to Standby states:
- Auto In
- Manual In
Reason Codes
- Enable reason codes: If checked, this will enable your agents to select reason codes for Logout, Not Ready and Call Wrap-up states.
- Logout: These are the codes displayed to end users in the InGenius UI when they logout
- Codes: A number ideally should match those already programmed into the Avaya Aura Communications Manager. If reason codes do not match those already programmed in switch, reason codes selected by agents will still be captured and available for reporting however, they will not be defined nor consistent with those in the registry.
- Comment: This is the translation of the numbered reason code and is displayed for agents in the InGenius UI.
- Enabled: This turns the reason code ON and OFF.
- Not Ready: These are the codes displayed to end users in the InGenius UI when they are not ready.
- Codes: A number ideally should match those already programmed into your Avaya Aura Communications Manager. If reason codes do not match those already programmed into the switch, reason codes selected by agents will still be captured and available for reporting however, they will not be defined and consistent with those in the switch.
- Comment: This is the translation of the numbered reason code and is displayed for agents in the InGenius UI.
- Enabled: This turns the reason code ON and OFF.
- Wrap-up: These are the codes end users see in the InGenius UI when they complete a call and go into wrap-up.
- Codes: It is recommended to have the codes mapped to the same codes programmed on the Avaya Aura Communications Manager. If codes do not match the codes programmed into the switch, codes selected by agents will still be captured and available for reporting. However, they will not be defined and consistent with those in the switch.
- Comment: This is the translation of the numbered reason code and is displayed for agents in the UI.
- Enabled: This turns the reason code ON and OFF.
Note: Clicking Reset To Defaults eliminates all the settings in the Avaya CTI tabs (CTI Server Connection, Agent Logout, Agent Not Ready, and Agent Wrap-up).
Cisco UCCE
Primary CTI Server
- Primary IP Address: This is the IP address of the Primary CTI server.
- Port: By default this is 42027.
- Use Secure Server Named: Used to authenticate to a secure server.
- Peripheral ID: The Unified ICM Peripheral ID of the ACD where devices to be monitored is located.
- CTI Server Protocol Version: By default this is 13.
- Client ID: A default agent ID that is set to InGenius.
- Password: The default Client ID password that is set to Password.
- Test: Verifies the settings are correct.
Alternate CTI Server
- Primary IP Address: This is the IP address of the Alternate CTI server.
- Port: By default this is 42027.
- Use Secure Server Named: Used to authenticate to a secure server.
- Peripheral ID: The Unified ICM Peripheral ID of the ACD where devices to be monitored is located.
- Test: Verifies the settings are correct.
Finesse
Within the Finesse tab, select the Use Finesse checkbox to enable Finesse. From here you can add your primary and alternate server information.
Note: If you are using Finesse, ensure the Password checkbox is selected. If it is disabled/not selected, all attempts to log in as an agent fail when using Finesse.
Agent Login
Select which of these parameters your agents will be required to supply on login:
- Agent ID
- Password
- Instrument
- Position ID
- Work Mode
- Skillgroup
- Mobile Agent
Agent Logout
These are the codes displayed to end users in the InGenius UI when the agent logs out.
- Logout Agent when Monitor Stopped: If checked, this will automatically log agents out if the monitor has stopped, like when the browser is closed or the session times out.
- Default Logout Reason Code: This is the reason code that is automatically selected if the agent is logged out some way other than by pressing the Log Out button, like when the browser is closed or the session times out.
- Agent Logout Reason Codes:
- Reason codes: The reason code number should match those already programmed in the Cisco UCCE. If reason codes do not match those already programmed in Cisco UCCE, reason codes selected by agents will still be captured and available for reporting. However, the reason codes will not be consistent with those in Cisco UCCE.
- Comment: This is the translation of the numbered reason code and is displayed for agents in the InGenius UI.
Agent Not Ready
These are the codes displayed to end users in the InGenius UI when they are Not Ready.
Default Not Ready Reason Code: This is the reason code that is automatically selected if the agent is logged out while in Ready state some way other than by pressing the Not Ready button, for example when the browser is closed or the session times out.
Agent Not Ready Reason Codes:
- Reason codes: A number should ideally match those already programmed in your Cisco UCCE. If reason codes do not match those already programmed in Cisco UCCE, reason codes selected by agents will still be captured and available for reporting however will not be defined and consistent with those in Cisco UCCE.
- Comment: This is the translation of the numbered reason code and is displayed for agents in the UI.
Note: To transition from one Not Ready state to a different Not Ready state without going into a Ready state, select the appropriate Not Ready reason code from the list.
Agent Wrap-up
These are the codes displayed to end users in the InGenius UI when they complete a call and go into wrap-up.
- Only Allow These Entries: If checked, the users can only input wrap-up entries from the Wrap-up Text list.
- Wrap-up Text: Wrap-up codes are used to indicate how the call finished. InGenius recommends to match the wrap-up codes with the Cisco UCCE registry codes already configured. If wrap-up codes do not match the Cisco UCCE configuration, wrap-up codes selected by agents will still be saved and available for reporting. However, the InGenius codes will not be consistent with the Cisco UCCE registry codes.
Call Info
- Call Info Displayed: Select which Cisco UCCE call parameters will appear within the InGenius call display:
- Call ID
- Call Type
- DNIS
- ANI
- Caller Entered Digits
- Dialed Number
- Customer Phone Number
- Customer Account Number
Note: Selecting Reset to Defaults eliminates all the settings in the Cisco CTI tabs (CTI Server Connection, Agent Logout, Agent Not Ready, and Agent Wrap-up).
Cisco UCCX
Install Cisco UCCX
- Open the Configuration Tool.
- Navigate to the Configuration | Telephony tab.
- In the PBX/Switch section, select UCCX.
CTI Server Connection
- Agent information: Allows you to choose the mode you want for the CTI Server Connection.
- Manual: Allows you to configure all the agent settings manually.
- LDAP: Takes the agent settings from Cisco Server via LDAP.
- Finesse: Takes the agent settings from Cisco Server via Finesse.
- Configure UI using agent information: InGenius UI will disable controls that are disabled in Cisco Agent Desktop. Available only in LDAP mode.
- Primary IP Address: The IP address of the Primary CTI server.
- Port: By default this is 12028.
- Primary Finesse URL: The URL address of the primary server's Finesse connection. Available only in Finesse mode.
- Port (Finesse): By default this is 8082. Available only in Finesse mode.
-
Alternate IP Address: This is the IP address of the Alternate CTI server.
- Port: By default this is 12028.
- Alternate Finesse URL: The URL address of alternate server's Finesse connection. Available only in Finesse mode.
- Port (Finesse): By default this is 8082. Available only in Finesse mode.
- CTI Server Protocol Version: By default this is 14.
- Client ID: This is an agent ID that by default is set to “InGenius.”
- Password: This is the password associated with the Client ID that by default is set to “Password.”
Note: The Client ID and the Password are both for future use. That is, you will be applying them the first time you log in to your account. You can change them from the default at that time.
Test
- Test Primary and Test Alternate: Ensure you have the correct settings.
Agent Logout
These are the codes displayed to end users in the InGenius UI when they log out. Available only in Manual mode.
- Log out Agent when Monitor Stopped: If checked, this will automatically log agents out if the monitor has stopped.
- Default Logout Reason Code: This is the reason code that is automatically selected if the agent does not manually select a code in the allotted wrap-up time frame.
- Agent Logout Reason Codes
- Reason codes: The reason code number should match those already programmed in the Cisco UCCX. If reason codes do not match those already programmed in Cisco UCCX, reason codes selected by agents will still be captured and available for reporting. However, the reason codes will not be consistent with those in Cisco UCCX.
- Comment: This is the translation of the numbered reason code and is displayed for agents in the InGenius UI.
Agent Not Ready
These are the codes displayed to end users in the InGenius UI when they are Not Ready. Available only in Manual mode.
- Default Not Ready Reason Code: This is the reason code that is automatically selected if the agent does not manually select a code in the allotted wrap-up time frame.
- Agent Not Ready Reason Codes
- Reason codes: Ideally, a number should match those already programmed into the registry in your Cisco UCCX. If reason codes do not match those already programmed into the registry, reason codes selected by agents will still be captured and available for reporting. However, these codes will not be defined and consistent with those in the registry.
- Comment: This is the translation of the numbered reason code and is displayed for agents in the UI.
Note: To transition from one not ready state to a different not ready state without going into a ready state, select the appropriate not ready reason code from the list.
Agent Wrap-up
These are the codes displayed to end users in the InGenius UI when they complete a call and go into wrap-up. They are only available in Manual mode.
- Only Allow These Entries: If checked, the users can only input wrap-up entries from the Wrap-up Text list.
- Wrap-up Text: Wrap-up codes are used to indicate how the call finished. InGenius recommends to match the wrap-up codes with the Cisco UCCX registry codes already configured. If wrap-up codes do not match the Cisco UCCX configuration, wrap-up codes selected by agents will still be saved and available for reporting. However, the InGenius codes will not be consistent with the Cisco UCCX registry codes.
Call Info
- Call Info Displayed: Select which Cisco UCCX call parameters will appear within the InGenius call display:
- Call ID
- Call Type
- DNIS
- ANI
- Caller Entered Digits
- Dialed Number
- Customer Phone Number
- Customer Account Number
Note: Selecting Reset to Defaults eliminates all the settings in the Cisco CTI tabs (CTI Server Connection, Agent Logout, Agent Not Ready, Agent Wrap-up).
Cisco UCM
There are no basic settings required here for Cisco UCM. All the Cisco settings are inherited from the Cisco Unified Call Manager TSP.
For more information on configuring your Cisco Unified Call Manager TSP, refer to Telephony Configuration.Genesys
To configure the Genesys telephony gateway:
- Select GenesysPureEngage from the left-hand side of the InGenius Configuration Tool.
- Select the Primary Config Server sub-tab. Insert the information from your Genesys server (your Genesys server host, port, username and password).
- If required, set up a backup Genesys telephony gateway. Select the Backup Config Server sub-tab and insert the backup Genesys server information.
- Click Test to verify the connection is successful.
Loggers and Email Alerts
The InGenius telephony gateway automatically creates diagnostic logs. For more information on telephony gateway logs, consult the Status Tab documentation.
To access the loggers and email alerts configuration within the InGenius telephony gateway:
- Open the InGeniusConfiguration Tool.
- Select the Configuration tab.
- Click the Loggers and Email Alerts button.
Using the Logger and Email Alert dialog, add new loggers with the following steps:
- Click Add.
- Select Log to File.
- Set the Log files directory to save the log files.
- Set the Maximum number of log files to be saved. Once the maximum number is reached, the log files will be overwritten.
- Enter a File name prefix to identify your log files.
- Set a Filter to define the details to record in the log files and click OK.
- Level (Critical) records critical errors only.
- Level (Debug) will log everything.
Within the Logger and Email Alert dialog you can add new loggers:
- Click Add.
- Select Email Alert.
- Enter the details to access email etc.
- Set the email Trigger:
- Level (Critical) sends an email alert when the telephony gateway encounters a critical error.
- Remote server unresponsive sends an email alert when the telephony gateway loses contact with a redundant telephony gateway. The redundant telephony gateway may be down or communication between the telephony gateways has been lost.
- Set a Filter to define the details to record in the email.
- Click OK.
Configuration Backups
The InGenius telephony gateway can be set to back up its configuration.
For details on how to configure backups, refer to Manage Telephony Gateway Backups.
Destination Folder: Directory where you wish to write the files. For network location, use UNC path instead of mapped drive.
Start time: Time to backup the configuration file. Ideally pick a time when the InGenius telephony gateway will be least active.
Run task as: If backing up to a network drive, your network may require a domain server user (preferably whose password doesn't change) with sufficient permissions to read from the configuration directory and write to the target directory.
Username: Username of the domain server user (Domain\Login).
Password: Password of the domain server user.
Backup Configuration Now: Press this button to backup the configuration immediately.
Schedule Backup: Press this button to turn on the scheduled backup.
Remove Scheduled: Press this button to turn off the scheduled backup.
Backup File: This is the backup file you wish to restore to the InGenius telephony gateway.
Restore Configuration: Click this button to overwrite the current configuration file with the one from backup.
Note: To restore a backup configuration, you must first stop the InGenius service on the Status Tab.
Status Tab
The Configuration ToolStatus tab allows an administrator to:
- Locate the log files.
- Access the InGeniusRuntime Administration.
- Determine the operational state of the InGenius telephony gateway.
- Manage the InGenius service.
- Start Service: Press this button to start the InGenius service.
- Stop Service: Press this button to stop the InGenius service.
- Logging window: High level logs of the InGenius service are displayed here.
- Log files location: Path to the directory where the log files are being saved. Press the button to the right to open the log directory in Windows Explorer.
Note: If the telephony platform is going to be stopped, cycled, or have maintenance that requires a reset, InGenius must be stopped before the maintenance is performed and only re-started once the telephony system is back online.
Send Diagnostic Data to InGenius
Pressing the Send Diagnostic Data to InGenius button will allow you to submit logs and configuration data directly to InGenius Customer Care, or download the log files to your computer. The dialog box is shown in the image below:
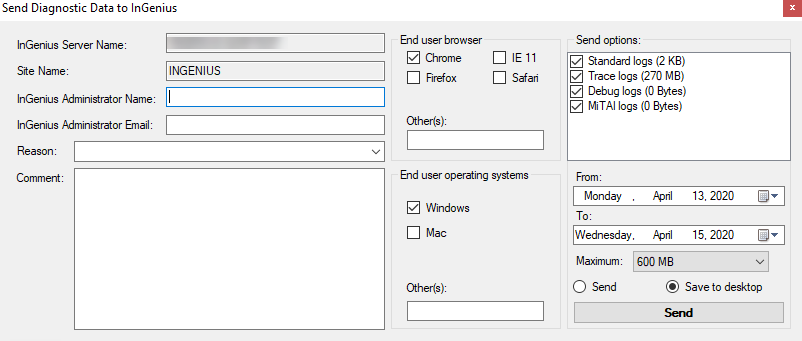
Below are descriptions of each of the fields displayed in the diagnostic data dialog box:
InGenius Server Name: Name of the server on which InGenius is installed; usually populated by the Configuration Tool.
Site Name: Domain running the InGenius telephony gateway; usually populated by the Configuration Tool.
InGenius Administrator Name: Enter the name of the person in your organization who is the administrator of the InGenius telephony gateway.
InGenius Administrator Email: Enter the email of the person in your organization who is the administrator of the InGenius telephony gateway.
Reason: Enter a reason for why you are submitting logs either by entering your own, or by selecting from the drop-down list:
- Post Installation Data Collection: Once installed for the first time, select this reason code and send in diagnostic data as a way to back up settings. Also assists InGenius Customer Care should there be a future need.
- Configuration Change: If you made configuration settings changes, select this reason code and send in diagnostic data as a way to back up settings. Also assists InGenius Customer Care should there be a future need.
- New Customization: If customizations were made, with the help of InGenius Customer Care, select this reason code and send in diagnostic data as a way to back up settings.
- Customization Modification: If customizations were changed with the help of InGenius Customer Care, select this reason code and send in diagnostic data as a way to back up settings.
- Request for InGenius Modification: If you wish to request InGenius Customer Care assistance to make changes, select this reason code and send in diagnostic data to help diagnose the changes required.
- Problem Report: If you wish to request InGenius Customer Care assistance with a problem, select this reason code and send in diagnostic data to help diagnose the problem.
- Request from InGenius Support: If InGenius Customer Care requests logs from you, select this reason code and send in diagnostic data.
Comment: Enter details you wish to communicate about the logs being submitted. If you have an active case with InGenius Customer Care, please provide the case number in this field.
End user browser / operating systems: List off the various browsers and operating system(s) your end users most use. This helps InGenius Customer Care analyze the logs.
Send options: Choose the log types you wish to submit.
From / To: Choose the start and end dates of the logs you wish to submit.
Maximum: Choose the maximum size of the logs you wish to submit.
Send / Save to desktop: Choose whether to submit the logs to InGenius Customer Care or zip and save them to the server's desktop.
Send: Press the Send button to submit or download the logs, depending on if you chose to submit the logs to InGenius or download to your PC.
Note: The standard diagnostic logs roll over at 16 GB.