OLRP Enrich and preview print jobs
This tutorial demonstrates a basic OL Remote Print (OLRP) implementation that uses OL Connect to enrich incoming print jobs and deliver a live, browser-based PDF preview. This is the third of three tutorials that show how to Use OL Connect Automate with OL Remote Print , and we recommend completing them in order.
Overview
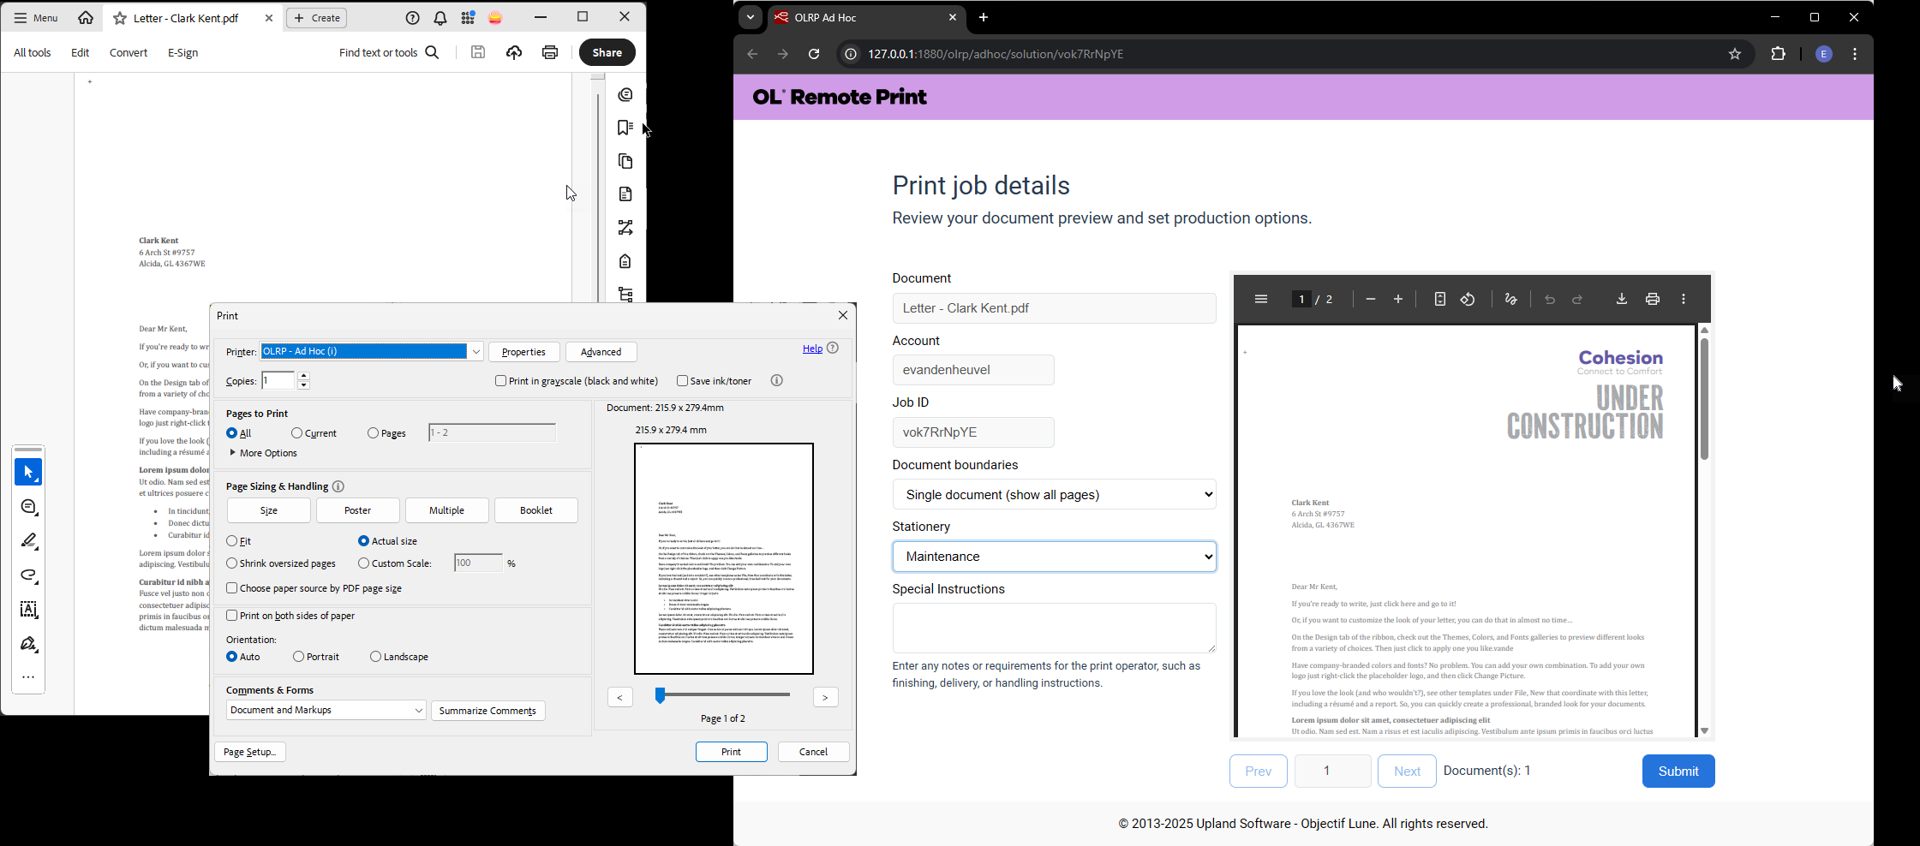
Through a simple web form, users can choose a stationery image to appear behind each page and set document boundaries, with the preview updating instantly after every change.
These flows are included as examples with the olrp nodes and can be imported using the Import option in the upper right menu. The required OL Connect resources can be downloaded from the OL Resource Center using the following link: print-preview.zip.
Flow components
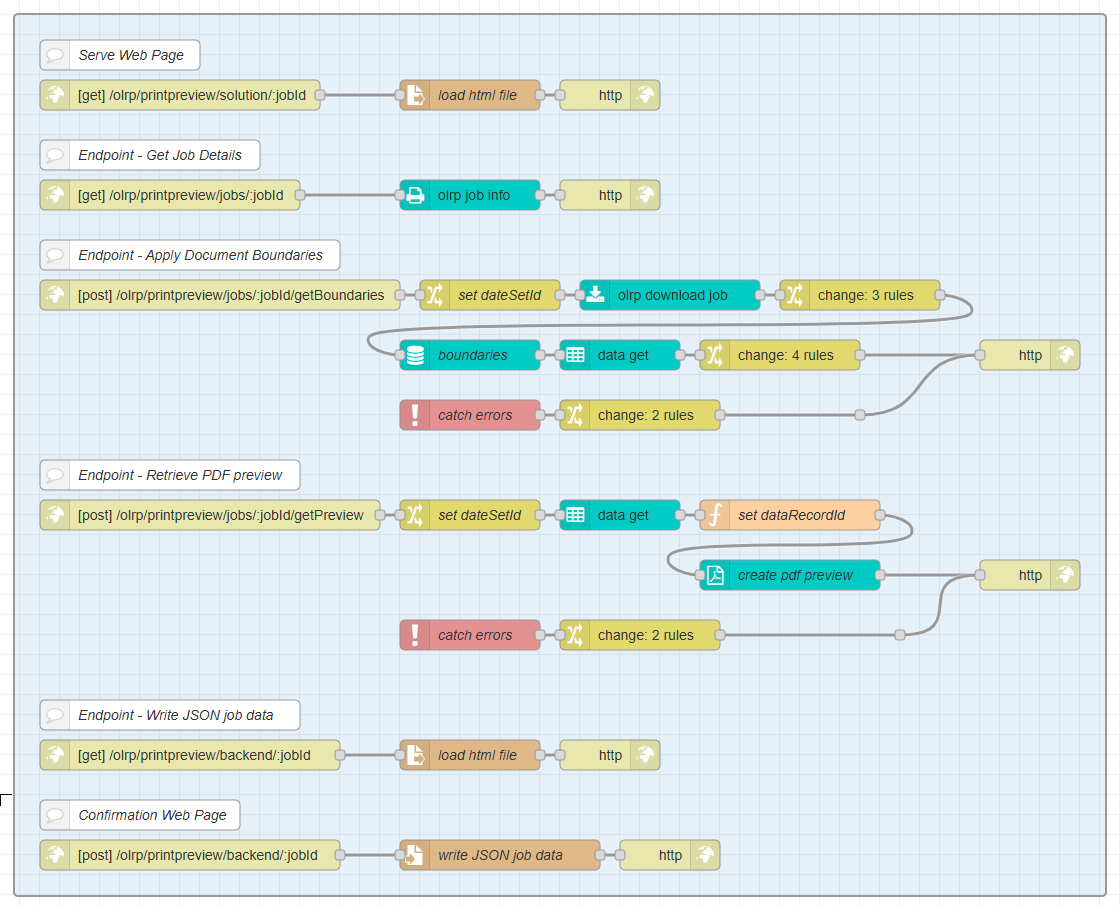
The Print Preview sample package includes a set of OL Connect Automate flows that manage both user-facing interactions, by serving web pages, and background processing, via endpoints. Each flow is responsible for a specific part of the solution.
Check Job Status
The first flow group handles checking the status of the OLRP job, using the same functionality as in the standalone OLRP check job status.
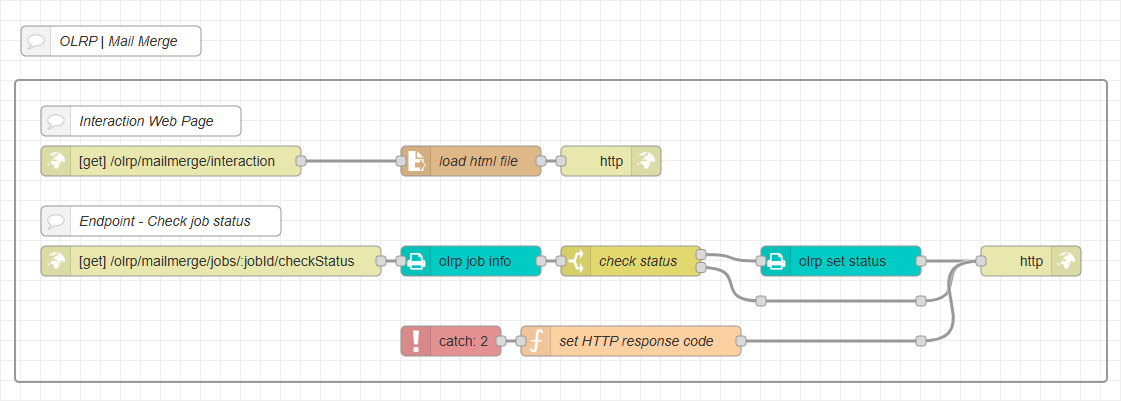
Once the job is fully received, the browser is redirected to a page where the user can select recipients or tenants.
Resources endpoint
The second group of the flow is an endpoint that serves the static assets required by the various web pages. These files are stored in the example’s assets folder and include the JavaScript files that provide front end functionality, as well as the CSS stylesheets that define the appearance of the pages.

Core functionality
The third flow group contains the core functionality of the example. These flows perform the following:
-
Serve the web interface with sample-specific capabilities.
-
Provide endpoints for retrieving PDF previews and handling document segmentation.
-
Store submitted job data in structured JSON format for persistence and future reference.
Web Page flow
Serves the main landing page where users can:
-
View job-related information.
-
Select preferred stationery options.
-
Define document boundaries for mail-merge scenarios.
-
Preview the job in PDF format, with the ability to navigate between segmented documents.
Endpoints
-
Job Details endpoint: Provides static information for a given OLRP job, allowing the web interface to display this information.
-
Document Boundaries endpoint: Dynamically sets document boundaries using a data mapping configuration, creating datasets and records in the OL Connect database. It returns the dataset ID and document count, which is used for the preview navigation on the web page.
-
PDF Preview endpoint: Generates a PDF preview for a specific record within a dataset. The endpoint uses submitted JSON containing the dataset ID, record index, and stationery selection.
-
Write JSON Data endpoint: Saves submitted job data to disk, triggered when a user finalizes their print job. The file is found under
/olrp/print-preview/jobs/ -
Job Confirmation page: Displays a static confirmation page to indicate successful job submission.
Install the sample
Prerequisites
Before installing the sample, ensure the following components are installed and properly licensed:
-
OL Connect Automate.
-
OL Connect software.
-
OL Remote Print server.
-
An OL Remote Print client (printer driver).
The printer driver must be installed with interactive mode enabled, and the URL set to:
olrp/printpreview/interaction
For example, on the machine hosting OL Connect Automate:
http://127.0.0.1:1880/olrp/printpreview/interaction
Installation steps
-
Set the Workspace Environment Variable:
Create an environment variable namedENV_WORKSPACEand point it to the root folder of your solution workspace.You can set this through the User Settings interface in the menu. However, the preferred method is to configure this variable during the installation of OL Connect Automate, or by editing the
olca.environments.jsonfile, as described in Use environment variables in flows. -
Create the olrp subfolder:
Inside your workspace folder, create a new folder namedolrp. -
Download and extract the sample package:
-
Download the print-preview.zip file from the OL Resource Center.
-
Unzip the contents and place them in the olrp folder.
The resulting structure should look like this:
-
        workspace/
			└── olrp/
			    └── print preview/
			        ├── 03 - Print Preview.json
			        ├── Welcome - James Rogers.docx
			        ├── Welcome - All.pdf
			        ├── ...
			        └── jobs/
			        └── resources/
			            ├── <OL Connect resources>
			            └── ...
			        └── site/
			            ├── interaction.html
			            ├── solution.html
			            ├── confirmation.html
			            └── assets/
			                ├── interaction.js
			                ├── pagination.js
			                ├── solution.js
			                ├── styles.css
			                └── variables.css
-
Load OL Connect Resources
In OL Connect Designer you’ll need to send all OL Connect resources to the OL Connect Server.
-
In OL Connect Designer, go to File → Send to Server…
-
Click the Browse icon and select all files from the
resources/folder. -
Click Send.
-
-
Import the Flow
In the Node-RED editor:
-
Open the menu, go to Import → Examples, and select the
03 - Print Preview.jsonfile from the print-preview folder. -
Or, go to Import → Clipboard and load the
03 - Print Preview.jsonfile from the unzipped package.
-
-
Update the server configuration for all OL Remote Print nodes:
-
Set the URL to your OLRP server (e.g.,
http://localhost:9180/) -
Enter your OLRP Username and Password
-
-
Update the server configuration for all OL Connect nodes:
-
Set the URL to your OL Connect Server (e.g., http://localhost:9340).
-
Enter your OL Connect Server Username and Password.
-
-
Click Deploy to activate the flow.