Managing Lists
Lists are subsets of your database that define mailing behavior and attributes. The lists tab allows you to create a new list, merge lists, dedupe lists, split lists, and delete lists.
Also included on the list tab are your suppression lists, segments, dynamic segment sets, and the targeting estimator feature.
Tip: becoming an effective email marketer requires consistent list cleansing and hygiene. Most lists shrink by 30 percent each year due to subscribers changing their email address or email provider. In addition, ISPs such as Yahoo! and Hotmail sometimes repurpose old email addresses as spam traps in order to flag senders who fail to maintain clean mailing lists. Marketers also need to monitor their subscribers’ activity. Subscribers who do not open or click for six months or more are unlikely to respond, and even more likely to complain, creating the potential for ISP blocking.
Please contact your PostUp Deliverability and Strategy Consultant for recommendations on how to maintain your mailings lists.
Note: Your account settings determine your level of system access. If several of the options and/ or processes outlined in this document are not available, please contact your site administrator.
Hovering over a mailing list in the list tab reveals a row of action icons.
- Edit - set different options for the list including which brands this list can be sent from, substitution tag values, a description of the list, attach a seed list, and options around subscription handling and list level welcome messages.
- Copy - makes a clone of the list and its recipients while retaining the same settings as the list it is being copied from.
- View - displys attributes of the list such as List Type, List ID, counts of recipients broken down by status, total current recipient count, and a preview of recipients on the list.
- Export - choosing this Export option will take to you the Export tab with this list already selected, where you can then further set additional export criteria if desired.
- Attrition - creates a report which shows counts of recipient status changes over the last 30 days, recipients grouped by import ID, blocked domains, and recipients grouped by status, both with and without blocked domains being applied.
- Domains - breaks down the count of recipients in each domain found on the list and orders them from largest to smallest.
- Trends - creates a report where you can see in graphs the subscribe and unsubscribe counts, Unique Open and Clicks results by mailing.
- Delete - completely delete the list, or remove all of the recipients from the list, leaving an empty list as a result. This action CANNOT be undone when completed.
Creating a list (email or SMS)
You may create a list by importing a file containing subscriber data directly into PostUp or by creating an empty list through the lists tab.
- Press the + New List button. The Create List page will appear.
- Select the channel you wish to use for the list, i.e. email or SMS.
- Select the Create an empty list option.
- Select next. The Query Details page will appear. The Details section should indicate that 0 members matched the query.
- Select next. The List Settings page will appear.
- Select Standard List from the List Type dropdown menu.
- Enter the name of the mailing list into the List Name field.
- Enter the recipient-facing list title into the Friendly Title field. This list title will replace the [-List-Friendly-Title-] mailing tag if used in an email or SMS message.
- Select a List Category, if applicable. Users will need to create one or more List Categories for this option to appear.
- [Optional] Include additional information about the list in the Description field. This is for internal use only, mailing recipients do not see this.
- [Optional] Select an additional list as a Seed List.
- Select Next. A confirmation page will appear.
- Select OK.
Merging lists
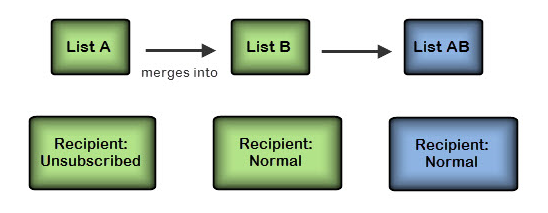
Merging moves customers from one mailing list into another, excluding all duplicate records.
Note: when a list merge takes place, and a recipient appears on both lists, the recipient’s status on the list being merged into will take precedence. For example:
- Press the Merge Lists button. The Merge List page will appear.
- Select the first mailing list from the Merge Recipients From section.
- Select the list to merge the subscriber records into, in the next field.
- Press the Merge button.
- A confirmation page will appear. Select Merge again.
- The Merged List Preview page will appear. Select Back to return to the Lists tab.
Note: when merging the lists, PostUp will delete the list that no longer contains the subscriber data.
Note: you cannot merge query lists.
Deduping lists
By deduping lists, you can remove members from one list who also appear on another mailing list. This process serves as an effective way to streamline lists and helps prevent sending duplicate messages to individual subscribers.
Query lists will not be made available for the deduping process.
Note: you should not run multiple deduping tasks on the same list, at the same time.
- Select Dedupe Lists on the left navigation bar.
- Once the Remove Duplicates page appears, Once logged in, select the mailing list to Remove Members From.
- Select the mailing list to scrub against, from the Who Are Also Found On section.
- Select Remove.
- When the confirmation popup box appears, click OK.
Change or add a brand to a mailing list
- From the Lists tab, locate the new mailing list.
- Select the Edit icon.
- The Edit Lists page appears. Select the appropriate brand(s) from the Brand options.
- Select Save.
Deleting a mailing list
Note: neither deleting an entire mailing list nor removing subscribers from a list will delete the subscriber records from the PostUp database.
- Find the appropriate mailing list.
- Press the Delete icon. The confirm deletion page appears.
- Select one of the following options:
- Cancel
- Delete list
- Remove all recipients
- A confirmation page will appear.
- Select OK.