Adding Content to a Mailing
After creating a mailing and selecting a target audience. you will need to add content to your mailing. You can do this by adding content from the asset library, or using reference tags to pull content. Once you have structured your mailing template, you can then customize the content.
When you have finished adding content, use the rendering tab to see how it will look in different clients.
Tip: use our AI assisted subject line generator to get subject line suggestions based on your HTML content.
Add or Manage Content from the Asset Library
- Select the content tab from the mailing workflow.
- The Asset Library will appear on the right-hand side of the page.
- Click on the Content tab to access the files and folders stored within the site’s Content Management. View your content by clicking on the folder dropdown box.
From the Content section, you can:
- Upload Content
- Edit, Copy, Delete or Move or Download the activated content folder
- Edit, Copy, Delete, Move, Download or Preview content files and images from within the Asset Library
You may also Create New Folders by performing the following actions:
- Click on the Folder dropdown menu.
- Click on the Create New… option.
- Enter the folder name into the provided field.
- Click Create.
Pull Content into a Mailing from the Asset Library
PostUp offers users the option to pull in templates, content blocks and images from the site’s Content Management System in order to build your email message.
- Click on the Content section of the Asset Library, if not already activated.
- Select the appropriate content folder from the Folder dropdown menu. The content and images assigned to the folder will appear within the Asset Library.
- Select from one of the following drag-and-drop options:
- Drag-and-drop the Reference Tag The Reference Tag will generate a tag that references the content located in the Content Management System. This option allows clients to make a one-time change to the content, automatically updating any mailing that references the content.
 icon to create a reference tag for the content block.
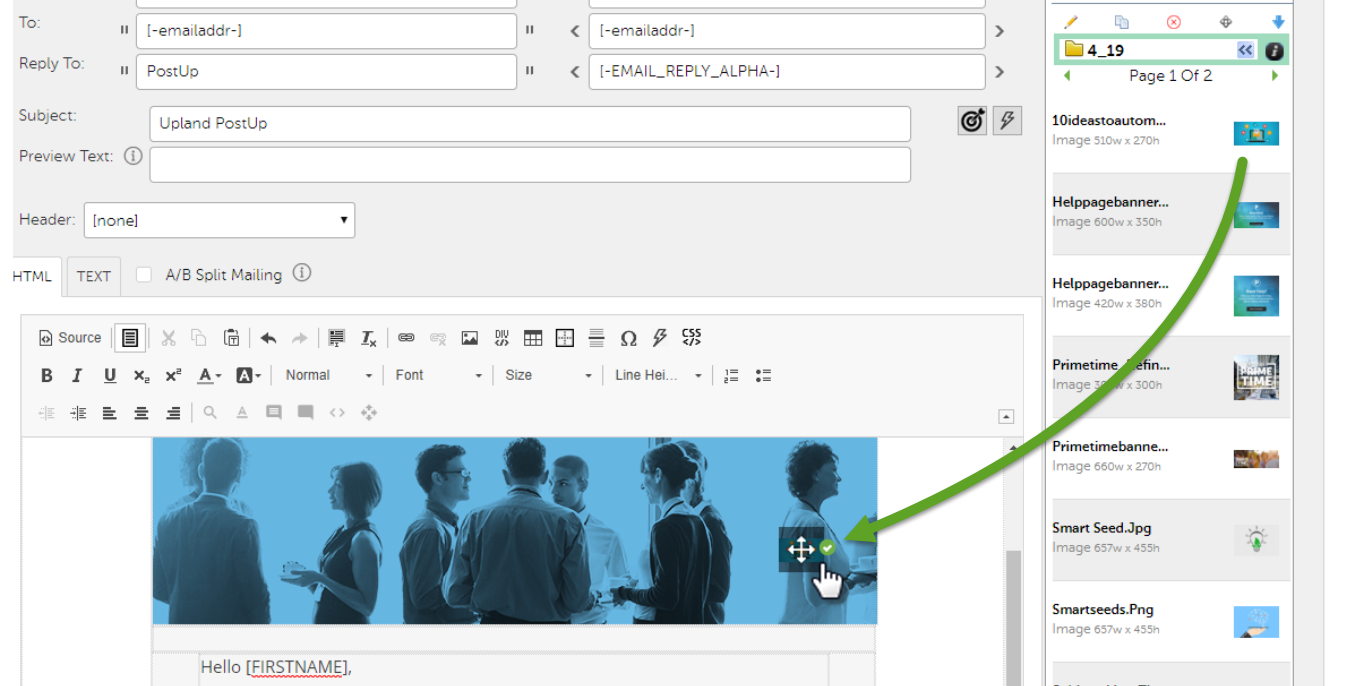
 - Drag-and-drop (or double click) the Snapshot The icon of a photograph that when dragged into the Content Editor from the Asset Library, will populate a visual display of the html content.
 icon to view the actual content block in the content editor. Be sure to place your cursor at the desired destination, prior to pulling over the content. PostUp will indicate the placement of the content block by highlighting the table cell with a border.
Note: you can use the Reference Tags for content blocks shared across multiple mailings. Examples include header and footer content used across a series of drip messages within a single campaign. In the event that a change needs to be made to a piece of content leveraged in multiple mailings, you can simply update the content through the Content Management System instead of updating each individual mailing. At the time of queuing, PostUp will reference the updated content stored in the Content Management System.
Customizing your Email Template
- Once you have pulled in your HTML template, you can then replace the images by locating them in the Asset Library and dragging them into the desired location.
- Right click on your image and select Image Properties to resize or add a link and alt text.
- Add or change links associated with text:
- Highlight the selected text.
- Click on the Link icon, located in the Content Editor toolbar. The Link modal will appear.
- Enter the URL that recipients will be redirected to if they click on the link.
- Click on the OK button.
- Add tags to your Subject Line or Content:
- Locate the desired tag in the Asset Library.
- Place your cursor where you want to add the tag.
- Double click on the desired tag.
- Click Preview to view your mailing. Or Preview as a Specific Recipient if you have Dynamic Content or are using Personalization tags.
- Click Apply Changes and Send Test Message to send yourself a test. You can also add email addresses into the Send Test Message to textbox or select a list from the dropdown box.
- [Optional] Perform an A/B Split Test.
- Click Apply Changes.

Previewing as a recipient
Note: before you can preview as a recipient, you must enable a recipient ID for preview in the recipients tab of the main menu.
- To preview the mailing, scroll down the content page and click Preview. This will open the preview window. If you are using dynamic content this will show the default content. Any personalization tags will still appear as the tag.
- To preview as a specific recipient, open the dropdown menu for Preview using member information.
- Select the recipient you wish to use for preview. The window will refresh to display the specific content and tag information that would pull in for the recipient.
- To preview as additional recipients, continue to select the desired recipients available in the dropdown menu. See the next section for examples of how this will appear.
- Use the list dropdown menu for populating any list specific tags, such as [-DATEJOINED-]