Add a New Measure Template
Measures allows users to track, analyze, store, and report on numerical information in PowerSteering. Measure values are either entered manually or formulated based on information that already exists in PowerSteering.
Once a Measure Template is created from the Measures Library, it can be added to new or existing work items in PowerSteering.
Note: Multiple measures can exist with the same name. This often occurs when users create multiple versions with updated information or keep a version available to make copies from quickly. Here are the ways in which multiple Measures with the same name are displayed:
Report Wizard: All instances of the same Measure are displayed when the measure name is selected from the list of available Measures.
Measure Mass Attach/Evaluate: If the Attach only if not already attached option is not selected, then every time a new instance of the Measure is created, it will be added to the work item.
Dashboard: The Dashboard only displays one instance of the Measure, which is always the most current version.
Visual Portals: All instances of the Measure are listed, allowing the user to select any desired.
Copy Project: All instances of the Measures are copied to the new Project (no values are copied).
To add a new Measure Template:
Before You Start: Users will require the "Measure Template" Context permission to both create and modify Measure Templates in PowerSteering.
-
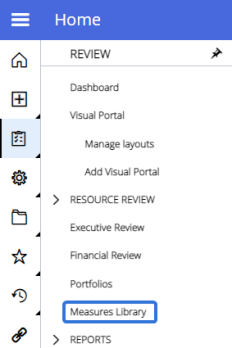
Select Review → Measures Library from the Navigation Menu:
-
Select the Add New button in the top right-hand corner of the page:

-
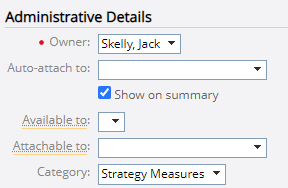
Enter the "Administrative Details" for the new Measure Template:
-
Owner (required): Select a PowerSteering user to be responsible for maintaining the template.
Note: Permissions for formula Measures can be tied to the template owner in the "Collection Method" section (Step 5 below).
-
Auto-attach to: Select one or more work types to which the Measure Template will automatically be attached.
Note: The Measure will only be attached to the selected work types that are created after the Measure Template. For example, selecting "Projects" from this menu will automatically attach the Measure to all Projects created after the Measure Template is submitted, not existing ones.
Note: This field is only visible to PowerSteering administrators.
-
Show on summary: Select this checkbox if you would like the Measure to appear on the Summary page of any new work items it is attached to.
Note: This field is only visible to PowerSteering administrators.
-
Available to: Select which users and/or groups will be able to attach the Measure to work. If left empty, any user with the "Copy/Attach Measure" Project Task permission will be able to attach the Measure to work items.
-
Attachable to: Select which object types the Measure can be attached to manually. If empty, then it can be attached to all object types.
Note: This option works independently of the "Auto-attach to" option.
-
Category: Select a Library Measure Category Tag value (or multiple, if allowed) for the Measure Template.
Note: For this property to appear, a PowerSteering administrator must add values to the Library Measure Categories Tag from the "Tags" Configuration page. Administrators should keep in mind that the name of this Tag can be changed; it may appear under a different name in the list of Tags.
-
-
Enter the "Measure Details" for the new Measure Template:

Note: Selecting the checkbox next to a property will prevent users from editing it once the Measure is attached to a work item. Selecting the lock icon above the checkboxes
 will lock or unlock all of the properties at once.
Other users with the "Measure Template" Context permission will be able to edit locked properties on the Measure Template, but not on the Measure itself. If a locked property is changed on the Measure Template, the change will be applied to all Measures that have already been attached to work items.-
Name (required): Enter a name for your Measure Template.
-
Description: Enter in any supporting information that you would like to attach to the Measure (its purpose, etc).
-
Units of Measure: Enter in the units that will be used to measure the numeric data tracked by the Measure.
Note: The value of this property will have no effect on the numeric values of the Measure. It will appear in the column header of the values on the actual Measure:

If left empty, this column header will be labeled "Values".
-
-
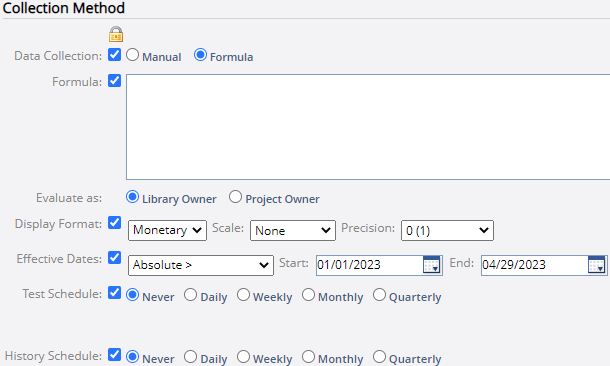
Enter the "Collection Method" properties of the new Measure Template:
Note: Selecting the checkbox next to a property will prevent users from editing it once the Measure is attached to a work item. Selecting the lock icon above the checkboxes
 will lock or unlock all of the properties at once.
Other users with the "Measure Template" Context permission will be able to edit locked properties on the Measure Template, but not on the Measure itself. If a locked property is changed on the Measure Template, the change will be applied to all Measures that have already been attached to work items.-
Data Collection: Determine how data will be collected for the Measure:
-
Manual: Data will be manually entered into the Measure by users on a regular basis.
-
Formula: Data will be calculated automatically based on a formulaic expression that retrieves data from PowerSteering. See The Formula Builder and Formula Builder Examples for Measures for additional information. If you still require assistance with the Formula Builder, reach out to your PowerSteering representative.
-
-
Evaluate As (only if "Data Collection" is set to "Formula"): Determine which user's permissions will be used to execute the "Data Collection" formula:
-
Library Owner: The Measure Template owner's permissions will be used to execute the formula.
Tip: This is the most popular option. Administrators, who have the highest level of permissions, often create and own Measure Templates.
-
Project Owner: The Project Owner's permissions will be used to execute the formula.
-
-
Display Format: Determine how data will be displayed on the Measure:
- Integer: The values will be displayed in whole numbers without any decimal places.
- Float: The values will be able to contain up to 6 decimal places. Use the "Precision" drop-down menu that appears to choose how many decimal places will appear on values.
-
Monetary: The data will be displayed in monetary values that can contain up to 6 decimal places. Use the "Scale" drop-down menu to choose a scale for the values (either thousands or millions), or select "None" from the menu if you do not wish to apply a scale. Also, use the "Precision" drop-down menu that appears to choose how many decimal places will appear on values
Note: If the scale / precision is changed on a Measure Template at a later date, the existing values on the actual Measures will be converted to match the new scale and precision. For example, a value of $19,232 will be converted to $19.23K if the scale has been changed from "None" to "Thousands" and the precision has been changed to "2".
-
Percent: The data will be displayed as a percentage that can contain up to 6 decimal places. Use the "Precision" drop-down menu that appears to choose how many decimal places will appear on values.
-
Date: The values will be displayed as dates. Use the "Date Format" drop-down menu to determine the format of each date value on the Measure.
Note: Date values are calculated using the EPOCH time concept. This means that they are calculated by the number of days since January 1st, 1970.
On each Measure, Date values will be displayed in the selected "Date Format" on the "Historical data" table (just like above). However, the y-axis will display EPOCH date values.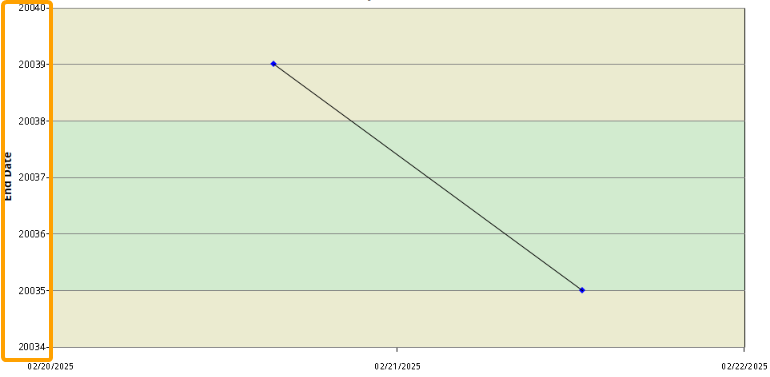
However, users can simply hover over the chart's data points to see the actual date.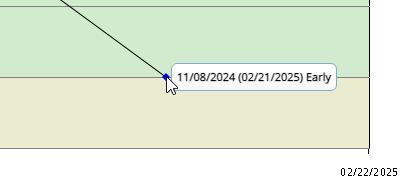
Users who create and edit Measures will also need to enter EPOCH values while determining indicator thresholds. While configuring "Variance" or "Goal" indicator thresholds, users will need to enter their date values as EPOCH numbers.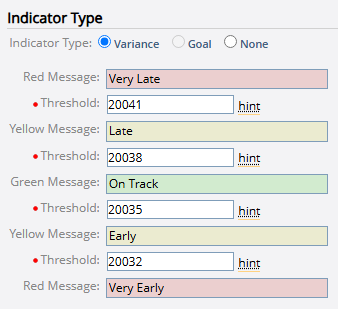
In this example, a date will need to fall between November 8th, 2024 and November 11th, 2024 to be considered "On Track".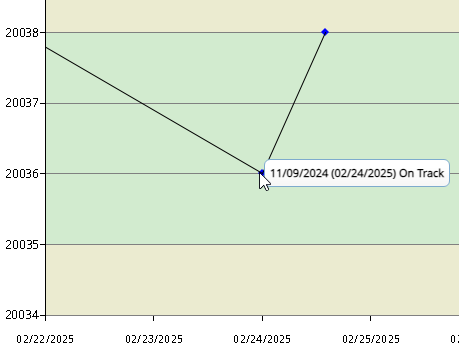
- Effective Dates: Use the drop-down menu to determine how long the Measure will stay active (in other words, how long the Measure will be calculated and / or send Inbox reminders to remind users to enter data):
Absolute: The Measure will remain active between a custom Start and End date. Calendar fields for both the Start date and the End date will appear:

- Active Project: The Measure will only be active when the work item it is attached to has an active status. Active statuses are "On Track", "Needs Attention", "Off Track", "On Hold", and "Delayed".
Project Lifetime: The Measure will be active between the earliest Start date and latest End date of the work item it is attached to. When this option is selected, another drop-down menu will appear that allows users to choose a "Buffer" period that will allow the measure to be active for up to a year beyond the end date:
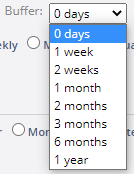
Example: Selecting "1 year" from the "Buffer" drop-down menu means that the Measure will continue to be active for one year after the Project's End date.
Note: The 2022R1.2 release deprecated the "Always" Effective Dates option. By default, every Measure that was set to "Always" has been automatically set to "Project Lifetime" with a 1 year buffer period.
- Baseline / Target Dates: The Measure will be active between the work item's captured Baseline dates.
-
Reminder Schedule (only when "Data Collection" is set to "Manual"): Determine how often Inbox reminders will be sent out to enter Measure data.
Note: Reminders are sent only to the Project Owner.
-
Test Schedule (only when "Data Collection" is set to "Formula"): Determines how often the Measure value should be calculated and temporarily stored as a test value (not an actual Measure value that is stored long-term). This value will be overwritten by a following Test Schedule run or a History Schedule run. This allows users to observe their Measure data as it changes without storing all calculated values.
Note: In order for a Test Schedule to run properly, the Measure Value Agent must be active and configured to run more frequently than the test schedule defined in the measure template. See Agents Overview for more information about this agent.
-
Never: Test values will never be calculated for the Measure.
-
Daily: Test values will be calculated on a daily basis. Additional fields will appear allowing the user to determine precisely how often these values will be calculated:

-
Weekly: Test values will be calculated on a weekly basis. Additional fields will appear allowing the user to determine precisely how often these values will be calculated:

-
Monthly: Test values will be calculated on a monthly basis. Additional fields will appear allowing the user to determine precisely how often these values will be calculated:

-
Quarterly: Test values will be calculated on a quarterly (three months) basis. Additional fields will appear allowing the user to determine precisely how often these values will be calculated:

-
-
History Schedule (only when "Data Collection" is set to "Formula"): Determines how often Measure values should be calculated and stored. These values will NOT be overwritten by a Test Schedule run or another History Schedule run; they will be saved long-term.
Note: In order for a History Schedule to run properly, the Measure History Value Agent must be active and configured to run more frequently than the History Schedule defined in the Measure Template. See Agents Overview for more information about this agent.
Tip: Measures can be configured to automatically recalculate a value after Metrics on the same work item have been edited. When this setting is active, all of a work item's Measures will automatically recalculate whenever changes are made to any of the work item's Metrics. These changes include edits to a Metric's numeric values, Tag/Custom Field values, or lock settings. Metric comments will not trigger a Measure recalculation.
This setting is inactive by default. If you would like to enable it for your PowerSteering environment, please reach out to a PowerSteering representative.- Never: History values will never be calculated for the Measure.
-
Daily: History values will be calculated on a daily basis. Additional fields will appear allowing the user to determine precisely how often these values will be calculated:

-
Weekly: History values will be calculated on a weekly basis. Additional fields will appear allowing the user to determine precisely how often these values will be calculated:

-
Monthly: History values will be calculated on a monthly basis. Additional fields will appear allowing the user to determine precisely how often these values will be calculated:

-
Quarterly: History values will be calculated on a quarterly (three months) basis. Additional fields will appear allowing the user to determine precisely how often these values will be calculated:

-
-
Determine the "Upland Analytics Collection Method" for the new Measure Template:

Note: The Measure Template's "Upland Analytics Collection Method" collects data based on the user-selected schedule for Upland Analytics reports that use the "Measure History Values by Work" data view. Measure History data can be cumbersome, so limiting the collection frequency to a minimum based on reporting needs is a best practice.
Note: Selecting the checkbox next to a property will prevent users from editing it once the Measure is attached to a work item.
Other users with the "Measure Template" Context permission will be able to edit locked properties on the Measure Template, but not on the Measure itself. If a locked property is changed on the Measure Template, the change will be applied to all Measures that have already been attached to work items.-
Never: Measure History data will never be collected for Upland Analytics reporting.
-
Monthly: Measure History data will be collected for Upland Analytics reporting on a monthly basis. Additional fields will appear allowing the user to determine precisely how often this data will be collected:

-
Quarterly: Measure History data will be collected for Upland Analytics reporting on a quarterly (every three months) basis. Additional fields will appear allowing the user to determine precisely how often this data will be collected:

-
-
Enter the "Indicator Type" properties for the new Measure Template:
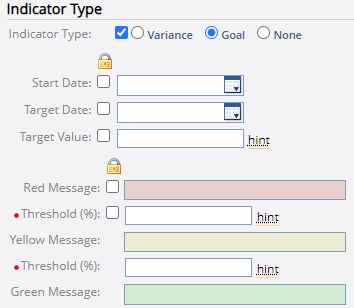
Note: Indicators give visual clues about the Measure's performance. The Indicator Type can be locked to prevent users from changing it when the measure is attached to a work item.
Note: Selecting the checkbox next to the Indicator Type will prevent users from editing it once the Measure is attached to a work item.
Other users with the "Measure Template" Context permission will be able to edit locked properties on the Measure Template, but not on the Measure itself. If a locked property is changed on the Measure Template, the change will be applied to all Measures that have already been attached to work items.- Variance: The Measure values are evaluated by their deviation from a target value (for example, a Measure value can either be higher or lower than the ideal value). See Variance Indicators for more information.
- Goal: The Measure values are evaluated against how they progress towards a constant goal value (for example, the closer the Measure value is to 100%, the better). See Goal Indicators for more information.
- None: The Measure values will not be evaluated against anything.
-
Select the Submit button at the bottom or the top of the page:

After selecting Submit, the new Measure Template will be saved to the Measures Library. Users will be able to attach the new Measure Template to work items (as long as the item's work type has been selected from "Attachable to" in Step 3 or the "Attachable to" property has been left blank). Also, the Measure will appear on any newly-created work types outlined in "Auto-attach to" from Step 3.