Enter Data into a Numeric Metric
PowerSteering users can enter numeric data into any Metric cell that has not been locked by an administrator. Users can also enter/view this data via the "My Financials" module on the Home Page, if enabled by an administrator through the Financial Review Layout.
Note: "Metric" is a replaceable term in PowerSteering. Your organization may use a different label to represent metrics on your site.
Note: PowerSteering users require the "Update Metric Numbers" Project Tasks permission to enter numeric data into a Metric. Also, they require the "Update Metric Tags" and the "Update Metric Custom Fields" Project Tasks permissions to edit Tag/Custom Field data on a Metric.
This page explains how to enter two types of data into a Metric:
Numeric Data
Numeric data refers to the numbers that are entered under the period columns of a Metric:

To enter numeric data into a Numeric Metric:
-
Navigate to a work item.
-
Select Project → Metrics → the Metric instance you would like to edit from the Navigation Menu:
Click thumbnail to play.
-
Choose the Metric View that you would like to enter data into.
-
Click the Edit Table button to enter "Edit Mode":

-
Click on the numeric box inside any unlocked (yellow) cells to enter data:

Note: White cells in a Metric are either locked for editing or part of a calculated line item that adds up the totals of other Metric cells. Calculated line items use bold-fonted values:

If locked for editing, contact someone with the "Lock Metrics" Project Tasks permission to unlock the cells for you if you need to enter information.Tip: You can quickly add identical values to multiple horizontal cells using the "R" cheat. All you have to do is simply add the letter "r" at the end of your numeric value along with how many columns you would like it to repeat across. For example, imagine your "Software" costs are the same for January, February, and March due to a monthly subscription. You can type "65r3" into the "January" column and press Enter on your keyboard to repeat it across three columns:

Click to play.
The repeat function is limited to 120 cells for a monthly view, 40 for quarterly, and 10 for yearly.Tip: Similar to the repeat function mentioned above, you can automatically "spread" a large amount evenly across a number of horizontal cells by using the "S" cheat. For example, imagine you have been allocated $1500 to spend on software costs for the next three months (January, February, and March). To make sure that your allocation is evenly distributed to each of these months, you can type "1500s3" into the "January" column and press Enter on your keyboard:

Click to play. -
Click the Save Changes button to save your new data:

Caution: Clicking on Cancel will discard all of your changes.
After clicking Save Changes, your Metric will be updated with new numeric values.
Tag / Custom Field Values
Administrators have the ability to add Tags and/or Custom Fields to Metrics in PowerSteering. Users can enter Tag and/or Custom Field values directly on the Metric right between the line item names and the numeric data:

If there are no columns between the "Name" column and the numeric value columns, no Tags or Custom Fields have been added to the Metric.
To enter Tag/Custom Field values into a Numeric Metric:
-
Navigate to a work item.
-
Select Project → Metrics → the Metric instance you would like to edit from the Navigation Menu:
Click thumbnail to play.
-
Click the Edit Table button to enter "Edit Mode":

-
Click on any yellow (unlocked) Tag/Custom Field cells to enter values:

Note: White Tag/Custom Field cells are locked from editing. Contact someone with the "Lock Metrics" Project Tasks permission to unlock them for you if you need to enter information.
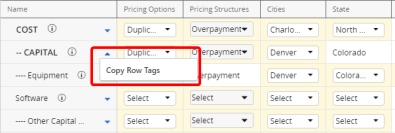
Tip: You can copy the Tag values (not Custom Field values) from one line item to another line item using the drop-down arrow
 next to a Metric line item and selecting Copy Row Tags:
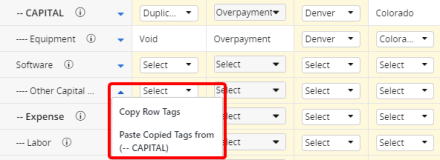
From here, you can simply select the drop-down arrow of another line item and selecting Past Copied Tags from... to paste the same values:
The Tag values from the copied line item will appear on the pasted line item:
Please note that you can copy locked Tag values, but you cannot paste over them. Also note that Tag values that have been made invisible through Field Management will still be included in the copy/paste, even though you cannot see them.Note: If certain Tag values are grayed out while you are editing the Metric, the Tag likely belongs to a Tag Dependency. This means that you must select a value in a different Tag in the line item first.
-
Click the Save Changes button to save your new values:

Caution: Clicking on Cancel will discard all of your changes.
After clicking Save Changes, your Metric will be updated with new numeric values.
