A company acts as a connector to the different databases existing in the accounting software.
This article details How to create a new company.
- From the Icon Bar click Setup
 .
. - From the Navigation Menu click Financial to expand the corresponding menu.
- From the Financial menu items, click System.
- Upon the Financial Settings page displaying, navigate to the Accounting tab.
- Click the Companies sub-tab to access the Company list page.
- Click New to create a new Company.
Note: You can create a new Company only if one of these options is selected for the Accounting System: Internal, Microsoft Dynamics GP or Sage 300.
- Enter/choose the required information:
- Name: This is the company name, if not the default company, Main Accounting System.
- Id: This is the designated Id for the company.
- Currency
: This is the currency for the default company, Main Accounting System, this is set to the organization's base currency, therefore cannot be modified. When a new company is being created, click the browse icon (...) and select the currency for the company, if different from the default selection.
Note: Ensure the same currency is set in both PSA and the Great Plains company to which the connection is being made.
- Calendar: Select a Financial Calendar from the list of available Calendars.

- Connection Information section (Available for Microsoft Dynamics GP Accounting Systems)
- Connection Enter the name of the ODBC DSN pointing to the accounting system/server database, then add a semicolon and enter with the name of the ODBC DSN pointing to the company's accounting system database.
Note: For Great Plains connection: the ODBC DSNs referenced should exist on the client workstations to connect to the Great Plains database.
- User - Enter the user name to access the Accounting system database.
- Password - Enter the password to access the Accounting system database.

- Connection Enter the name of the ODBC DSN pointing to the accounting system/server database, then add a semicolon and enter with the name of the ODBC DSN pointing to the company's accounting system database.
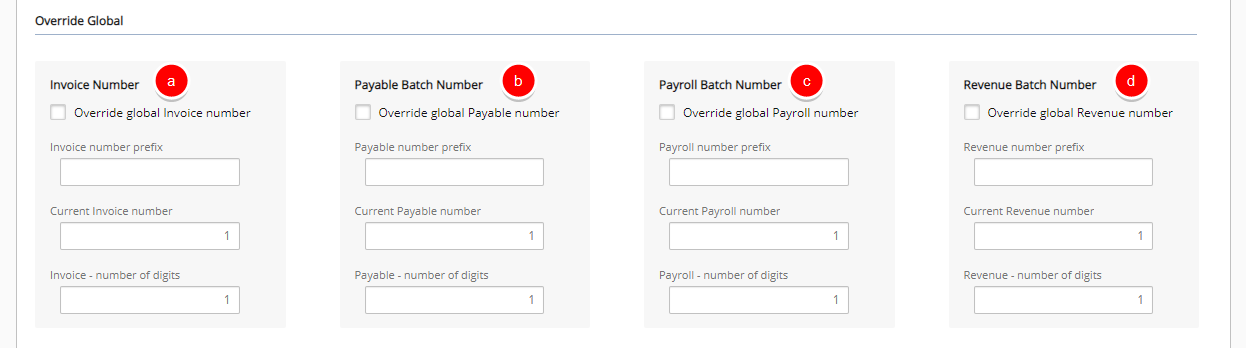
- Override Global section:
- From the Invoice Number sub-section, select the Override global Invoice number option to override the Invoice number at the company level. Then, manually enter the following information: Invoice number prefix, Current Invoice number and Invoice - number of digits
- From the Payable Batch Number sub-section, select the Override global Payable number option to override an Invoice number at the company level. Then, manually enter the following information: Payable number prefix, Current payable number, and Payable - number of digits
- From the Payroll Batch Number sub-section, select the Override global Payroll number option to override an Invoice number at the company level. Then, manually enter the following information: Payroll number prefix, Current payroll number and Payroll - number of digits
- From the Revenue Batch Number sub-section, select the Override global Revenue number option to override an Revenue Batch Number at the company level. Then, manually enter the following information: Revenue number prefix, Current Revenue number and Revenue – number of digits
- Fill in or select the appropriate address information in the following boxes: Phone, Fax, Address, City, State, Countryand Zip Code

Note: The Address entered here and used in the Invoice Template is determined through the following precedence rule:
- Address defined at Company level
- Address defined for Site marked as Default billing address
- Address defined for Site marked as Organization's headquarters.
- Click Save to apply your changes.
- The page will refresh and depending on your selection made for the Accounting system field located under the Accounting System tab, you may now see the following tabs within the Company Edit page.
- General
- Properties (Available for Microsoft Dynamics GP Accounting Systems)
- WIP Policies
- Select Back to return to the Company List page. Note that your newly created Company is now listed here.