After successfully installing and connecting the Microsoft Teams PSA Workflow Notification Bot, there are a few additional steps to complete the setup. You will need to:
- Enable the Send Notification option for a State or Transition within a Workflow.
- Enable the Microsoft Teams Notifications settings at the User level.
Note: Individual users can choose to disable Microsoft Teams Notifications from their personal User Settings, allowing flexibility based on personal preferences.
Caution: The Microsoft Teams PSA Workflow Notification Bot must be installed and configured in order to receive the PSA Workflow Notifications in Microsoft Teams. For more information see Install and Connect the Microsoft Teams PSA Workflow Notification Bot.
Enabling the Send Notification to MS Teams Option
- Select the workflow type that you need to modify:
- Expense workflows, click Setup > Expense > Workflows
- Invoice workflows, click Setup > Financial > Workflows
- Leave Request workflows, click Setup > Timesheet > Leave Request Workflows
- Project workflows, click Setup > Work > Project Workflows
- Resource Request workflow, click Setup > Workforce Planning > Resource Request Workflows
- Timesheet workflows, click Setup > Timesheet > Timesheet Workflows
- Work Item workflows, click Setup > Work > Work Item Workflows
- Click an existing workflow name from the list to access the Workflow Edit page.
Note: For the purpose of this article we are going to modify an existing Expense Workflow (Setup > Expense > Workflows).
- The Workflow States and Transitions are listed by name and type in the left pane and represented graphically in the design area. Depending on whether you wish to receive the notification based on a State or Transition:
- Select a State or Transition from the left pane:
- Click the States/Transitions tab to display all the States/Transitions available for this Workflow.
- Then click a State/Transition Name from the list to access the State/Transition Edit dialog box.
- Select a State or Transition from the design area by:
- Double-clicking a Workflow State or Transition in the design area to open the State/Transition Edit dialog box.
- Select a State or Transition from the left pane:
- Select the Notifications sub-tab.
- Click an existing Notification name or create a new one. For more details on how setup Notifications, refer to Setting Up the Notifications for the Workflows.
- From the General tab of Notification Edit, choose the Send Notification to MS Teams option.
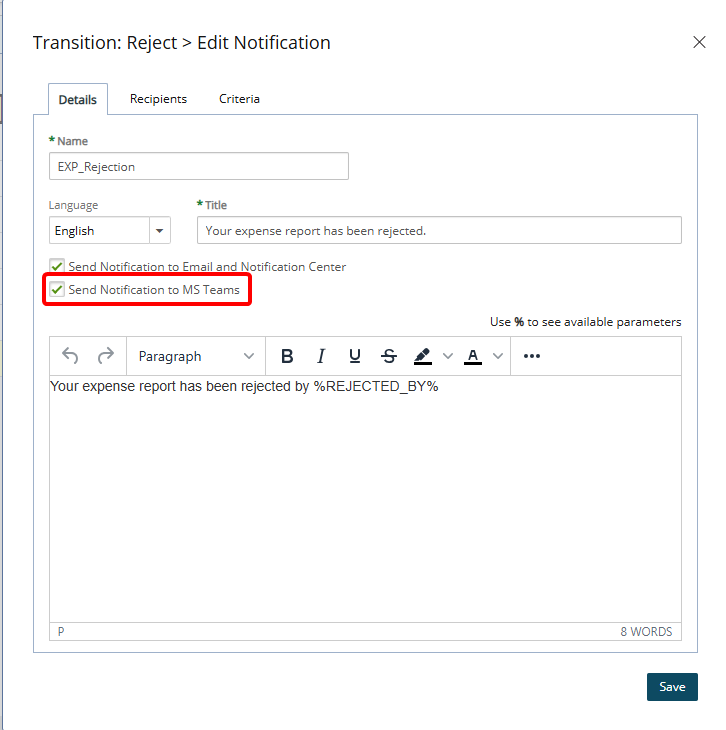
Note: For users logged in using Single Sign-On (SSO), Expense, Leave Request, Project, Timesheet, and Work Item Workflow Notifications in Microsoft Teams can include direct links. These links allow users to take immediate action within PSA without manually navigating through the system. For more information, see Using Actionable Notifications in Microsoft Teams.
- Click Save and then Close the dialog box.
- Upon returning to the Workflow Edit page, click Save.
- You can now enable the Microsoft Teams Notifications settings at the User level.
Enable the Microsoft Teams Notifications settings at the User level
- From the Icon Bar click Setup
 .
. - From the Navigation Menu click Organization.
- From the available options select Users.
- Upon the Users list page displaying, click the name of the User you wish to edit, to access the User Edit page.
- From the Receive Notifications on section of the General Details subtab ensure that the Microsoft Teams option is selected for the User. When selected, the User will receive notifications in Microsoft Teams, provided that the necessary settings are in place.
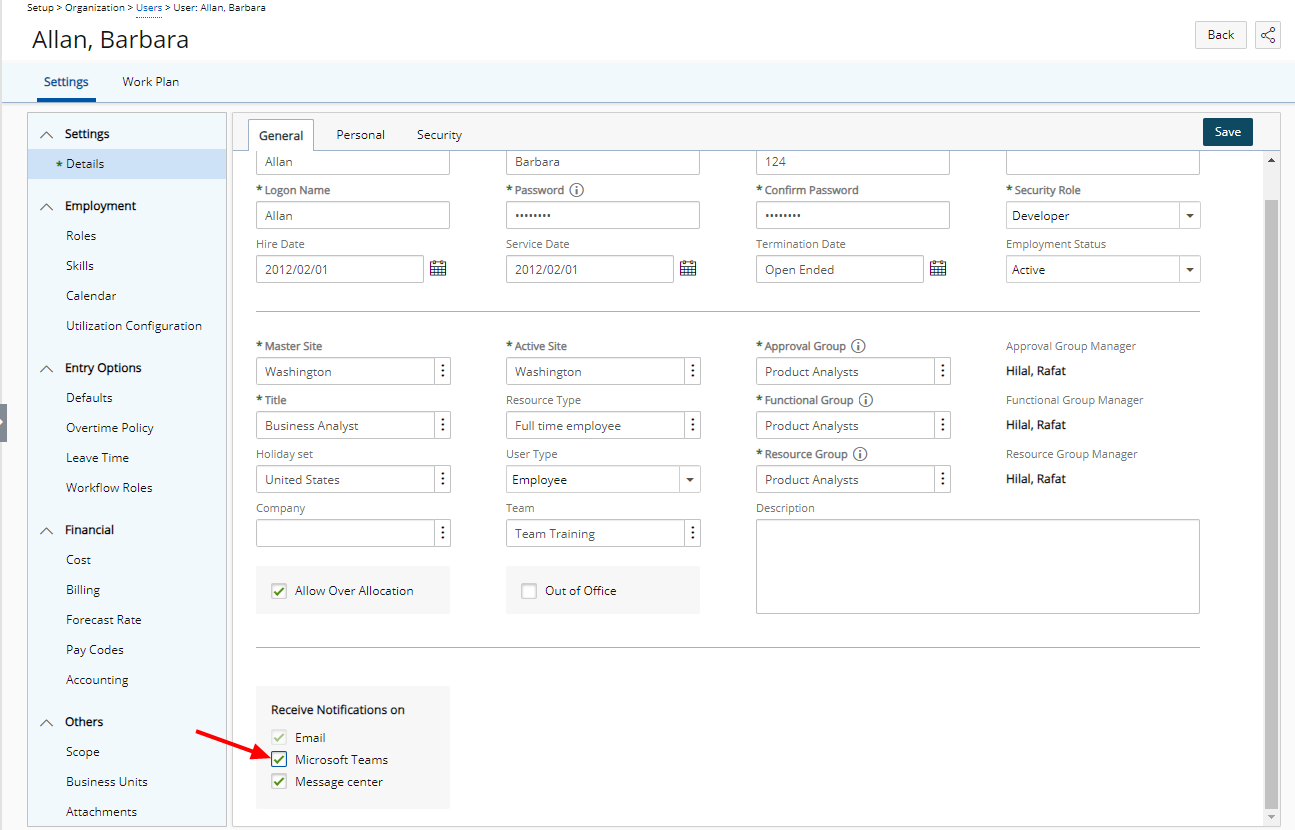
- Click Save to apply your changes.