From the Comments tab you can create or manage Comments.
This article details how to create, modify and delete Comments.
Note: The Can delete other Users’ comments on Work Item Entries and Can edit other Users’ comments on Work Item Entries security permissions with Yes/No rights can be granted from the Setup > Work menu of a Security Profile edit page. These permissions allow users to delete and/or modify other Users’ comments. For further details refer to Allowing Users to delete/edit other Users’ comments on Work Item Entries.
To Add Comments to a Work Item Entry
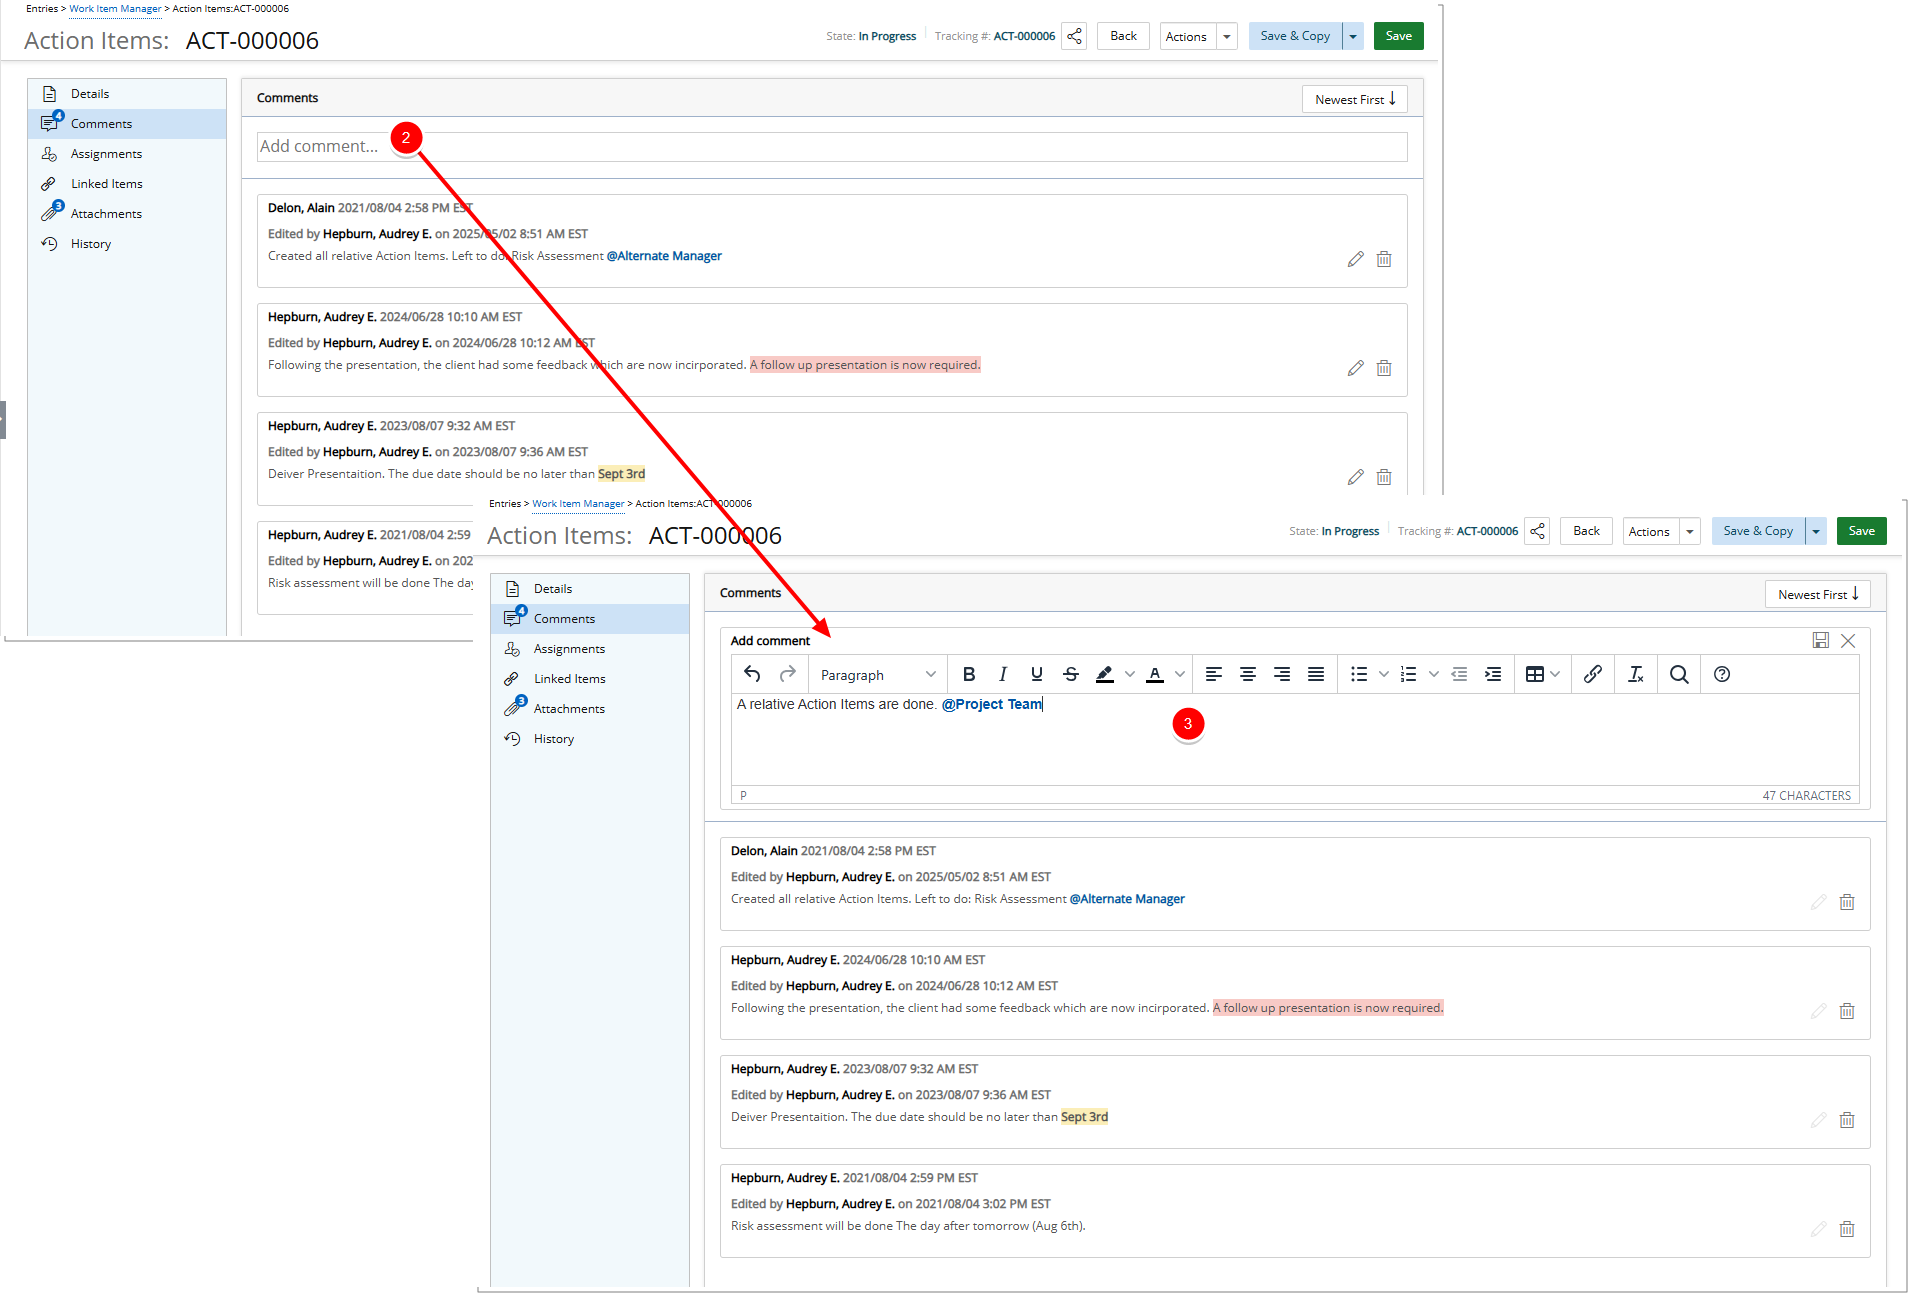
- Access the Work Item Entry Comments
 tab.
tab. Tip: The Work Item Comments can be accessed either from the Work Item Entry edit page accessed through the Project Edit or the Work Item Manager by either editing the Work Item Entry or by expanding the entry drawer.
- Regardless of how you accessed the Comments tab, note that upon accessing it, an empty comment line item is available.
- Use the WYSIWYG editing area to add your comment
Tip: For details on how to use the WYSIWYG editing area to format your Comments text refer to Working with the Rich Text Editor.
- When the Enable Mentioning in Comments & Notes setting located within the System Configuration page is turned on, you can mention others in Work Item Comments using @ notation. Typing “@” opens a dropdown list of up to 15 user suggestions, which updates dynamically as you type to refine the results. Mentioned users receive a notification, helping them stay informed about relevant updates or required actions.
Note: For details on how the Mention feature works refer to Using Mentions in Comments and Notes.
- Click Send

Tip: As an alternative, you can use the Ctrl+Enter keys to save the comment.
- The newly added comment will be listed. You can add additional ones by following the steps 3-4 above.
A count appears next to the Comments icon, providing a visual indication of the total number comments.
Tip: When the Enable Mentioning in Comments & Notes setting located within the System Configuration page is turned on, you can mention others in Work Item Comments. For more information on how Mentions work refer to Using Mentions in Comments and Notes.
To Modify a Comment
You can modify your own comments at any time.
Note: Users having the Can edit other Users’ comments on Work Item Entries security permission in their Security Profile can modify other Users’ comments. For further details refer to Allowing Users to delete/edit other Users’ comments on Work Item Entries.
- Access the Work Item Entry Comments tab.
Tip: The Work Item Comments can be accessed either from the Work Item Entry edit page accessed through the Project Edit or the Work Item Manager by either editing the Work Item Entry or by expanding the entry drawer.
- Click the Edit
 button located to the far right of the comment box you wish to modify.
 Tip: You can easily sort the Comments list by clicking Newest First
 /Oldest First
  button. By default the list is ordered to sow the newest comments first.
 - Make the necessary modifications.
Use the WYSIWYG editing area to modify your comment.
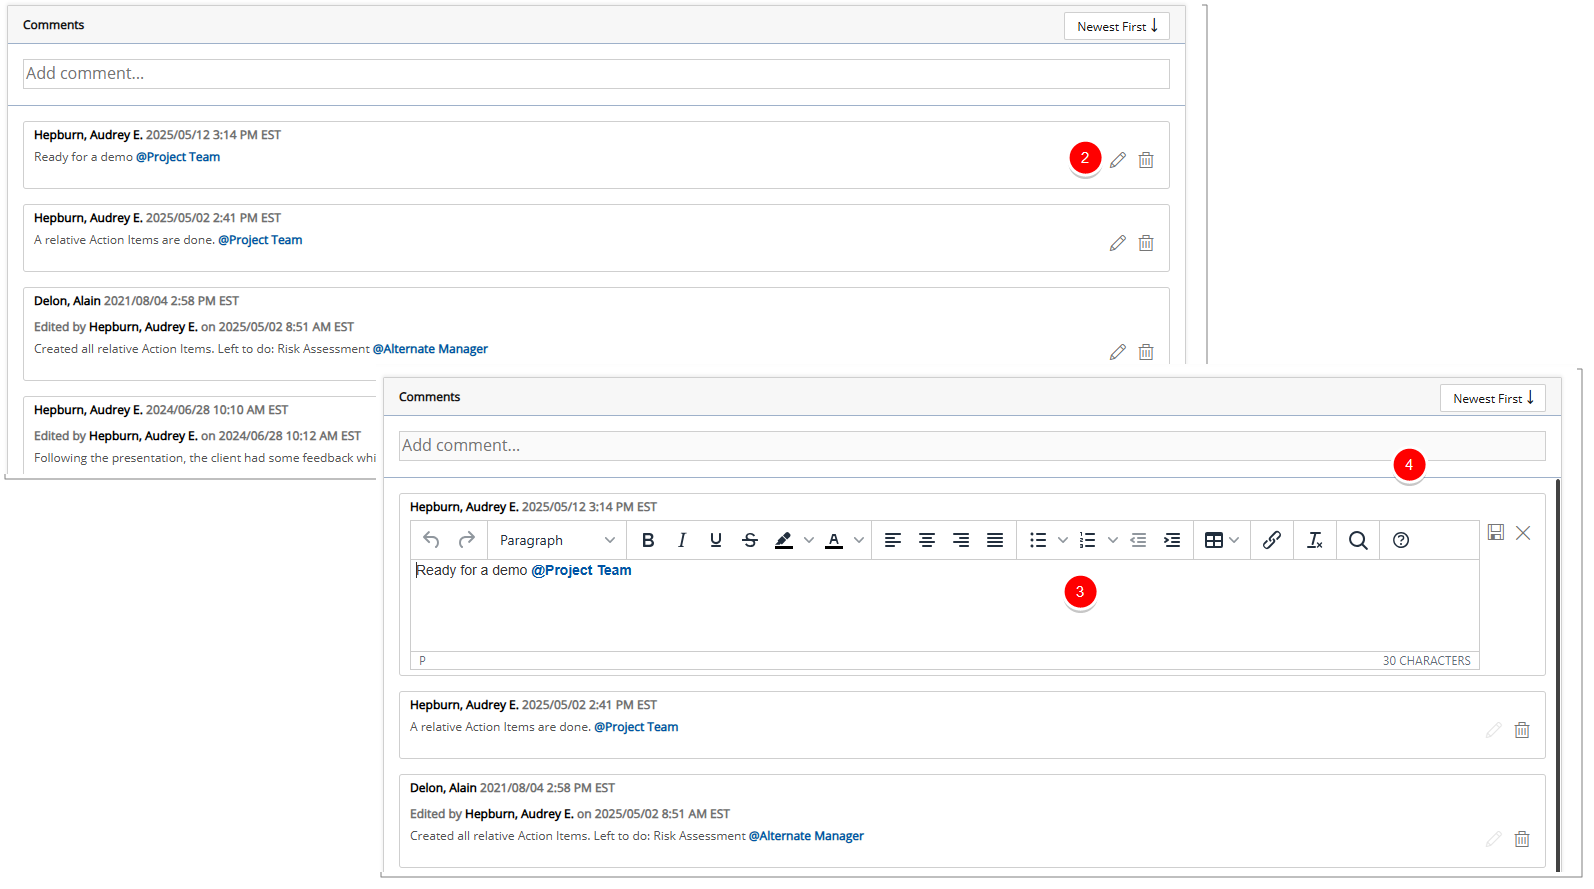
Tip: You can format the Comment using the Rich Text Editor. For details and available formatting options, see, see Rich Text Editor.
- When finished click Save
 . To cancel click the Close
  button instead.
As an alternative, you can use the Ctrl+Enter keys to save the comment.
button instead.
As an alternative, you can use the Ctrl+Enter keys to save the comment.
- Time stamps indicating the time of modification and the contributor's User Name are prominently displayed. Moreover, the of Time Zone (logged user active site) information ensures accuracy across different regions.
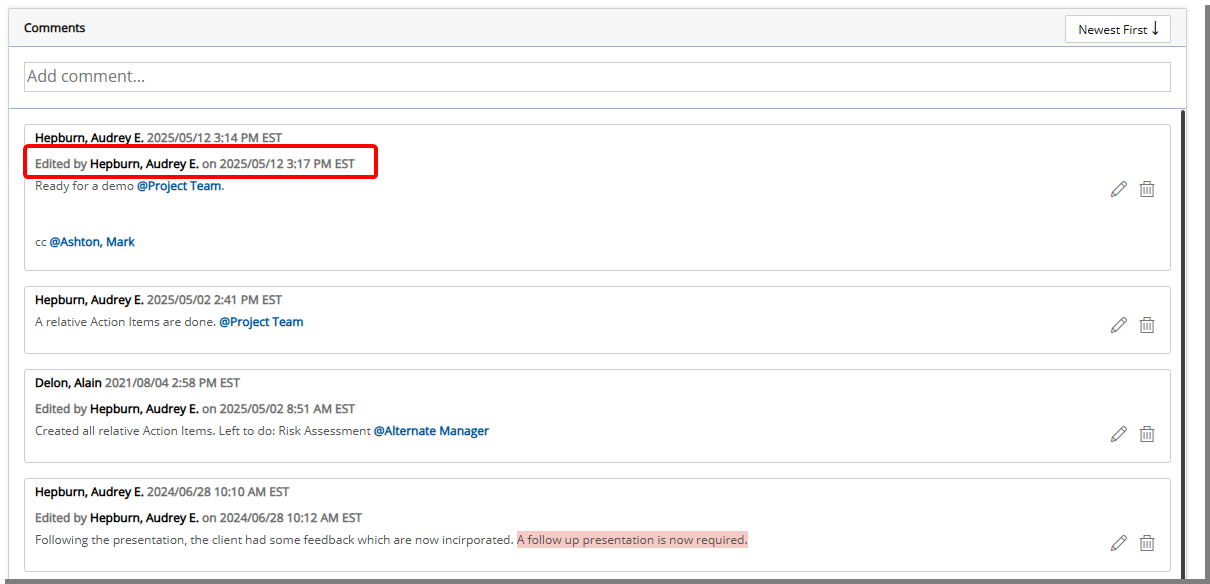
Note: Comments are by default organized based on newest modification date, facilitating streamlined discussions. You can choose to show Oldest first.
To Delete a Comment
You can delete your own comments at any time.
Note: Users having the Can delete other Users’ comments on Work Item Entries security permission in their Security Profile can delete other Users’ comments. For further details refer to Allowing Users to delete/edit other Users’ comments on Work Item Entries.
- Access the Work Item Entry Comments tab.
Tip: The Work Item Comments can be accessed either from the Work Item Entry edit page accessed through the Project Edit or the Work Item Manager by either editing the Work Item Entry or by expanding the entry drawer.
- Click the Delete
 button located to the far right of the comment box you wish to delete.
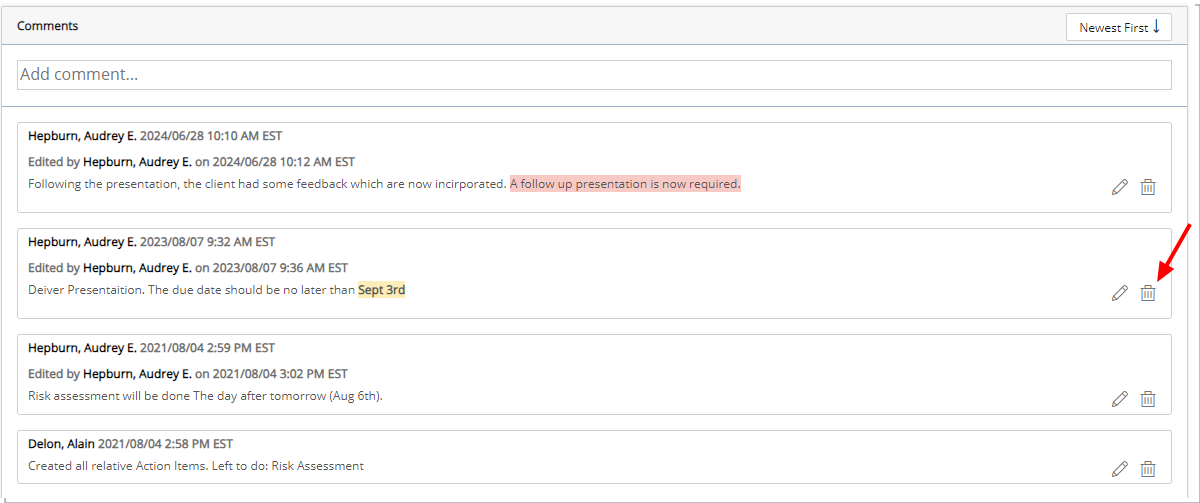
Tip: You can easily sort the Comments list by clicking Newest First
/Oldest First button. By default the list is ordered to sow the newest modified comments first. - Click Yes to confirm the deletion or No to cancel the process.