This article provides detailed instructions on how to add a new booking to a Work Plan. Bookings are essential for managing resources, scheduling tasks, and ensuring project timelines are met. By following these steps, you can effectively allocate resources and maintain an organized work plan tailored to your project's needs.
Depending on your organizational role and assigned permissions, you can access the Work Plan through one of several available paths. These access points are illustrated in the Accessing the Work Plans article.
For the purpose of this article, we’ll focus on accessing the Project Work Plan.
Note: The pages and formats shown in this article may differ from what you see in your environment. Your organization’s configuration or the rights assigned to you may result in a different experience.
- From the Icon Bar click Project List
 .
. - From the Project List page, select the Project you wish to edit by following one of these steps:
- Click the Project context menu button
 to expand it. From the available options click Edit.
OR - Click the name of the Project you wish to access.
Tip: Use the search capability for an efficient way of finding the specific project. For further details refer to Searching for a Project within the Project List page.
- Click the Project context menu button
- Hover your mouse over the Planners tab and click the Work Plan option.
- Upon the Work Plan displaying click New and select Booking from the available options.
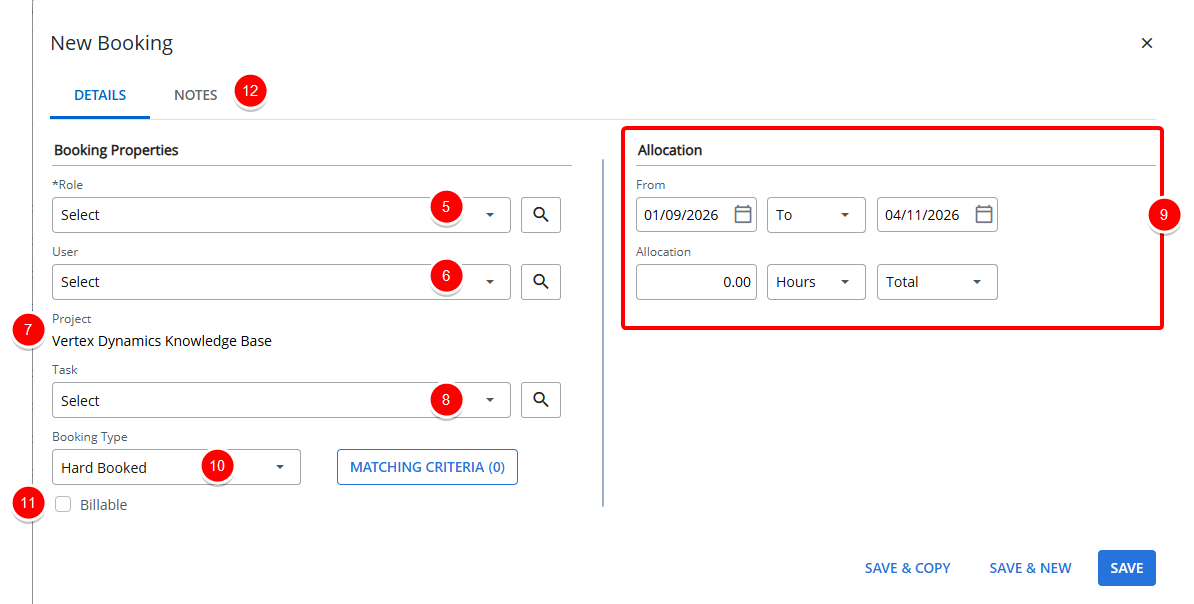
- Upon the New Booking dialog box displaying, select a Role.
- If applicable, enter or select a user from the User selection box.
- If applicable, enter or select a project from the Project selection box.
Note: When using the Project Work Plan, the Project field is pre-filled with the project currently being viewed and is read-only.
- If applicable, enter or select a task from the Task list.
The Task selection box will only be displayed if it is configured in the Booking Attributes Setup page. By default, the Task selection box displays only current tasks (with an End date of today or in the future).
Note: If you want to view all Tasks, excluding suspended ones, you can check the Show All Tasks option in the Task List dialog box while browsing for a Task. Once selected, all non-suspended tasks will appear in both the Task selection box and the Task List dialog box. Your selection will be remembered across all Work Plans and Views for the same browser, so you won’t need to adjust it repeatedly.
- If applicable, select or enter the appropriate values in the Allocation section.. Click here to view the article on allocating time.
- If applicable, modify the default selection made for Booking Type.
- If applicable, select appropriate Booking Attribute(s).
- If needed, navigate to the Notes tab.
- Click the Show Formatting Options
 button to access the Rich Text editor to format your Note.
 - Select the required Note Type.
- Enter the required note in the text field and format it as needed using the available options in the Rich Text Editor.
Note: If Enable Mentioning in Comments & Notes is turned on in System Configuration, you can mention team members using @ notation. A placeholder message—“Type @ to mention and to notify someone”—appears next to the cursor as guidance.
- Click Send
 to save the note and send notifications to mentioned users. You can add additional notes by repeating steps 5 and 6 as needed, or edit or delete a saved note.
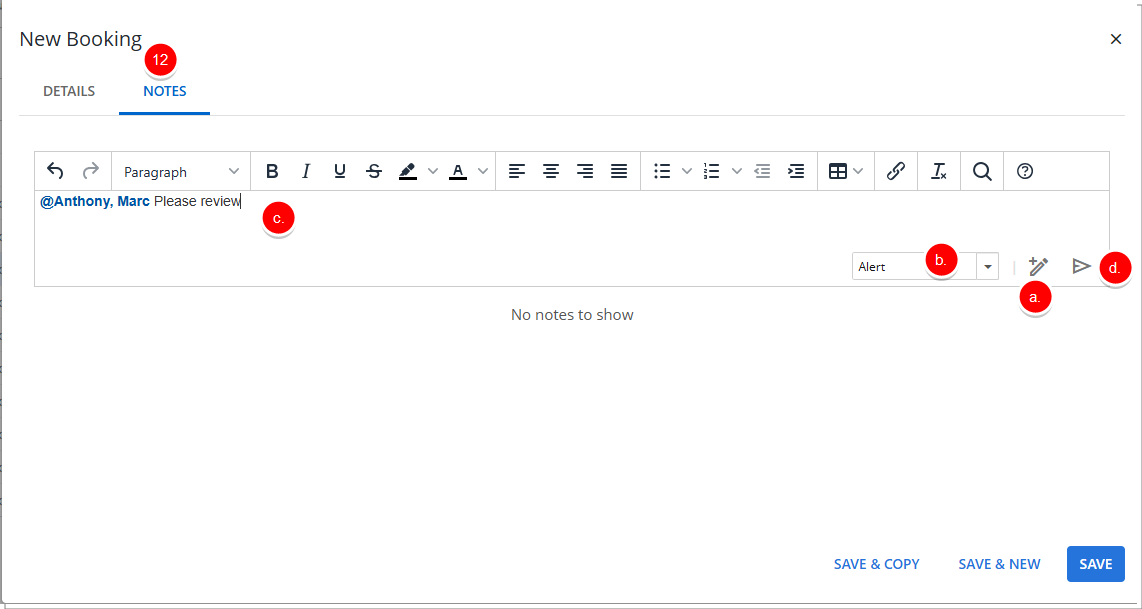
- Click the Show Formatting Options
- Select Save to save the Booking, close the Add Booking dialog box, and return to the Work Plan.
Tip: The saved booking line is highlighted in light blue for a few seconds. The highlight then fades back to the normal background color. This helps you quickly spot the booking.
For further details refer to:
Automatic Assignment of Roles for New Project Team Members Added During the Creation of a Hard/Soft Booking Through the Work Plans
When creating a Hard or Soft Booking, for a Resource from any of the Work Plans, the Resource is automatically added to the Project Team, the system automatically assigns them the Role that was previously defined for them in the Work Plan. This means that the Roles assigned to each team member in the Project Team match those specified in the Work Plan, ensuring consistency throughout the project life-cycle.
When multiple Hard/Soft Bookings are made for the same Project Team member with different Roles, the Role assigned during the creation of the first Hard/Soft Booking will define the Role for that team member within Project Team page. Subsequent bookings for the same team member will not override or change this initially assigned Role.
For any existing members of the Project Team, their Roles remain unchanged. This means that any team members who were previously assigned Roles will retain those Roles.