Once you have created Milestones and mapped out your overall Project Plan, you can easily identify Billing Milestones.
When you complete a Billing Milestone, the system creates a Charge Entry that reflects the correct Payable status.
If both the Work Type and Charge are set to Payable, the generated entry is also marked Payable and included in project costs.
If either setting is not Payable, the entry remains Non-Payable.
This article covers how to create a Billing Milestone.
Tip: If the Milestones Column has been added to the Project List, you can access the Project Milestones page by clicking the Milestones counter. For further details on how to modify the Columns Selection refer to: Adding new Column(s) to the Project List page.
- From the Icon Bar click Project List
 .
. - From the Project List page, select the Project you wish to edit by following one of these steps:
- Click the Project context menu button
 to expand it. From the available options click Edit.
OR - Click the name of the Project you wish to access.
Tip: Use the search capability for an efficient way of finding the specific project. For further details refer to Searching for a Project within the Project List page.
- Click the Project context menu button
- From the Project Edit page, hover your mouse over the Manage tab and select Milestones from the available options.
- From the Milestones page click New. Inline Editing will be enabled to allow you to create a new Milestone.
- Enter or select the following information:
- Enter a name for the milestone in the Name box.
- Select an appropriate option from the available State list. There are three out of the box states: On Hold, In Progress and Completed. Note that the Completed State is unavailable when creating a Milestone. The Milestone States options are configurable. for more information on how to configure the Milestone State options click here.
- Click the Calendar button, located beside the Target Completion Date to select a date when the milestone is expected to be completed. By default, the Target Completion Date is set to the associated project's end date.
Note: A warning message appears when you set a Milestone Target Completion Date outside of the Project End date. It validates the selected Milestone target completion date and provides an opportunity to correct it if necessary.
- The Actual completion date field remains disabled until the milestone is completed by the automation services or manually. This field is automatically populated by the system. Users cannot modify this date.
- from the Status list set the visual indicator of the milestone status.
- Enter a value in the % Complete box. The value can be any number between 0 and 100, but cannot be a decimal. By default, the value in the % Complete field is set to 0.
- Select the mode by which the milestone will be completed from the Completion Type list, the available options are:
- Stage: User manually selects the Completed state from the State list to complete a milestone.
- Date: Milestone is completed automatically by the automation processing options when it reaches or passes the target completion date.
Note: Only milestones that are in the In progress state can be completed by the automation processing options.
- Enter a Description for the Milestone.
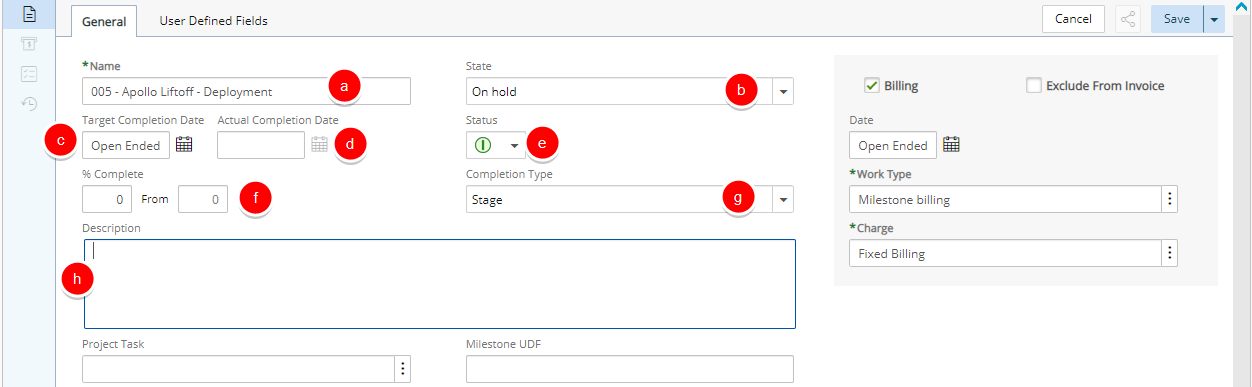
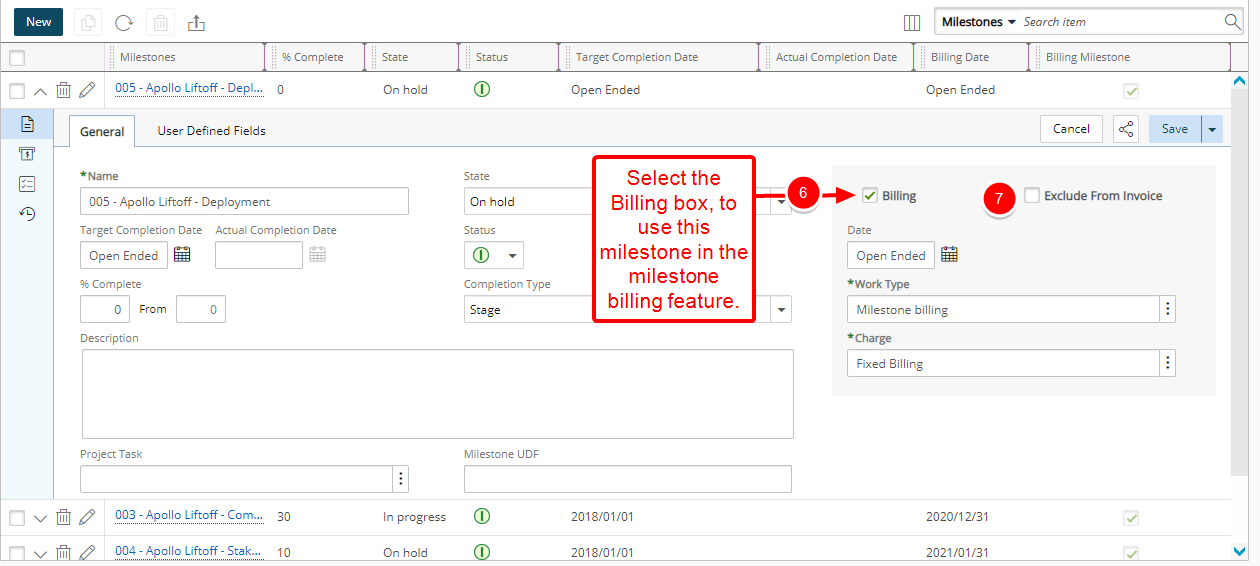
- Select the Billing selection box, if you want to use this milestone in the milestone billing feature.
- Date: Click the Calendar button, beside the Date box and select a date when the milestone is to be completed. By default Open Ended is selected.
- Work Type: Click the Ellipsis button, located beside the Billing Work Typeoption to create a user-defined work type for the billing milestone. The Work Type list page opens. Select a billing work type from the list and click Close.
Note: Suppose the Billing Milestone selection box is checked, and a work type is selected. If the selection box is now unselected, then the selected work type continues to hold, but the field is disabled.
- Charge: Click the Ellipsis button, located beside the Billing Charge box to define a charge for the billing milestone. The Charge List page opens. Select a Charge item.
Note:
- Once a Milestone Billing rule is created, the Billing Work type option is disabled for that milestone. It is enabled again once the Milestone Billing rule is deleted.
- If the Billing Milestone option is checked, the Billing Work type and the Billing Charge options are enabled. Otherwise, they are disabled and set to Milestone Billing and Fixed Billing.
If both the Work Type and Charge are set to Payable, the generated entry is also marked Payable and included in project costs.
- When Exclude From Invoice is selected, a Charge Entry will not be created, and the Billing Milestone will be excluded from any Invoice.
Note:
- The Exclude From Invoice option is not selected by default.
- Upon completing a Milestone, this option is no longer available for selection.
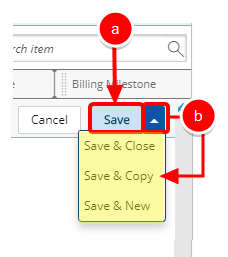
- Save your changes by following either one of the steps described below:
- Click Save to save your Milestone.
- Click the Save context menu to view the available options:
- Save & Close: Click the Save & Copy to save your changes and return to the Milestone page.
- Save & Copy: Click the Save & Copy to create a duplicate entry of the Milestone that you currently have displayed, with identical details, where you can edit the details.
Note: When copying a Completed Milestone, only the general information will be copied and the copied Milestone state will be On Hold.
- Save & New: Click the Save & New to open a clean Milestone, ready for an entirely new entry, with the options and boxes reverting to default values.