Financial Planner data can easily be exported to Excel by selecting a specific date-range. Furthermore, the available export options allow you to customize the exported data by choosing how the data is formatted in Excel. The available formatting options when exporting are :
- Indent tree in main column
- Freeze (anchor) head rows
- Freeze (anchor) left column
- Export empty cells.
Example: Olivia is tasked with analyzing the Financial Planner Data of her projects for a three-month period starting on January. She can now easily choose the required date range when exporting the Financial Planner Data of her projects to Excel and analyze the Data more effectively.
This article details how to export the Financial Planner date to Excel.
- From the Icon Bar click Project List
 .
. - From the Project List page, select the Project you wish to edit by following one of these steps:
- Click the Project context menu button
 to expand it. From the available options click Edit.
OR - Click the name of the Project you wish to access.
Tip: Use the search capability for an efficient way of finding the specific project. For further details refer to Searching for a Project within the Project List page.
- Click the Project context menu button
- From the Project Edit page, hover your mouse over the Planners tab and select Financial Planner from the available options.
- Ensure that the required information is present in the Financial Planner. Otherwise, you can either Override the Template at Project level or modify the Financial Planner Template, provided you have the rights to do so.
- Click Export to Excel
 .
Note that numeric columns are formatted as number or currency in the exported Excel files, allowing you to perform calculations directly on the data.
.
Note that numeric columns are formatted as number or currency in the exported Excel files, allowing you to perform calculations directly on the data. - From the Export to Excel dialog box, choose the Export settings:
- Click the Calendar icons located against the From and To dates to select the export period.
Note: The selected From and To dates must be within the Financial Planner's selected Period's Start and End dates.
- Select Indent tree in main column to have the Financial Planner tree indentation to be reflected in the Excel sheet.
- Select Freeze (anchor) head rows to anchor the heading rows in the Excel sheet.
- Select Freeze (anchor) left to anchor the left column in the Excel sheet.
- Select Export also empty cells to export all empty cells to the Excel sheet.
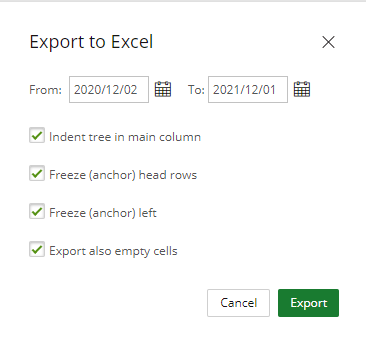
- Click the Calendar icons located against the From and To dates to select the export period.
- Upon selecting the required options, click the Export button.
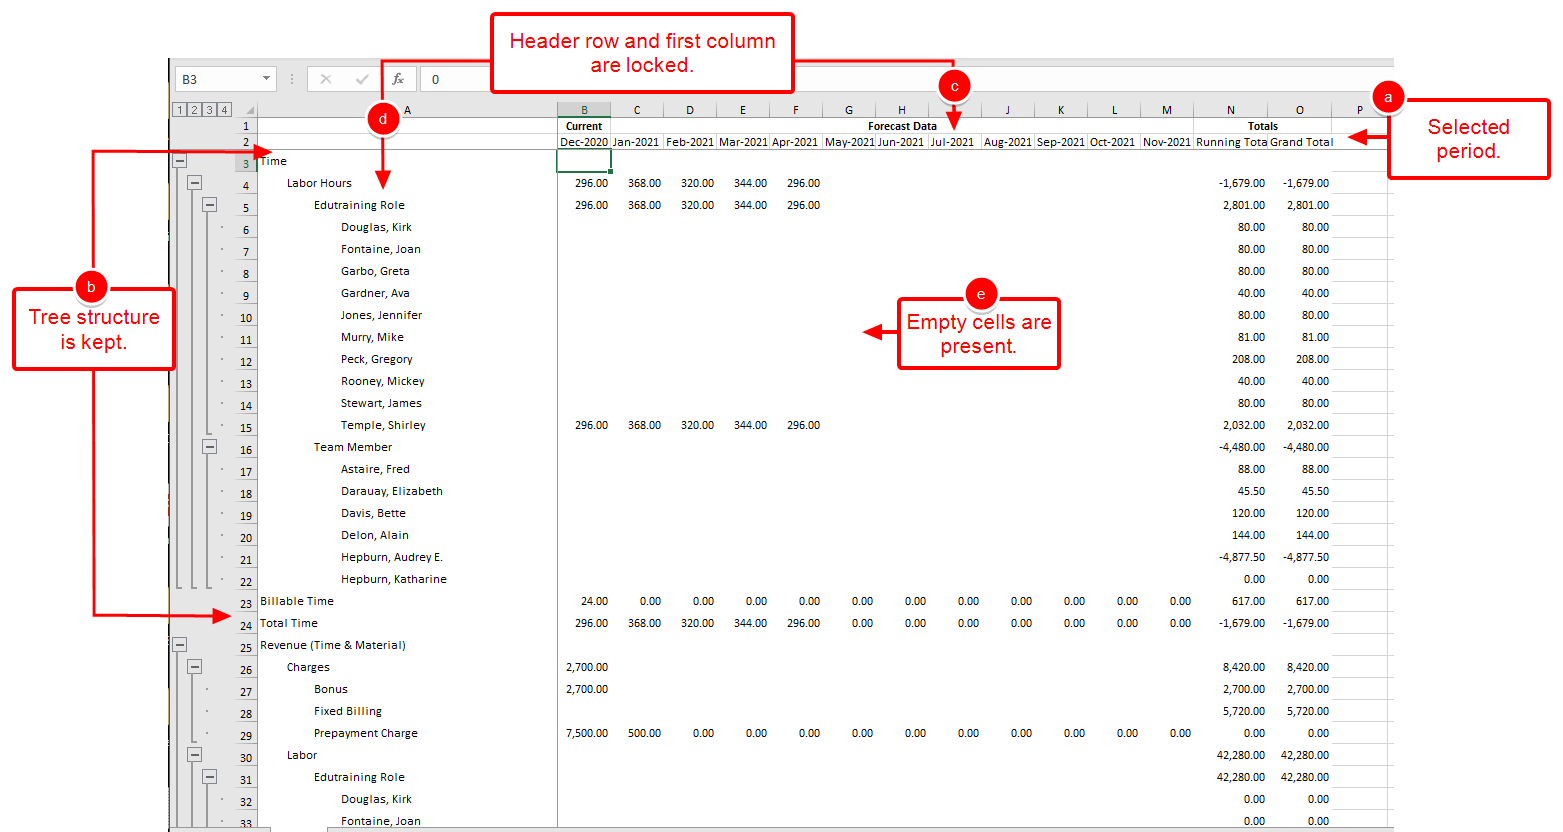
- View your exported file and note the:
- Selected Period
- Financial Planner tree indentation
- Anchored head rows
- Anchored left column
- Presence of all empty cells