Updating Tasks in Recover
Note: This article is for Recover 2.0. For the existing version, refer to the Recover 1.0 help documentation.
After responding to a customer's feedback, you may want to update your task to reflect the action taken and its results. Depending on the action, you can do this from the action menu in the task list table on the Recover homepage or within the task details screen.
The available update actions are:
-
Add a note to your task.
-
Update the assignee of a task.
-
Change the priority of a task.
-
Change the status of a task.
-
Change the last action of a task.
-
Defining the root cause of a task.
Adding a note to a task
Notes are used to record your progress or add information to a task, e.g. to say that you tried to call a customer, to record that you sent a voucher code, etc. You can view your notes from the task detail screen.
There are two ways to add a note to a task: using the action menu, or updating the task details.
Using the action menu:
-
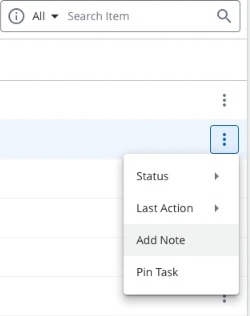
Go to the Recover homepage and open the action menu in the task list table.
-
Select Add Note from the available actions.
-
Enter the details of your note.
-
Save your note using the add note button.
Updating the task details:
-
Go to the Recover homepage and select the task you wish to update.
-
Go to the Notes tab to view your existing notes.
-
Press the Add Note button at the bottom of your notes tab.
-
Enter the details of your note.
-
Save your note using the add note button.
Update the assignee of a task
You can reassign the task assignee for any of the tasks available in the tasks list.
-
Go to the Recover homepage and select the task you wish to update the assignee.
-
From the drop-down lists at the top of the page, open the Assign to drop-down list.
Note: You can only assign it to someone who has access to Recover.
-
Select an assignee from the list or click on 'assign to me' to self assign the task.
Tip: Add a note confirming the change to your notes tab.
Note: When a user appears on the list but is greyed out, that means the user doesn't have an email address associated with it.
Changing the priority of a task
You can change the priority of a task to represent the level of urgency and importance.
-
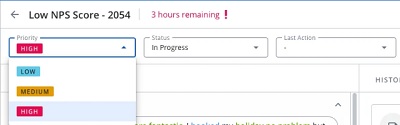
Go to the Recover homepage and select the task you wish to update.
-
From the drop-down lists at the top of the page, open the Priority drop-down list.
-
Select the new priority for your task.
Tip: Add a note confirming the change to your notes tab.
Changing the status of a task
Once you have opened a task, you will want to track its progress and keep its status up to date, e.g.close a resolved task.
-
Go to the Recover homepage and select the task you wish to update.
-
From the drop-down lists at the top of the page, open the Status drop-down list.
-
Select the new status for your task.
Tip: Add a note confirming the change to your notes tab.
Changing the last action of a task
You can change the last action of a task, e.g. sent to legal, referred to manager, etc., to show that certain processes are being followed.
-
Go to the Recover homepage and select the task you wish to update.
-
From the drop-down lists at the top of the page, open the Last Action drop-down list.
-
Select the new last action for your task.
Tip: Add a note confirming the change to your notes tab.
To learn how admins can add the actions, refer to Creating Recover Action List Steps.
Defining the root cause of a task
When a task is closed, users are asked to specify a root cause of the task. This helps to identify the source of the issue quickly so that required action can be taken.
-
Go to the Recover homepage and select the task you wish to update.
-
From the drop-down lists at the top of the page, open the Status drop-down list.
-
Select Closed as the status. This opens a pop-up dialog.

-
Select a Root Cause from the drop-down list and enter the reason in the Root Cause Note field.
-
Click Save.
-
Alternatively, the root cause can be added when you update the status to "Closed" from the homepage.
To learn how admins can add the root cause values to the list, refer to Adding the Root Cause Values.