A Spotlight is a dynamically-generated web page that displays a combination of sales and marketing assets, such as case studies, videos, and press releases that you can send to your prospects and clients, and track their engagement in real-time. Spotlights should be used as a way to send content in lieu of an email with multiple attachments. Spotlights are branded with your company's branding guidelines. They provide customer intelligence, generating notifications when each asset is visited.
Viewing & Searching Spotlights
The users can opt for the older version of the Spotlight or the new Modernized Spotlight Grid version. This setting is available for users with Administrator or Super Admin role only.
Note: For information on how Sales/Portal Users search and view Spotlights, see Using Spotlights .
- Navigate to the Spotlights page.
- (Optional) Locate a specific Spotlight by entering a keyword and clicking the Search button or Enter.
- Select one of the following tabs:
- My Spotlights: These are Spotlights that you have created.
- Recommended Spotlights: These Spotlights are pre-designed by your Customer Reference Team. Portal users can be restricted from editing the Recommended Spotlights tab by enabling the "Don't Allow Portal Users To Edit Recommended Spotlights" setting in the Admin section. When this setting is enabled, the Edit button is grayed out and the Clone button is replaced with a Send button.
- All Spotlights: Includes all available Spotlights. This tab is viewable only by users with Reference Manager or Administrator permissions.
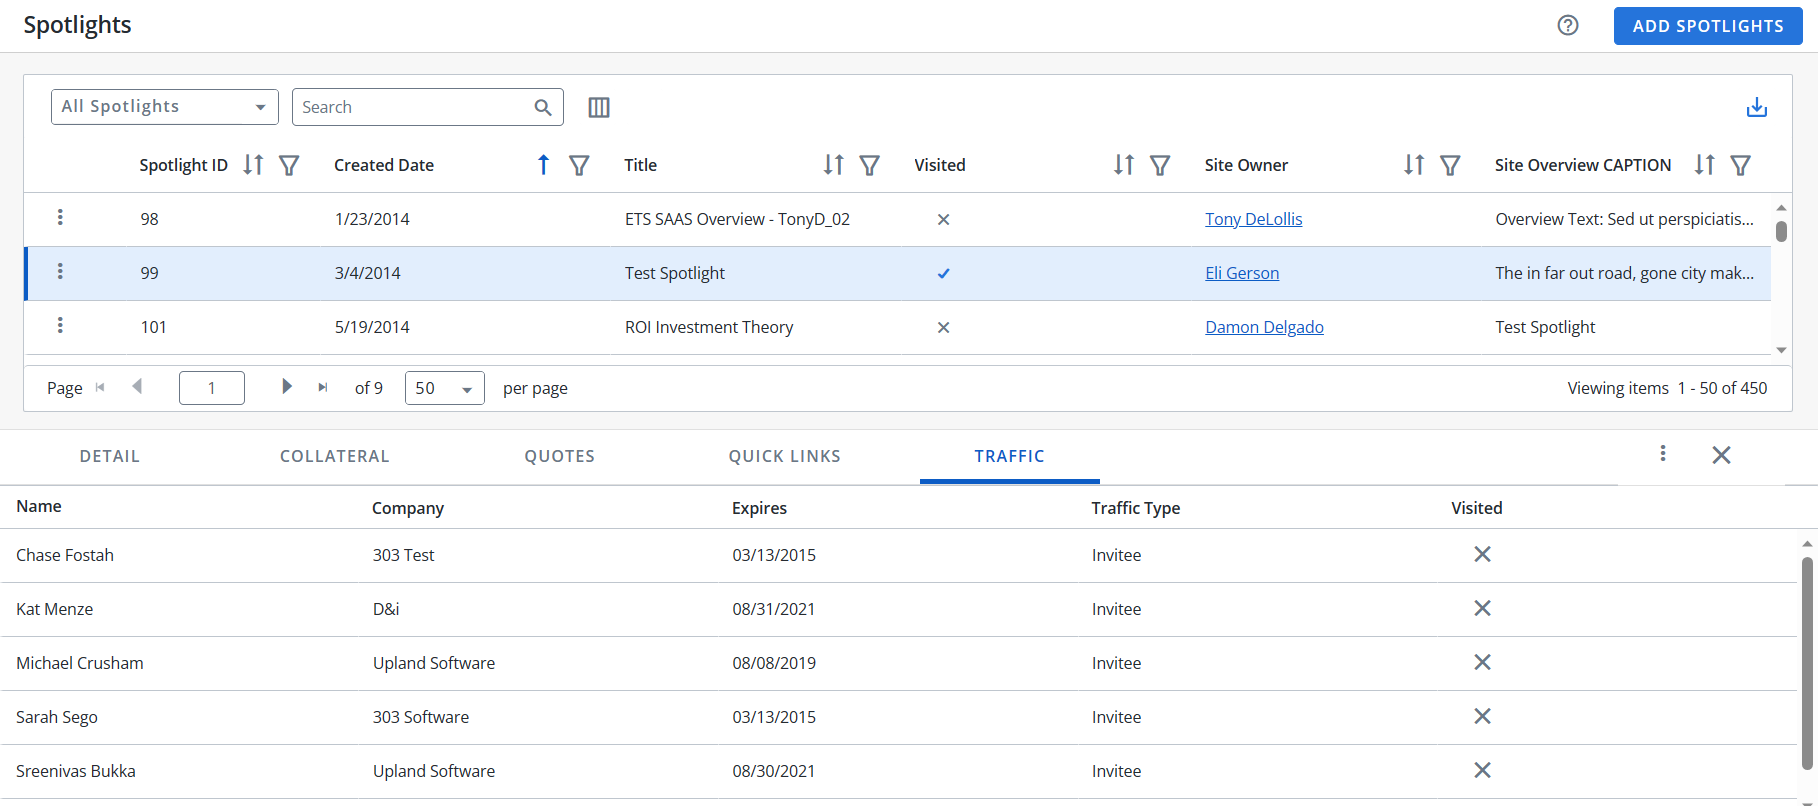
- Click the desired Spotlight Title to view additional details such as description, asset contents, and invitee listing.
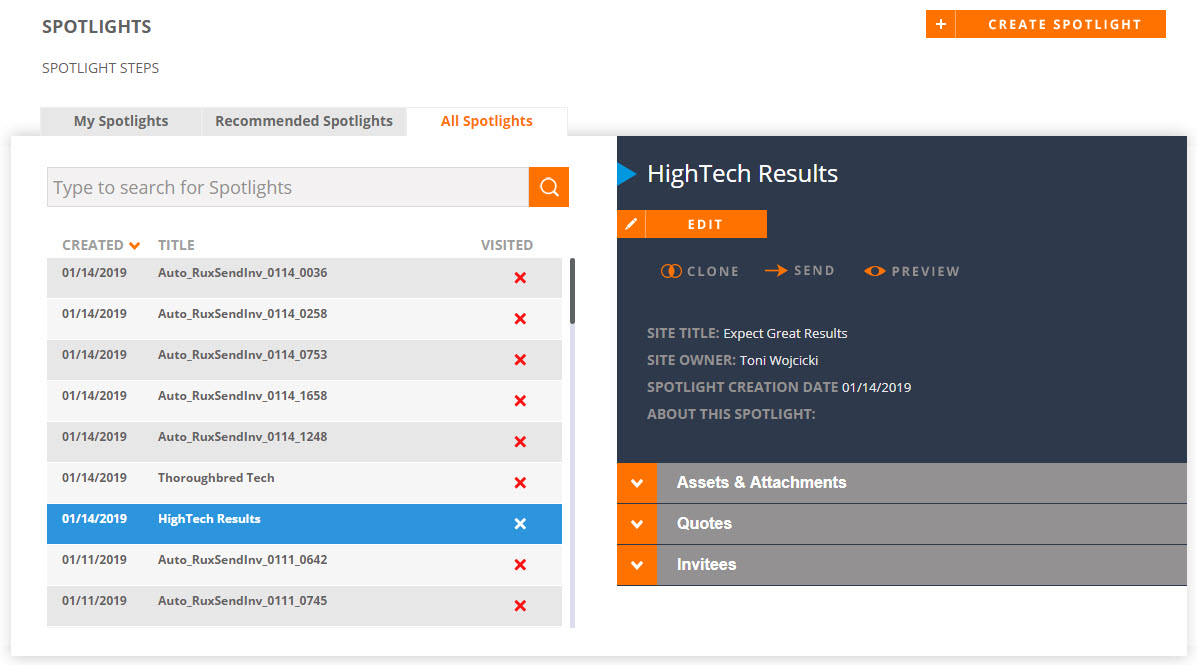
Note: A green check mark in the Visited column indicates that a particular Spotlight has been visited. A red X indicates that it has not.
- Navigate to the Spotlights page using the navigation bar icon,
 .
. - (Optional) Select a preferred View from the drop-down menu:
- My Spotlights: These are Spotlights that you have created.
- Recommended Spotlights: These Spotlights are pre-designed by your Customer Reference Team.
- All Spotlights: Includes all available Spotlights. This tab is viewable only by users with Reference Manager or Administrator permissions.
Note: The RO Platform will remember your View selection. The next time you open the Spotlights grid, your selected View will be displayed as the default.
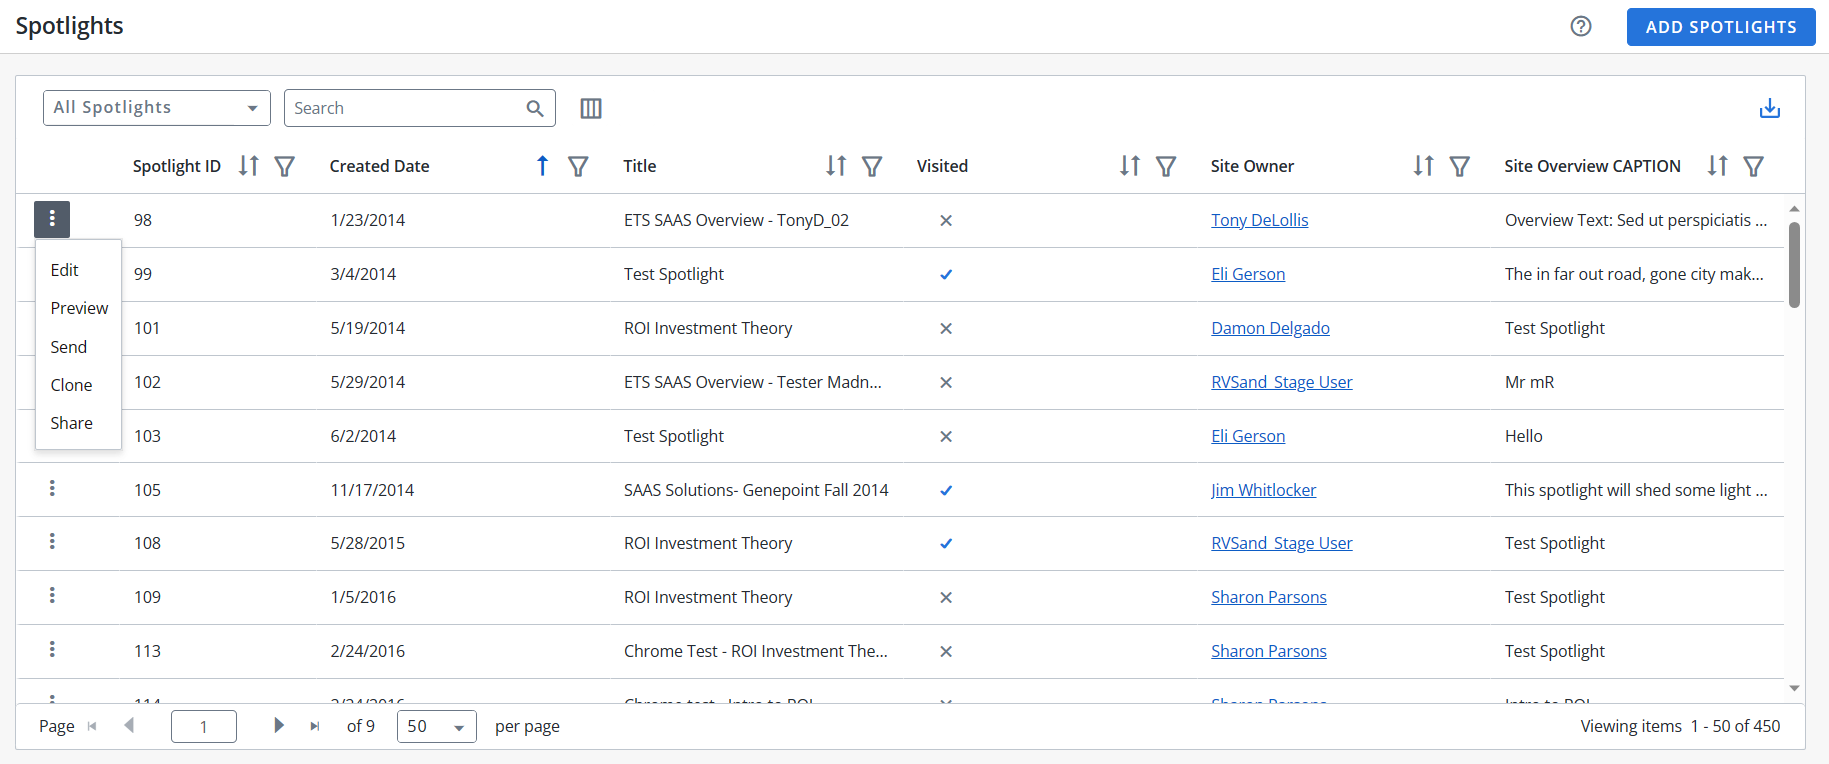
- To perform a search, enter two or more characters into the search bar and click Enter. Results begin populating below the search bar once text is entered. Click the X to clear your search bar.
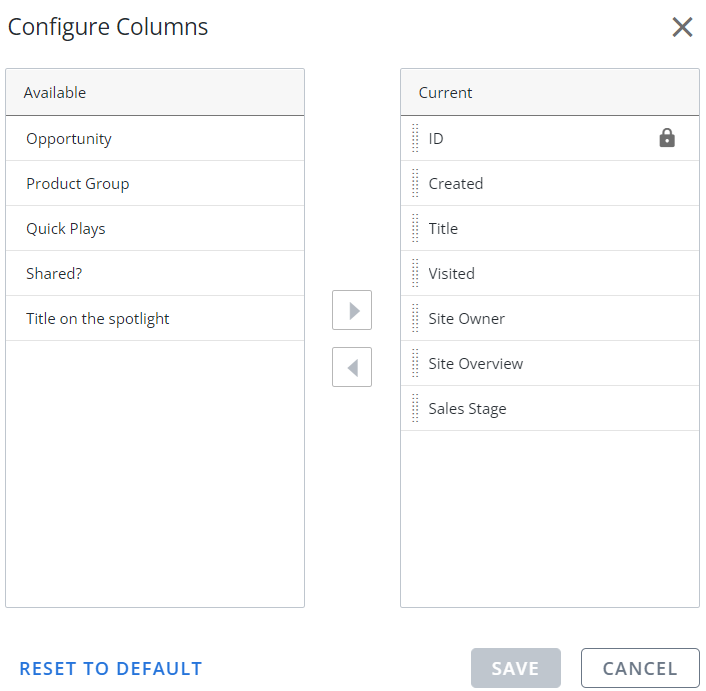
- To configure the Columns, click the
 button and click on the Column name in the Available section and click the
  button to add it to the Current section. You can also rearrange the Columns in the required order in the Current section by dragging the Column name tiles.
 -
The ID column is a default column. You can only rearrange it.
-
Click Reset to Default to go back to the default Column arrangement.
- (Optional) Click the
 button next to the column headers to sort the column from either top-to-bottom or bottom-to-top: chronologically for dates, sequentially for numbers, and alphabetically for text. Your sort selections will be remembered as your default preference. The blue arrow
  next to a column header indicates the type of sorting applied to the column.
 - (Optional) Click the
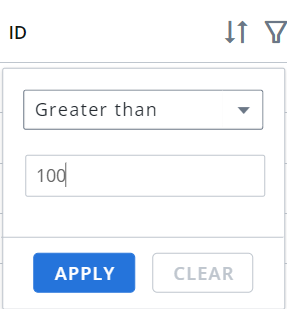
 button next to the column headers to filter what appears in the columns. For example, if you want to filter the IDs, then click on the button and select the range type from the drop-down menu (equals, greater than, lesser than or Is null) and enter a number. Click Apply. To save the filters, refer to Using the Saved Filter.
 - (Optional) Click the
 button to export all the records or the filtered records to excel. The exported records will follow the sorting order and the columns customized in the grid.
 - (Optional) Use the page scrolling controls at the bottom left of the grid to view Spotlights on other pages. To go to a specific page, click in the field, type the page number, then press Enter. Select the number of rows you want to display in the grid by clicking the drop-down menu.
- Click the
 button on any Spotlight to view More Actions. See, Using Additional Spotlight Options.
 - Click anywhere on the desired Spotlight to view additional details such as details, collateral, quotes and traffic.
Note: If you are an Admin, navigate to Admin > Grid Configuration to set default columns for all users.
Note:
Note: The RO platform will remember your Filter selection even if you leave the Spotlights page and return to it later.
Note: Click the More Actions button ![]() to find additional options such as edit, preview, send, clone, share and delete.
to find additional options such as edit, preview, send, clone, share and delete.
-
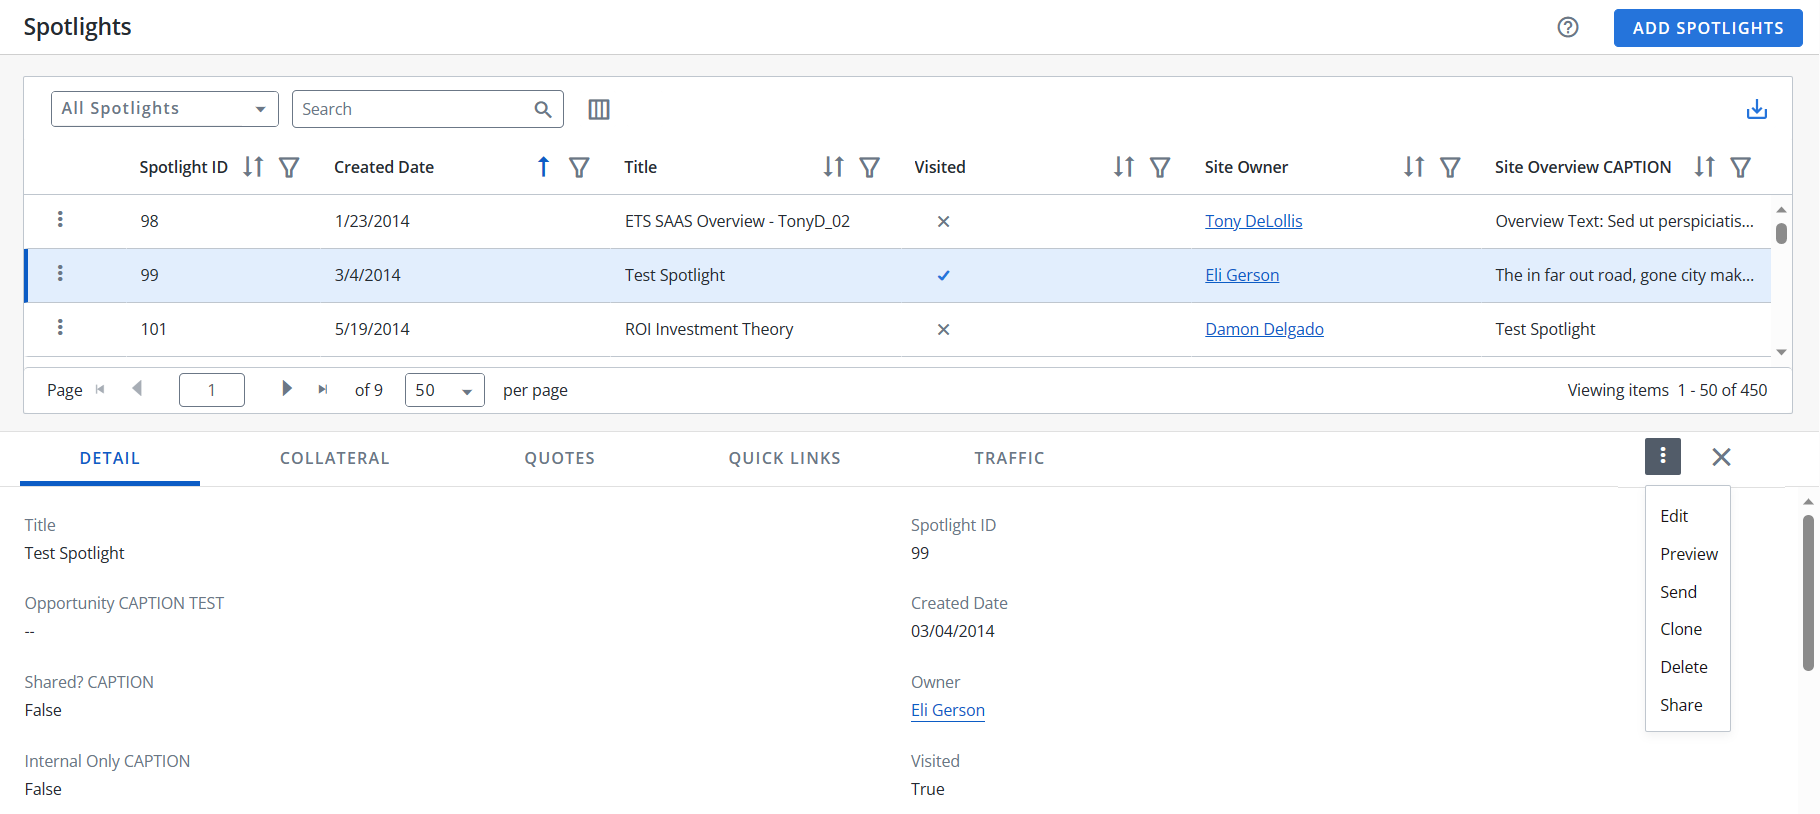
Details Tab
You can find the details such as ID, title, owner, creation date, etc.
-
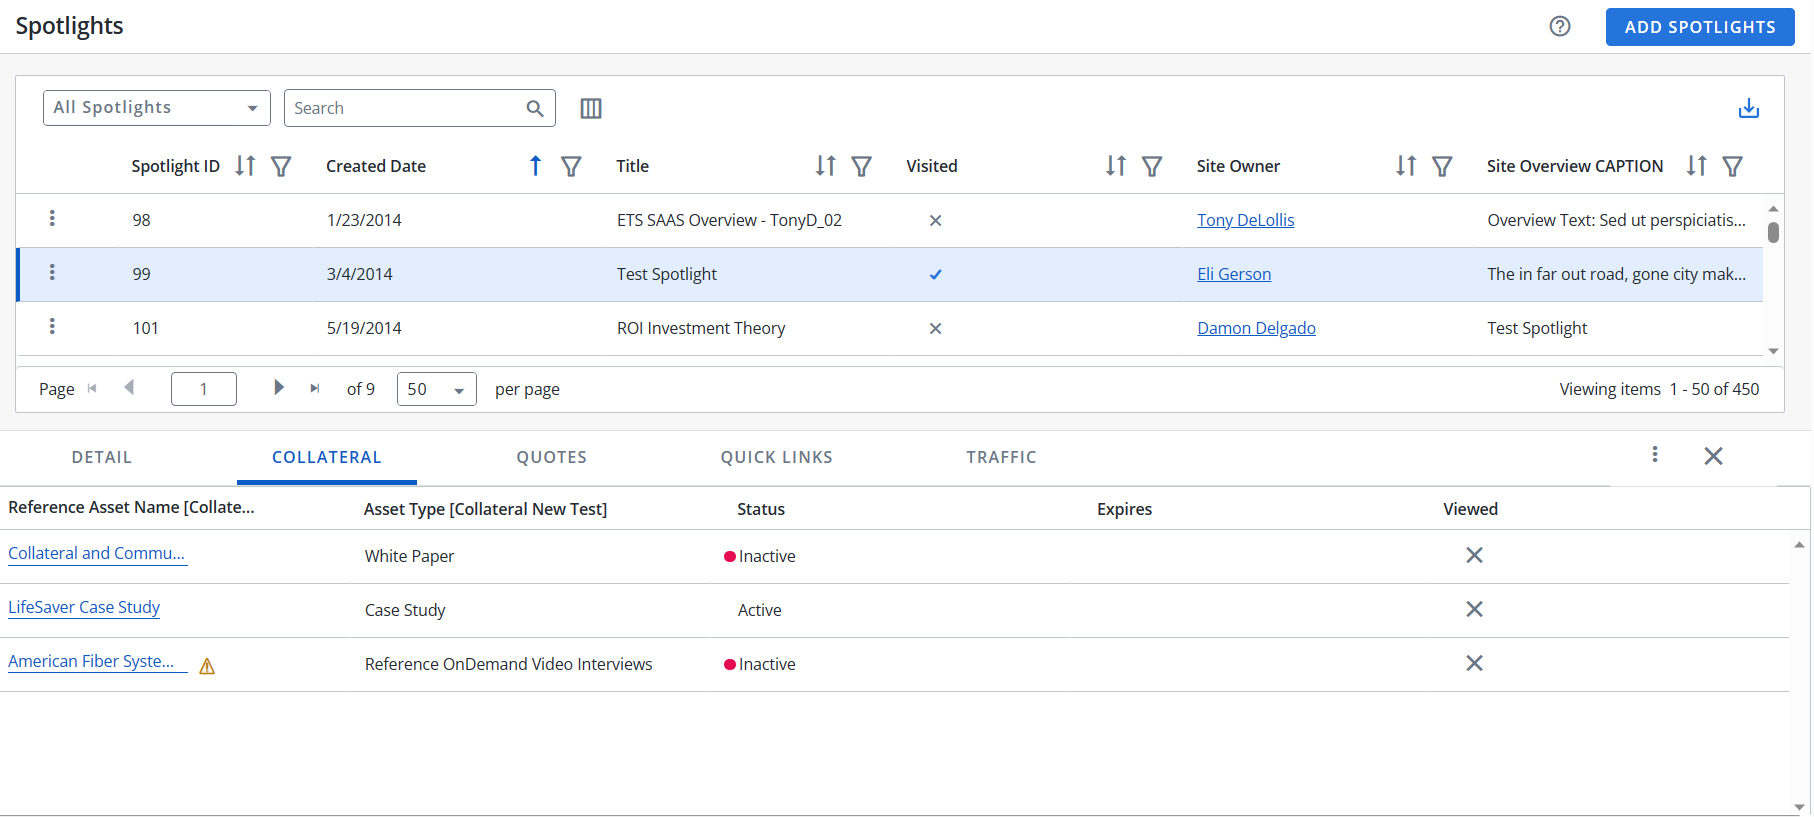
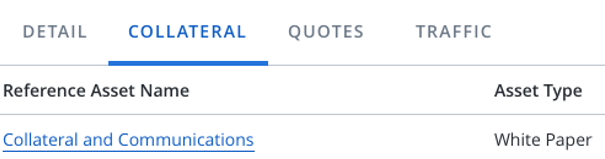
Collateral Tab
You can find the assets associated with the spotlight. You can also view the asset type, status, expiry date and viewed status. A warning symbol appears in front of the Reference Asset Name if the asset is used for internal purpose only.
Note:
-
A blue check mark
 in the Visited column indicates that a particular Spotlight has been visited. A X indicates that it has not.
-
The red dot in the Status and Expires column indicates that the asset has been expired.
-
If the status shows Inactive and the asset is not expired, it means that the asset is set to Inactive manually by the administrator.
-
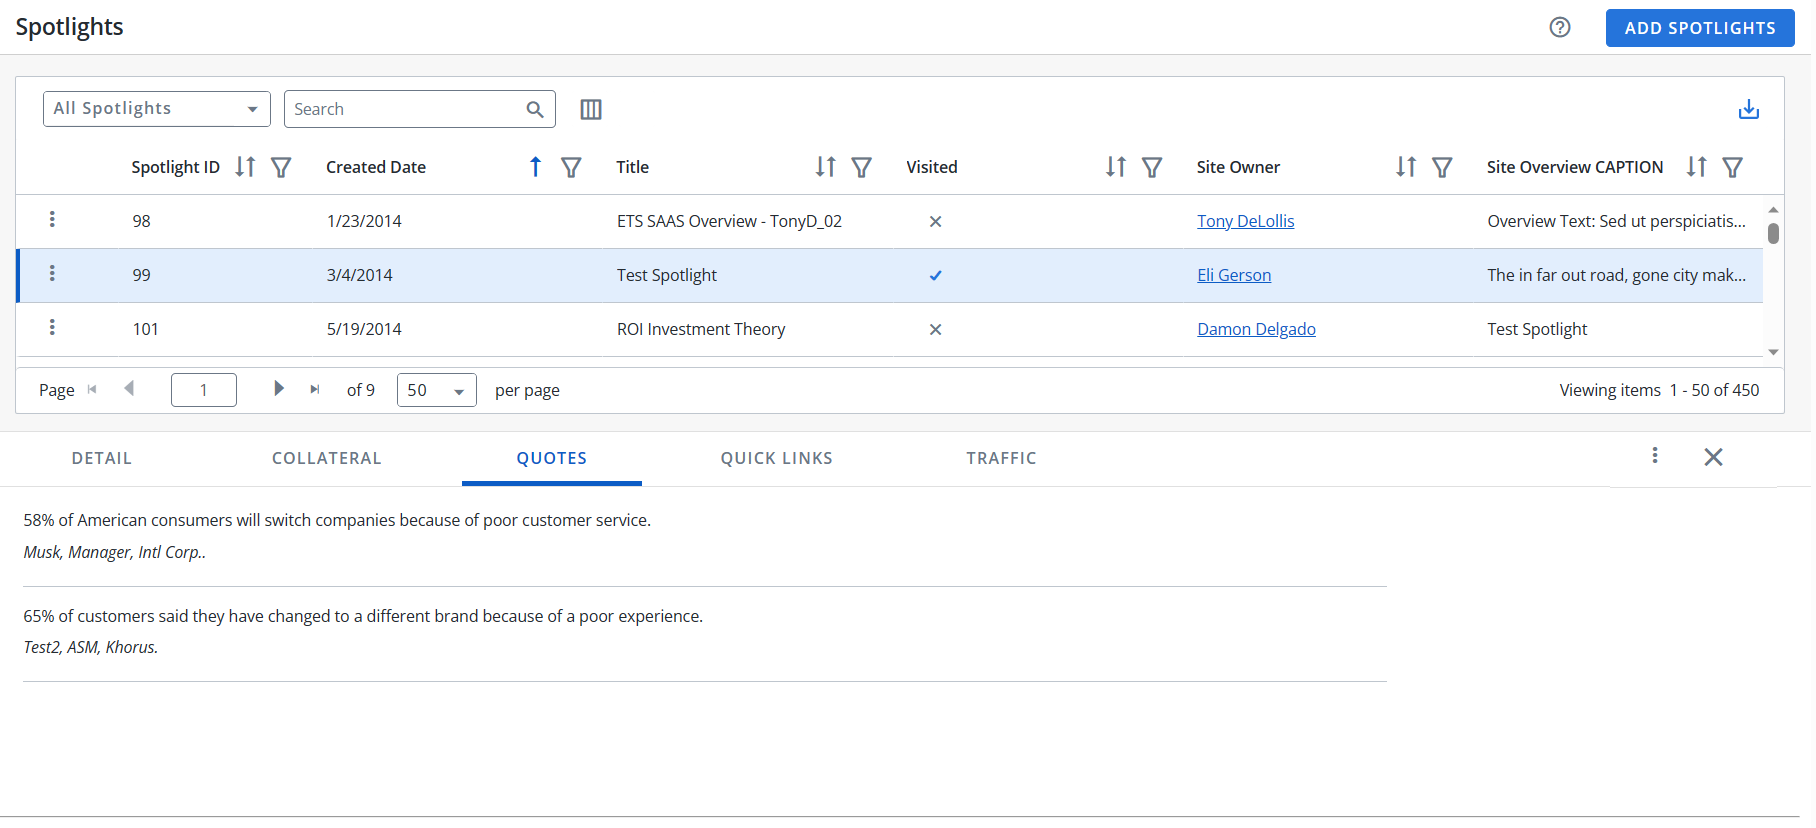
Quotes Tab
You can find all the quotes associated with the Spotlight.
-
Traffic Tab
You can find the details of the people who visited the Spotlight. If the invitees open the Spotlight, they will be listed as Invitee in the Traffic Type column. If the invitees forward the spotlight to other people, then they will be listed as Visitor. For more information about visit history, see Invitee Details.
Users can filter the columns based on their requirements and save the filters for future use. This allows users to quickly access the information they need and eliminates the need to manually filter columns every time they use the grid.
To create a saved filter:
-
Filter the columns in the grid as desired. The Save Filter button is displayed next to Filters along with the number of filters applied.
- Click Save Filter and enter a filter name. This dialog displays the column names of the applied filters.

- Click Save to save the filter.
Note: The "Clear All Filters" button,
 , will display once a filter has been applied. Click the icon to clear all applied filters.
 - To find the saved filter, open the Filters drop-down menu and select the desired saved filter.

- To delete the saved filter, open the Filters drop-down menu and click
 icon.
icon.
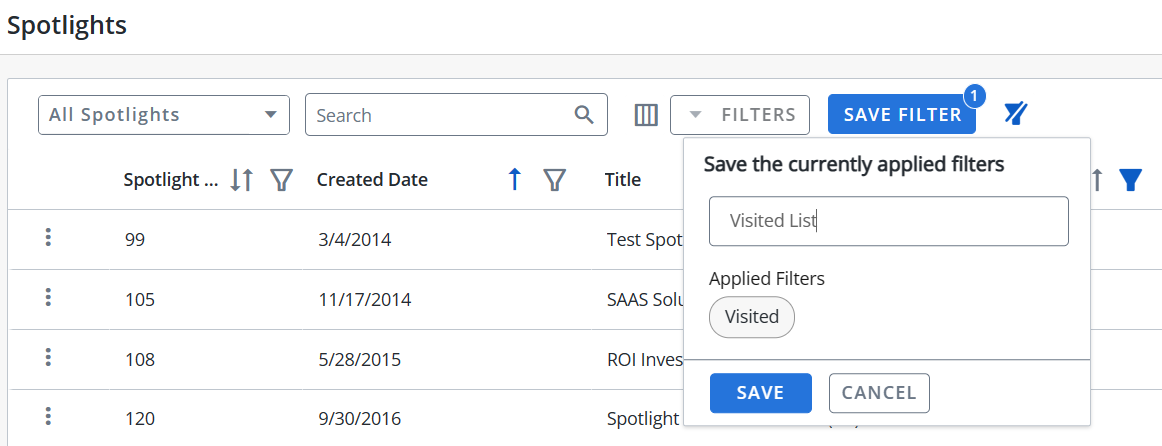

Note:
-
It is not possible to create saved filters with the same filter name.
-
The RO platform will remember your Save Filter selection even if you leave the page and return to it later.
Creating Spotlights
- Navigate to the Spotlights page.
- Click Create Spotlight or Add Spotlight for the modernized spotlight grid. The Spotlight Setup and Invitations page will appear.
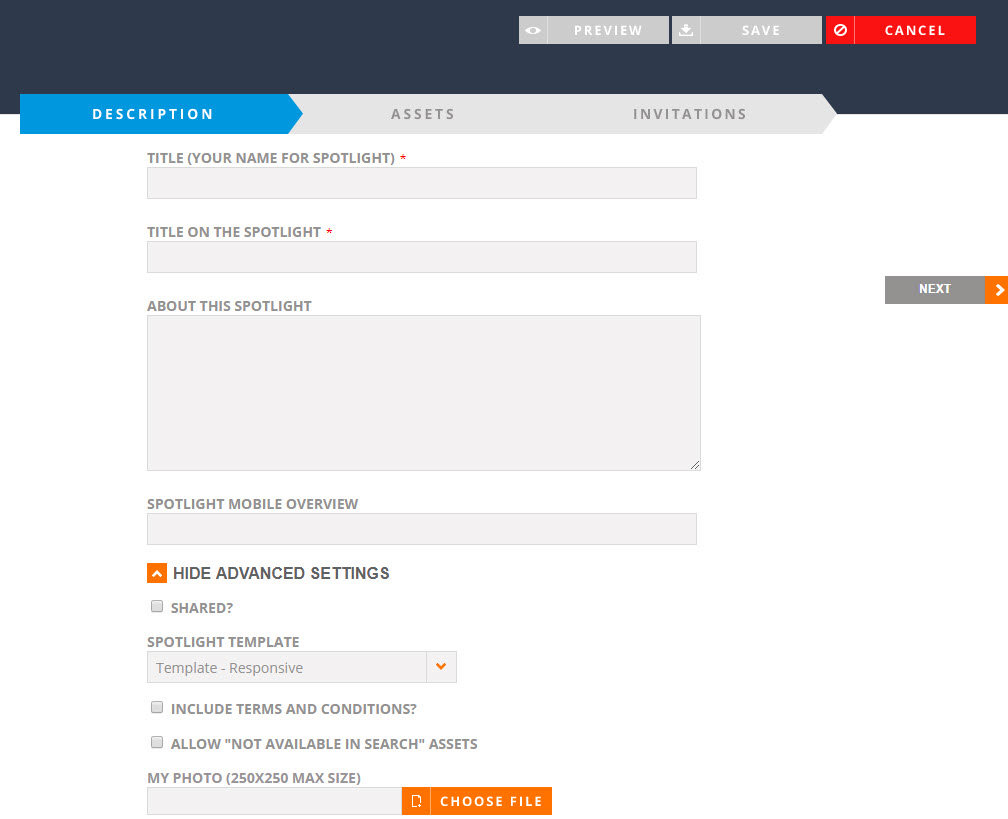
- Description: This section allows you to name and describe your new Spotlight.
- Enter your Spotlight details. Fields marked with an asterisk are required.
- Title (Your name for Spotlight): This is the title that will be displayed under the My Spotlights tab. Your prospect cannot see this title.
- Title on the Spotlights: This is the Spotlight title that will be displayed to your prospect.
- Spotlight Overview: This is the description that will displayed to your prospect.
- Spotlight Mobile Overview: This is the description that will displayed when your prospect accesses the Spotlight via mobile device.
- Click Show Advanced Settings to enable any of the following:
- Recommended: Select this check box if you are creating a recommended Spotlight that you want to be visible to all users.
- Spotlight Template: Select a predefined template from the drop-down menu.
- Internal Only: Select this check box if your spotlight is for internal use only. Internal Spotlights, which can only be created by system administrators, allow Spotlights to be shared as internal assets. This setting is only available if the "Enable Internal Only" setting is enabled in the Admin section.
- Hide My Name and Photo: Select this check box if you do not want to include the personal photo you've uploaded into the Reference Manager.
- Include Terms and Conditions: Select this check box if you would like to include standard terms that prevent the Spotlight recipient from contacting your customers directly.
- My Photo: Upload an image for your Spotlight. The maximum image size is 250x250 pixels.
- Require Invitee Credentials: Select this check box to require Spotlight visitors to enter their contact information prior to accessing the Spotlight. This setting captures information about Spotlight visitors when a Spotlight has been forwarded to them.
- Opportunity: If you are integrated with Salesforce, click the lookup icon,
 , to add your Salesforce Opportunity.
 Note: If integrated with Salesforce, you can enable your Spotlight for Quick Plays. For more information, see: Salesforce.
- Click Next.
- Enter your Spotlight details. Fields marked with an asterisk are required.
- Assets: This section allows you to reorder, hide, or delete assets from your Spotlight.
- Click
 to add any Collateral, Attachments, Quotes, or Quick Links. Click
  to remove any assets. For more information on adding and removing assets, see Adding Collateral.
 - Click the up and down Order column arrows to re-order how the assets will appear on the Spotlight.
- Select the Active check box(es) to enable any assets. Clear to disable any assets.
- Click the Trash icon to remove assets from the Spotlight.
- Click Next.
Note: In order to add Attachments, the following settings must be enabled in the Admin section: "Enable Add Attachments" and "Allow As Spotlight Attachment".
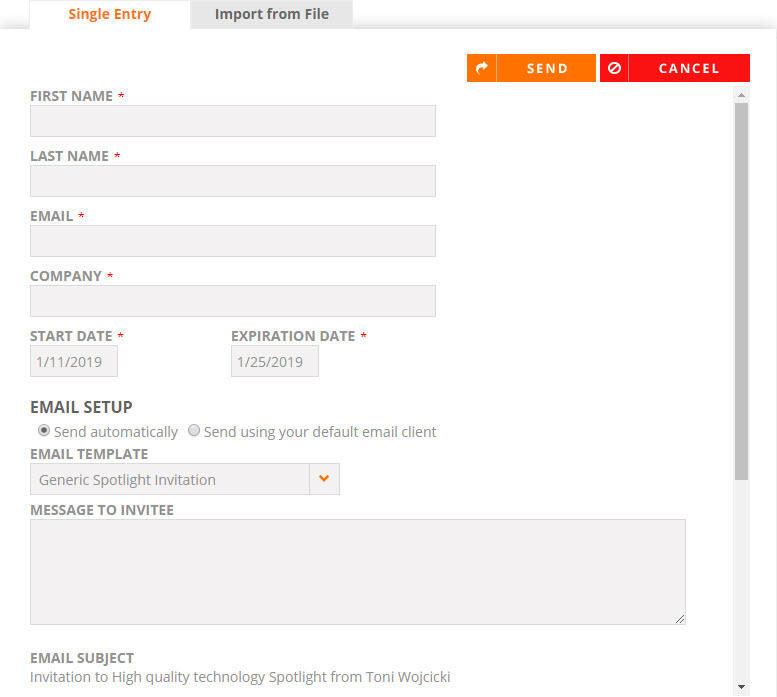
- Click
- Invitations: This section allows you to add invitees to your Spotlight.
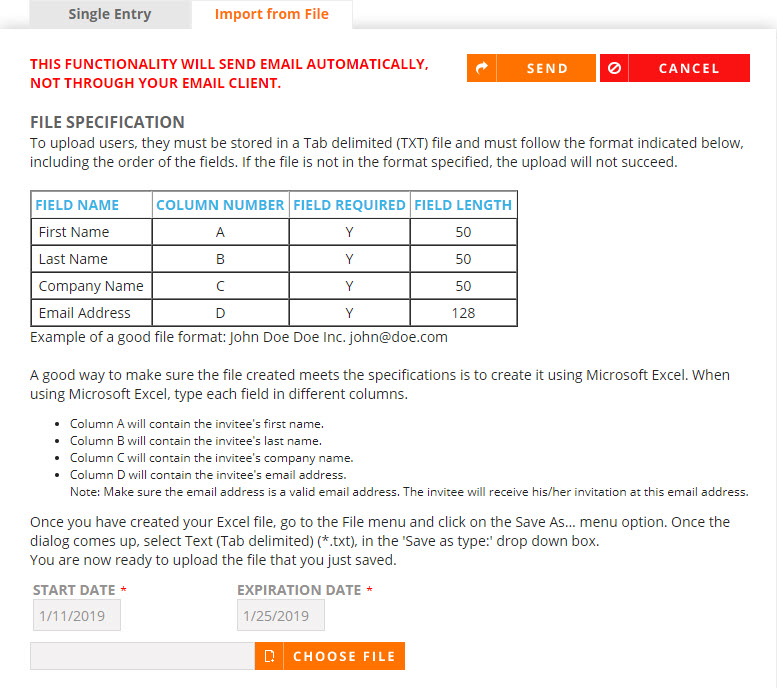
- Click to add Invitees. Use one of the following methods:
- Single Entry: Enter any invitees manually.
- Import from File: Upload one or more invitees using a TXT file.

Note: The End Date defaults to 14 days after the Start Date.
Note: Email Templates are used when Send automatically is selected for the Email Setup; for more information on Email Templates, see Administration. The Send using your default email client option is NOT available in Google Chrome.

- Click Send and Save.
- Click
Note: Spotlights can also be created from the Search Results page. For more information, see Searching.

Note: Once a Spotlight is sent, your customized Spotlight will appear under the My Spotlights tab and you will receive an email confirmation indicating that the Spotlight been sent and when it has been visited. You can review who has visited the Spotlight by clicking on the Invitees section of the Spotlight display.
Using Additional Spotlight Options
- Navigate to the Spotlights page.
- Once you locate the Spotlight you are going to edit and/or send, click the Spotlight to view request details on the right side of the screen.
- Perform one of the following actions:
- Edit: Click the Edit button to make any desired changes to your Spotlight. For more information, see Creating Spotlights.
- Clone: Click the Clone button to use an existing Spotlight as a template to create a new one. This allows you to customize a Recommended Spotlight to meet your specific requirements.
- Send: Click to resend the Spotlight to your Invitees. You can also add, delete, and/or edit Invitees here.
- Preview: Click the Preview button to preview the recommended spotlight.
Note: Email Templates are used when "Send automatically" is selected for the Email Setup; for more information on Email Templates, see Administration. The "Send using your default email client" option is NOT available in Google Chrome.
- Navigate to the Spotlights page.
- Once you locate the Spotlight you are going to edit and/or send, click the button and perform one of the following actions:
- Edit: Click the Edit button to make any desired changes to your Spotlight. For more information, see Creating Spotlights.
- Preview: Click the Preview button to preview the recommended spotlight.
- Send: Click to resend the Spotlight to your Invitees. You can also add, delete, and/or edit Invitees here.
- Clone: Click the Clone button to duplicate an existing Spotlight as a template to create a new one. This allows you to customize a Recommended Spotlight to meet your specific requirements.
- Share: Click the Share button to share the Spotlight to any social media platforms.
Note: Email Templates are used when "Send automatically" is selected for the Email Setup; for more information on Email Templates, see Administration. The "Send using your default email client" option is NOT available in Google Chrome.
Note: You can perform all the above actions along with an additional delete option in the additional details section. For more information, see Additional Details.
After sending a Spotlight invitation, you will want to know when a prospect has visited and what content was viewed. When a prospect has visited a Spotlight, the Spotlight sender will receive an email notifying them that the prospect has visited the Spotlight.
- Navigate to the Spotlights page.
- Once you locate the desired Spotlight, click the row to view request details on the right side of the screen.
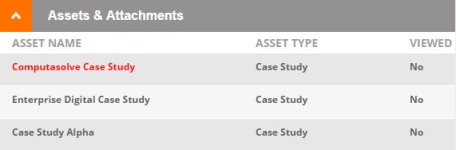
- To view Asset details:
- Expand the Assets & Attachments section.
- To view an Asset, click the Asset Name.
- To view Invitee details:
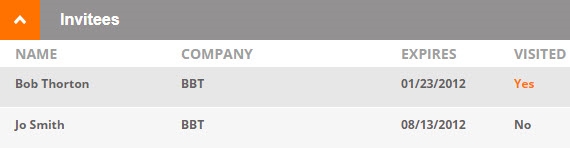
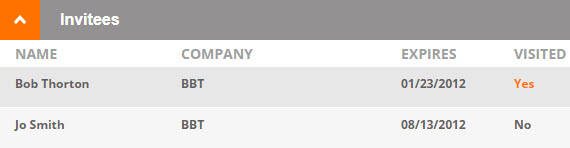
- Expand the Invitees section. You will see the Invitees' name(s) and whether the Spotlight was visited.
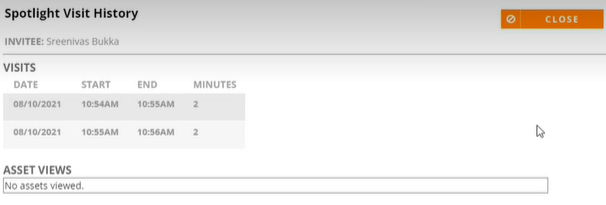
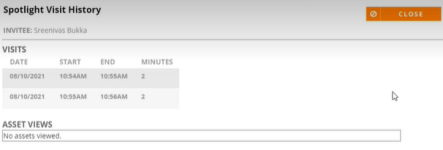
- If visited, click the Yes link to open the Spotlight Visit History dialog where you can see a full list of all assets viewed by each Invitee.
Note: A system-generated email will be sent to the Spotlight sender, notifying them when a Spotlight has been visited.
Note: A green check mark in the Visited column indicates that a particular Spotlight has been visited. A red X indicates that it has not been visited.

After sending a Spotlight invitation, you will want to know when a prospect has visited and what content was viewed. When a prospect has visited a Spotlight, the Spotlight sender will receive an email notifying them that the prospect has visited the Spotlight.
- Navigate to the Spotlights page.
- Once you locate the desired Spotlight, click anywhere on the desired Spotlight to view additional details below.
- To view Asset details:
- Click on the spotlight and select Collateral tab in the additional details section.
- To view an Asset, click the Asset Name.
- To view Invitee details:
- Click on the spotlight and select Traffic tab in the additional details section.
- Click on the blue check mark on the Visited column to view the Spotlight Visit History.
Note: A system-generated email will be sent to the Spotlight sender, notifying them when a Spotlight has been visited.
Note: A blue check mark indicates that a particular Spotlight has been visited and a X indicates that it has not. You can view the status in spotlight grid column, collateral tab or traffic tab.