If you have Edit access to an Account Manager plan, you can edit its basic configuration on the Plan Settings pages.
These pages are very similar to the pages of the Plan Setup wizard when you're creating a new account plan.
- Click the Settings button in the top right.
- Plan Settings is organized into several pages. The tabs enable you to navigate between these.
- Plan Type
- Status
- Click Add Member.
- Enter some or all of the person's name and/or title, and click Search. (Or just click Search to get a list of all users.)
- The users who match the search criteria are listed. Select the user(s) you want to add to the team.
- Click Add.
- The selected users are added to the team. In the Plan Access column, select an access level for each team member. One team member must be the Plan Owner.
- Select the Chatter group to which you want team updates to be automatically posted. If necessary, you can Create New Chatter Group.
-
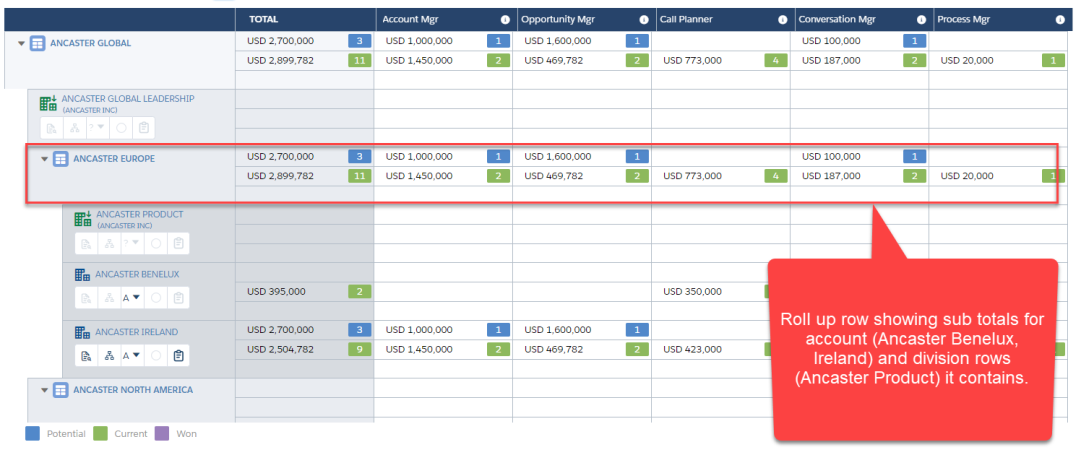
A roll up row is an expandable row in your opportunity map. For example, if you wanted to include a summary view in your plan of a selection of European accounts, you could create a roll up row for Europe and then select the accounts (and divisions) you wish to include within that. The roll up provides a sub-total of the opportunities on the account and division rows that it contains (including accounts and divisions within child roll up rows). Below is an example of how roll ups can be used to build a geographic account plan.
Alternatively, you might decide to create a roll up row corresponding to a vertical market, a set of accounts within an enterprise organization or accounts of a certain type.
-
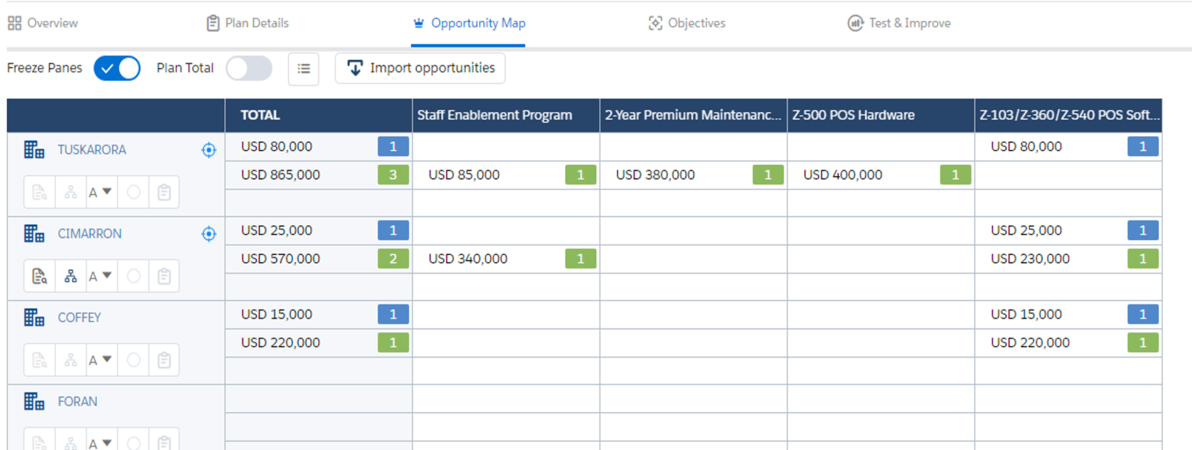
Your other option is to simply add accounts as a standalone rows - as shown in the example portfolio plan below.
- Click Add Roll Up Row.
-
Name and save your roll up row.
-
Click the ellipsis button, indicated below, and select one of the following:
The options Plan Using and Hide Rows are available once you have added an account or division row to your roll up.
Add Roll Up Row
Add a new roll up inside the roll up you just created. Three levels of roll up are allowed (e.g. Ancaster EMEA > Ancaster Europe > Ancaster Benelux).
Note: The same account or division row can be added multiple times to an Account Manager plan, so long as each instance is in a different roll up.
Add Account Row
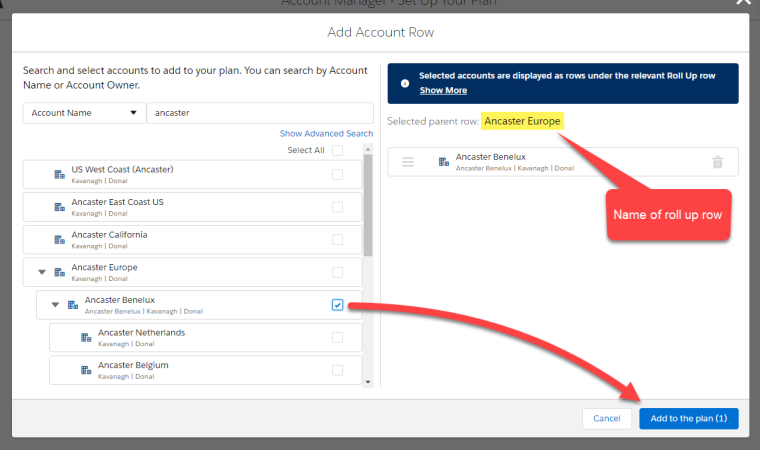
Add one or more account rows within the roll up. On the Add Account Row window that is displayed, you can search accounts to add by Account Name or Owner. An advanced search option provides additional search criteria for you to identify and select the correct accounts. Click Add to the plan (#) when you have selected the required accounts.
Add Division Row
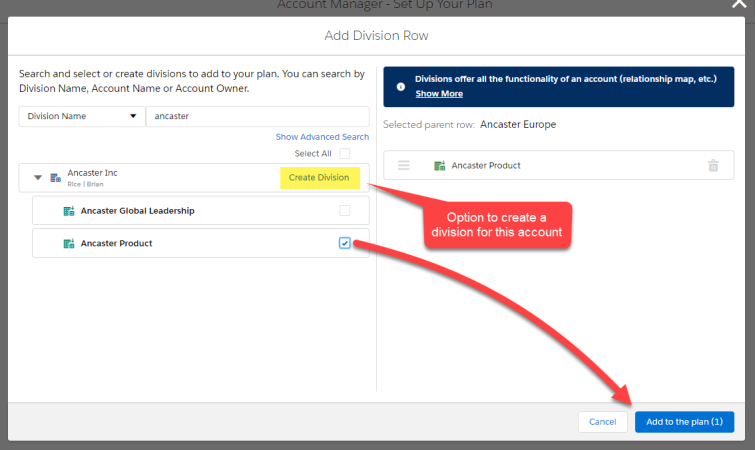
Add one or more divisions within the roll up. On the Add Division Row window that is displayed, you can search divisions to add by Division Name, Account Name or account Owner. The advanced search option allows you perform an advanced search of accounts and add the divisions of accounts that are displayed in your search results.
Alternatively you can create a new division for any account in your standard or advanced search results and add it to your roll up row.
Click Add to the plan (#) when you have created/selected the required divisions.
Note: If you create a new division, it becomes available to other users who are creating or editing an account plan. For more information, see Creating Account Divisions.
Plan Using
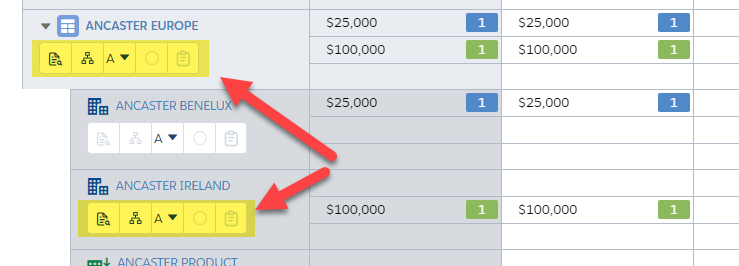
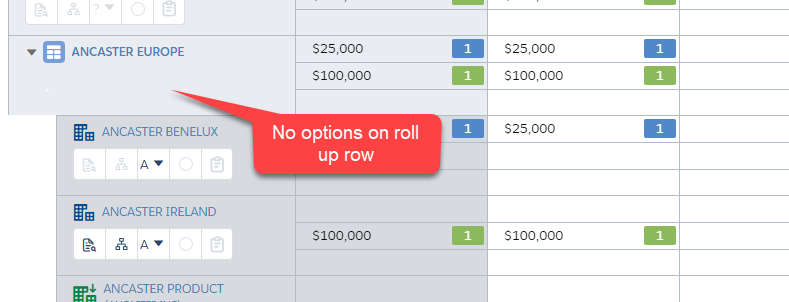
Nominate an account or division within the roll up that you want to plan against. In effect, this means that the options shown for this account or division on the opportunity map are also shown up on the roll up row. In the example displayed below, Ancaster Ireland is set as the main row for planning in the Ancaster Europe roll up.
If no account or division is selected (Plan Using = 'None'), options are not provided on the roll up row.
If an account is nominated for the roll up row, the information is flagged on the Account Structure screen - as shown below:
Hide Rows
Enable this setting to hide all rows within a roll up. Only the roll up row is displayed on the opportunity map, and it continues to show the opportunity subtotals for the account and division rows it contains.
-
Click Add Account Row on the Account Structure tab.
-
On the Add Account Row window that is displayed, you can search accounts to add by Account Name or Owner. Click Add to the plan (#) when you have selected the required accounts.
Each account that you add will be displayed as a distinct row on the opportunity map.
- Drag solutions and/or solution families across to the right-hand pane.
- In the right-hand pane, drag the solutions into the order in which you want them to be shown on the opportunity map.
- If you want to remove any solutions from the list, simply drag them back to the left-hand pane.
-
To mark a solution for particular focus, click its Target icon.
Tip: Be selective in how you target solutions. Avoid targeting all the solutions included in your plan.
- Click Add Period.
- Set the Start and End dates for the period.
-
Specify the revenue target for the period.
Note: For multicurrency orgs, this value is denominated in the corporate currency or your user currency - depending on how the administrator has configured Altify Account Manager.
- Repeat these steps for each period.
-
When you're done on this page, click another tab or Save & Close.
- Click Delete Account Plan on this page.
- Click Yes, Delete Account Plan to confirm that you want to go ahead with the deletion.
![]()
This is where you specify the plan's name and the following essential details:
The plan type determines the structure and some of the contents of the account plan.
Changing the plan type affects these aspects of the plan, but you can always switch back to the original plan type without losing any data.
Note: The Status field is currently inoperative - setting the value to 'Active' or 'Inactive' has no effect.
When you're done on this page, click another tab or Save & Close.
This is where you specify who is on the Account Manager plan team ‑ the people who will collaborate with you.
Adding a team member:
Note: You only get Chatter options if Chatter is enabled in the org.
Removing a team member
Click the team member's trashcan icon. (This does not delete the User record in Salesforce.)
Note: You can't remove the Plan Owner or yourself from the team.
When you're done on this page, click another tab or Save & Close.
This is where you add accounts to the plan – "where you are selling to". Each selected account and division is allocated a row on the opportunity map.
There are two ways to build your Account Manager plan. You can apply both methods in your plan if required.
Take a look at How should I structure my Account Manager plan? if you need help deciding on a structure for your Account Manager plan.
Adding a Roll Up Row
Tip: Watch the video Setting up an enterprise account plan for assistance with creating account plans containing roll up rows.
Adding an Account Row
To add a standalone account row to your opportunity map, do the following:
Tip: Watch the video Setting up a portfolio plan for assistance with creating account plans containing standalone account rows.
Rearranging Rows
The order in which roll ups, accounts and divisions are arranged in the Account Structure determines their order on the opportunity map.
To change the order of the rows, drag them to their desired positions.
You can't drag a row in or out of a roll up.
Removing a Row
To remove an account, division or roll up row, click its trashcan icon.
Targeting an Account Row
To mark an account row for particular focus, click its Target icon.
Tip: Be selective in how you target accounts. Avoid targeting all the accounts included in your plan.
Grouping Accounts
The Group Accounts button on account rows allows you to group duplicate accounts on a single row in your opportunity map. When two or more accounts are grouped, you can add opportunities from any of the grouped accounts on the row in question.
The number of grouped accounts on a row is indicated by the message '# grouped accounts', as shown in the example below.
Note: If you have parent and child accounts in your Salesforce org, a parent and its child accounts are automatically grouped in Altify Account Manager.
To access the editor, click the Group Accounts button on the relevant row. For more information, see Manual Account Grouping.
When you're done on this page, click another tab or Save & Close.
This is where you specify 'what you sell': the plan's solutions. On the opportunity map, each solution is a column.
The available solutions are listed in the left-hand pane. You add them to the plan by dragging them to the right, where you can arrange them into the order you want them to be shown in on the opportunity map.
If the plan type has any default solutions, these are automatically added to the right-hand pane.
(The order in which the solutions are shown on the left has no effect on the opportunity map.)
If you drag across an individual solution that belongs to a solution family, it is presented within its solution family in the right-hand pane, and on the opportunity map.
When you're done on this page, click another tab or Save & Close.
Note: A solution can include 'tooltip' text. Hover over the info (i) icon to see this text. (The tooltip is also available in the opportunity map.)
This is where you add plan periods and revenue targets to the Account Manager plan.
The revenue target is the total value of the opportunities you hope to win during the period.
Typically, you set a revenue target for each 12-month period in the lifetime of the plan, and another revenue target for the remaining months, if any. However, you can set periods to any length you want.
Adding a plan period
If this is the first plan period, the Start date is set automatically to he start of the current month. You can adjust this if necessary.
If this is a subsequent plan period, the Start date is set to immediately after the End date of the previous period.
If you adjust the End date of the previous period, the Start date of this period adjusts automatically. This ensures that there is never a gap or overlap between plan periods.
To delete a plan period, click its trashcan icon.
The Total Plan Duration extends from the start date of the first plan period to the end date of the last plan period.
However, team members can continue to work in the plan even after the end date has passed.
If you ever need to delete the Account Manager plan:
Note: This tab is available only if your Salesforce configuration grants you Delete access to the plan. For example, if your org uses a role hierarchy and your role is lower than that of the plan owner, you don't see the Delete Plan page and you can't delete the plan.
