Project Request Configuration
While creating a Project Request, Eclipse PPM users must choose an existing Project Template as a model for their desired Project. Eclipse PPM administrators have the ability to configure how each Project Template will be used to create Project Requests, including the process for submitting the request, how the request form will appear, which fields will be included on the request form, and whether users will have to include documents along with their requests.
Tip: The bottom of the "Requests" page contains a list of all Project Requests that have been created using the Project Template:
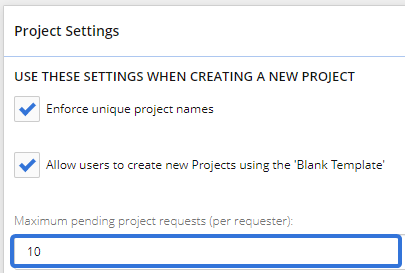
Note: Eclipse PPM users can only have a set number of pending Project Requests at once. Administrators can configure this number from the Edit Project Settings page:
In the example above, users will only be able to have 10 requested Projects pending at once. After requesting 10 Projects, a user will have to wait until at least one request is addressed before requesting another Project.
This page covers the following topics:
Enabling a Project Template to be used for Project Requests
Before a Project Template can be used to submit Project Requests, an administrator must enable it from the Template Menu.
To enable a Project Template to be used for Project Requests:
Before You Start: Users will require the "Manage Project Templates" Administration & Configuration permission from an Application Policy to enable Project Requests on Project Templates.
-
Select the Administration icon
 from the Navigation Menu:
Click thumbnail to enlarge.
-
Select Project from the "Templates" menu:

-
Select which Project Template you would like to enable for Project Requests:

-
Open up the Template Menu in the top right-hand corner of the Project Template profile page:

-
Select the Request view:

Tip: The bottom of the "Request" page contains a list of all Project Requests that have been created using the Project Template:

-
Select the Enable button:

After clicking Enable, Eclipse PPM users will be able to use the Project Template to create Project Requests:

Note: To disable a Project Template for Project Requests, simply follow the same instructions above but select the Disable button during Step 6:
Configuring Project Requests from a Project Template
Eclipse PPM administrators can configure how Project Templates will be used to create Project Requests. This includes the request submission process, the appearance of the request form, and any documents that should be included with the request.
To configure Project Requests from a Project Template:
Before You Start: Users will require the "Manage Project Templates" Administration & Configuration permission from an Application Policy to configure Project Requests on Project Templates.
-
Select the Administration icon
 from the Navigation Menu:
Click thumbnail to enlarge.
-
Select Project from the "Templates" menu:

-
Select which Project Template you would like to enable for Project Requests:

-
Open up the Template Menu in the top right-hand corner of the Project Template profile page:

-
Select the Request view:

-
Configure any of the following settings:
 Submitting Requests
Use this window to configure the process for submitting requests using the Project Template:

-
Add reviewer to default project security policy: When this is selected, the reviewer will automatically be added to the default project security policy.
-
Automatically populate "Requested By" field with logged in user: When this is selected, the requesting user's credentials will automatically be entered into the "Requested By" field.
-
Add submitter to project using this resource role: When this is selected, the drop-down menu can be used to determine the requesting user's role on the new Project if it gets approved.
-
Send all requests to a specific approver: When this is selected, the drop-down menu can be used to determine who the approver will be whenever a Project Request is made using the template. When this is unchecked, no approver will be set and the request will be sent to the "Requested By" user on the request form.
Tip: Entering "@DirectManager" will automatically send the Project Request to the requesting user's direct manager for approval.
-
Send notification to these users whenever a request is submitted: When this is selected, the text field can be used to determine which users and groups will receive a notification when a Project Request is submitted using this template.
-
Send notification to these users whenever a request is resolved: When this is selected, the text field can be used to determine which users and groups will receive a notification when a Project Request using this template is resolved (either approved or rejected).
Tip: Selecting "@Request Submitter" from the drop-down menu will send an email notification to the user who requested the Project once the request is either approved or rejected.
-
Forward undeliverable requests to this person: When this is selected, the text field can be used to determine a user that will receive the Project Request if it cannot be delivered to the intended approver. The user in the text field will be able to approve the Project.
Example: Imagine the "Send all requests to a specific approver" contains "@DirectManager". Not all users have a Manager in Eclipse PPM, so users without one would have their request sent to the user identified in the "Forward undeliverable requests to this person" field.
Select the window's Save button once you finish configuring your settings.
 Form Customization
Use this window to customize the look and labels of your project request form:

-
Special instructions: Enter in any special instructions that you would like submitters to see on the form:

-
Logo Image (URL): Enter in the URL for an image you would like to use as a logo on the form.
Tip: An easy way to get the URL of an online image is to right-click on it and select Copy image address. Once you do that, you can paste the address directly in the "Logo Image" text box.

-
Environment Name: Use the drop-down menu to determine the environment name that will display on the request form:

-
Environment Name: The default environment name set by an administrator will display automatically.
-
Other: Enter a custom environment name into the textbox to the right.
-
None: No environment name will display on the request form.
-
-
Form Name: Use the drop-down menu to determine the form name that will display on the request form:

-
Form Name: The name of the Project Template will automatically be displayed as the form name.
- Other: Enter a custom form name into the textbox to the right.
-
None: No form name will display on the request form.
-
-
'Requested By' Text: Enter in any instructions you would like the submitter to see before filling out the "Requested By" field:

-
Font: Use the drop-down menu to choose what font should be used for text on the request form.
-
Primary Text Color: Use the color picker to choose a color for the primary text on the form (titles and headers):

The red font represents primary text on the request form.
-
Secondary Text Color: Use the color picker to choose a color for the secondary text on the form (header explanations):

The red font represents secondary text on the request form.
-
Guidance Text Color: Use the color picker to choose a color for the guidance text on the form (your "Requested By Text" field entry):

The red font represents guidance text on the request form.
-
Header Background Color: Use the color picker to choose a background color for the request form's header background:

In this example, the header background has been set to red.
-
Page Background Color: Use the color picker to choose a background color for the entire page:

In this example, the page's background has been set to red.
Select the window's Save button once you are finished customizing the form.
 Fields to Include on the Request Form
Use this window to determine which fields will be included on the project request form:

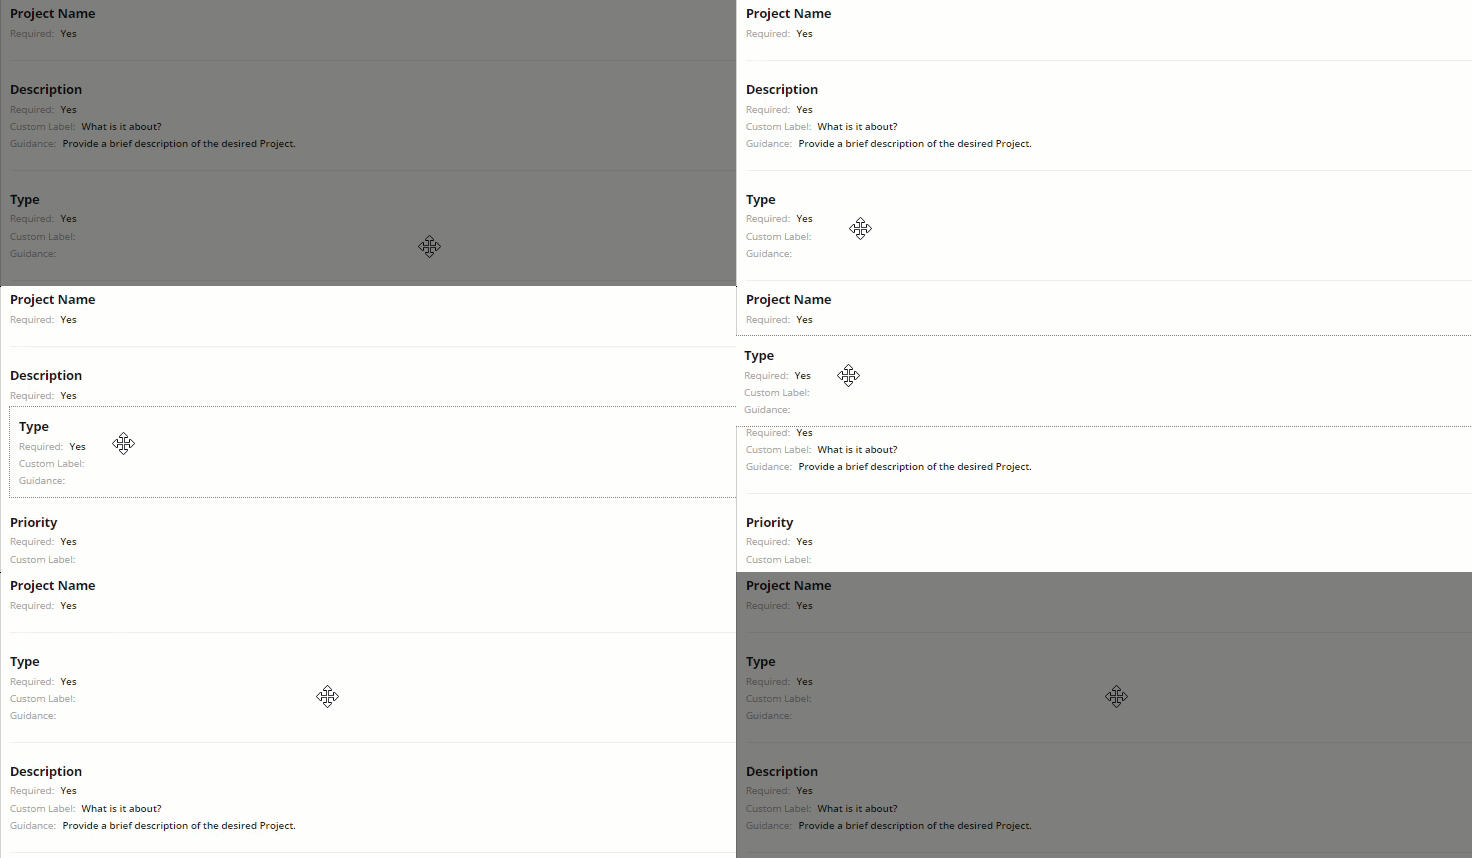
Fields can be dragged and dropped in the window to change their order of appearance on the form:

Simply click on a field and drag it anywhere in the list to change the order on the form.
Use the Add Field drop-down menu to add other fields to the form:

Use the drop-down menu on any field to either edit the field or delete it from the form:

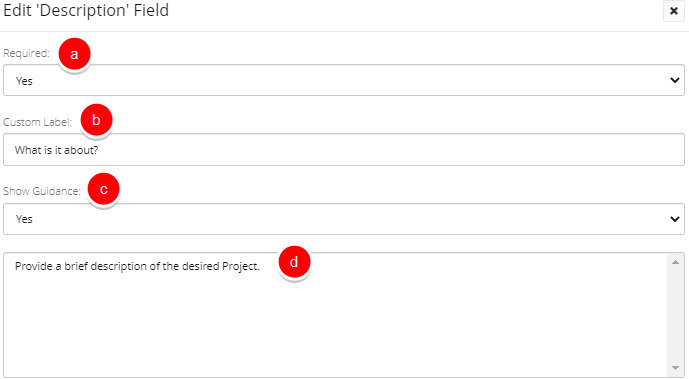
The following "Edit" options for each field are as follows:

-
Required: Select "Yes" if you would like this field to be mandatory on the project request form. If "Yes" is selected, users will not be able to submit the Project Request unless a value has been entered for the field.
-
Custom Label: Enter a new label for the field on the project request form.
-
Show Guidance: Select "Yes" if you would like to include a description of the field on the project request form. This will open up the Guidance text box.
-
Guidance text box: Enter in a description or any special instructions for the field.
Select the window's Save button once you are finished editing the form's fields.
 Additional Documents
Use this window to define any documents that should be included with the project request (Statement of Work, etc.):

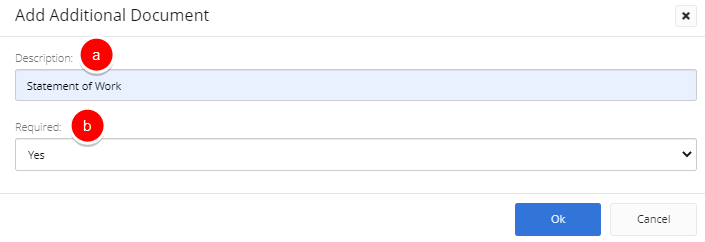
Use the Add Document button to allow a certain document to be submitted along with Project Requests:

-
Description: Explain which type of document should be uploaded to the project request form.
-
Required: Select "Yes" if you would like to prevent users from submitting the project request form without uploading the document.
Note: There is no Save button for this window; documents will automatically be added to the form after selecting the Ok button on the "Add Additional Document" window.
Use the drop-down menu on any document to edit it or remove it from the form:

-
After going through the configuration windows, the Project Template's request form will reflect the changes.
