Resource Management Configuration
Resource Management allows users to create custom views, where specific set of criteria and fields can be applied.
To open up the Resource Management page, select the Resource Management icon from the Navigation Menu:

Click thumbnail to enlarge.
This page covers the following topics:
Viewing and Configuring the Resource Management Window
The Resource Management window consists of the following:

-
Date Selector: Select which dates you would like to display on the Resource Management sheet. The single arrows
 will move the dates forward or back one period. The double arrows
  will move the dates forward or back by all the displayed periods.
Example: In the picture above, the Resource Management sheet displays 4 weekly periods. Pressing a forward single arrow will move the dates forward one week. Pressing a forward double arrow will move the dates forward by 4 weeks.
The calendar icon
 can be used to determine a start date for the displayed periods.
The drop-down menu to the right can be used to choose how many periods will be displayed on the sheet at once.
Note: The size of the periods (weekly or monthly) can be configured from (d) the "Options" drop-down menu.
-
Projects: Select a Project filter from the drop-down menu. The Projects that fit this filter will be displayed on the Resource Management sheet.
Note: These are the same Project filters that can be found on the "Projects" Advanced Search page. Users can even create their own Project filters to display a custom set of Projects in Resource Management.
Note: After selecting a new option from the "Projects" drop-down menu, you will need to select the (g) Refresh button to see the changes.
-
Resources: Select Project Resources, Resource Plan Resources, Work Plan Resources, or a Resource filter from the drop-down menu:
-
Project Resources: Resources that have been added to the filtered Projects (b) will appear on the Resource Management page.
Note: Resources without any allocations will not appear on the Resource Management sheet, but they will still appear in the Resource Availability window.
-
Resource Plan Resources: Resources that have been added to the Resource Plans of the filtered Projects (b) will appear on the Resource Management page.
-
Work Plan Resources: Resources that have been added to the Work Plans of the filtered Projects (b) will appear on the Resources Management page.
-
Resource Filters: Select one of the Resource filters. The Resources that fit this filter will be displayed on the Resource Management page.
Note: These are the same Resource filters that can be found on the "Resources" Advanced Search page. Users can even create their own Resource filters to display a custom set of Resources in Resource Management.
-
-
Options: Configure options for the Resource Management page:
-
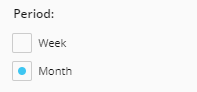
Period: Decide whether the Resource Management page will display weekly or monthly periods.
-
Units: Decide whether effort will be displayed in FTE, % of FTE, or Hours.
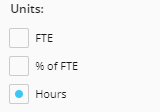
Note: FTE (full-time equivalent) refers to the number of hours that is considered full-time. A full FTE (that is all of the hours that consist of full time) is 1.00. For example, an organization's work week might consist of 40 working hours. If Josh has 20 hours of his week allocated to a Task, that will equal half of his FTE, which is 0.50. If "% of FTE" is chosen, this will display as a percentage instead, which is 50.
-
Show: Determine what will be displayed on the Resource Management sheet:

Decide whether to display Planned Time (from the Resource Planner) of Allocated Time (from the Work Planner) on the Resource Management sheet. If Allocated Time is displayed, select "Filter out allocated time beyond task completion date" to exclude any allocated time towards a Task after the Task's end date.
Select the "Actual Time" checkbox to include a column for each Resource's Actual Time. Also, you can select the "Show Variance Indicator" checkbox to apply variance colors to the Actual Time values based on their variance from the Allocated Time values. The cells will be colored in either green, yellow, or red based on how far the "Actual" value is from the "Allocated" value:
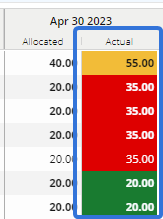
Note: Eclipse PPM administrators can set the thresholds for these colors by using the "Time Entry Variance Indicator Settings" spectrum while managing Organization Details.
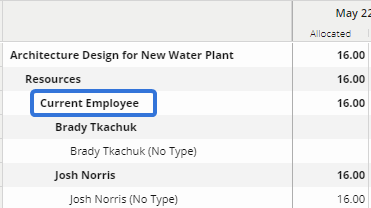
Finally, select "List resource rows by resource type" to organize the Resources by Resource Type on the Resource Management sheet.
-
Projects: Decide whether Project names will be displayed by themselves or with their Project Numbers.

-
Tasks: Decide whether Task names will be displayed by themselves or with their WBS.

-
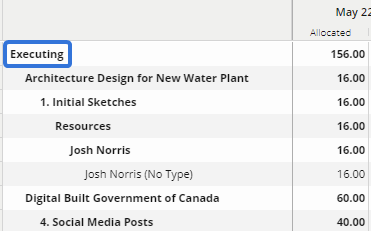
View Type: Decide whether to organize the Resource Management sheet by Projects or by Resources.

-
Group By - Projects: Decide how to group Projects on the Resource Management sheet.

For example, selecting "Status" will group all of the Projects by their status:
-
Group By - Resources: Decide how to group Resources on the Resource Management sheet.

For example, selecting "Status" will group all of the Resources by their status:
-
-
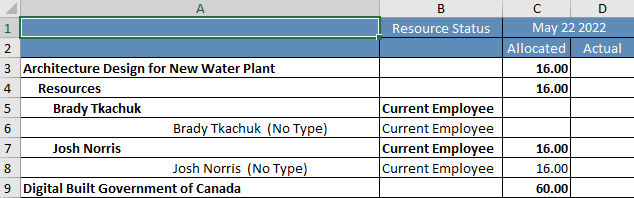
Columns: Add additional columns will display on the Resource Management sheet:

Select a category from the "Available Columns" drop-down menu to add new columns to the sheet. After selected a column, you can change the column's header name or width under "Selected Columns". After clicking the Save button, the column(s) will be added to the sheet:
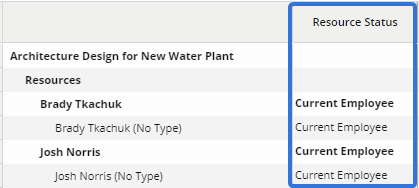
Note: Selected columns will also be applied to the Availability window below.
-
Export: Select this button to export the Resource Management sheet as an .xlsx file:
-
Refresh: Select this button to update the Resource Management sheet with any new Eclipse PPM data.
-
Enter in any Resource Types into the textbox to filter the Resources on the Resource Management sheet.
Viewing and Configuring the Availability Window
The Availability window keeps track of each Resource's remaining available time. It will let users know if a Resource has available time, is fully-booked, or over-booked during a given time period.
Note: Availability window columns can be added / removed using the Columns button while configuring the Resource Management window.
If the Availability window is not already open on the Resource Management page, you may have to select the "Availability" arrow button at the bottom of the screen:

Resources with green cells in the Availability window have remaining available time for the period:

Resources with yellow cells have limited remaining available hours:

Resources with red cells containing negative values are over-allocated for the period:

Note: Colors will only appear if "Show Heat Map" is selected from the (e) "Options" drop-down menu.
Note: Administrators can edit the Availability Heat Map settings while managing Environment Details.
The Availability window consists of the following settings:

Note: The Availability window mirrors a lot of the settings established in the Resource Management window.Units and periods must all be chosen from there.
-
Resources: Select Project Resources, Resource Plan Resources, Work Plan Resources, or a Resource filter from the drop-down menu:
Note: If the (c) "Sync to worksheet" checkbox is selected, this drop-down menu will reflect whatever is chosen from the Resource Management window.
-
Project Resources: Resources that have been added to the filtered Projects (b) will appear on the Availability window.
Note: Resources without any allocations will not appear on the Resource Management sheet, but they will still appear in the Resource Availability window.
-
Resource Plan Resources: Resources that have been added to the Resource Plans of the filtered Projects (b) will appear on the Availability window.
-
Work Plan Resources: Resources that have been added to the Work Plans of the filtered Projects (b) will appear on the Availability window.
-
Resource Filters: Select one of the Resource filters. The Resources that fit this filter will be displayed on the Availability window.
Note: These are the same Resource filters that can be found on the "Resources" Advanced Search page. Users can even create their own Resource filters to display a custom set of Resources in Resource Management.
-
-
Projects: Select a Project filter from the drop-down menu. The Projects that fit this filter will be displayed on the Resource Management sheet.
Note: These are the same Project filters that can be found on the "Projects" Advanced Search page. Users can even create their own Project filters to display a custom set of Projects in Resource Management.
Note: If the (c) "Sync to worksheet" checkbox is selected, this drop-down menu will reflect whatever is chosen from the Resource Management window.
-
Sync to worksheet: If this checkbox is selected, changes made to the "Projects" and "Resources" drop-down menus on the Resource Management window will automatically reflect in the Availability window.
-
Refresh: Select this button to update the Availability window with any new Eclipse PPM data.
-
Options: Configure options for the Availability window:
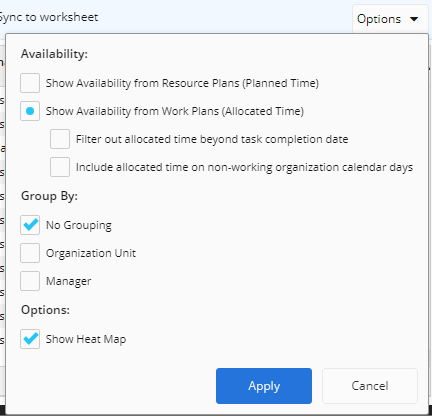
-
Availability: Decide whether to display available time according to the Resource Plans (planned time) or the Work Plans (allocated time):
If "Show availability from Work Plans (Allocated Time)" is chosen, users can select "Filter out allocated time beyond task completion date" to filter out and allocations on a Task that go beyond that Task's end date.
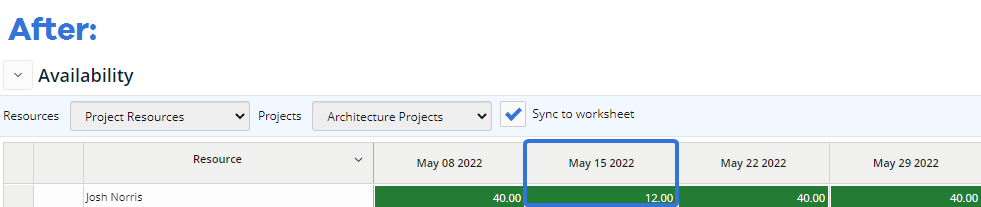
Users can also select "Include allocated time on non-working organization calendar days" to calculate availability by subtracting the total allocated hours (including those on the default Organization Calendar's non-working days) from the maximum availability (only on the default Organization Calendar's working days).
Example: Imagine you have selected the "Include allocated time on non-working organization calendar days" checkbox on the "Availability" tab. This changes how Josh's availability is calculated for the week he is working on the "Sketches" task. Now, the allocated hours that are subtracted from his maximum availability for the week will also include the hours allocated on the default Organization Calendar's non-working days, which is 20 hours. The maximum availability will still only include hours on working days, which is 32 hours. Therefore, Josh's new availability for the week is calculated by subtracting the 20 allocated hours from the 32 available hours, which is 12 hours:
-
Group By: Determine how the listed Resources will be grouped.
-
No Grouping: The Resources will not be grouped. They will be listed in alphabetical order.
-
Organization Unit: The Resources will be grouped by the Organization Units they belong to.
-
Manger: The Resources will be grouped by their Direct Managers.
-
-
Options: Decide whether or not to display the Heat Map (colors) on Resource availabilities.
Note: Administrators can edit the Availability Heat Map settings while managing Environment Details.
-