Working with the Inbox
To open the Inbox:
-
Select
 Text Messaging in the left pane, and then select Inbox.
The Text Message Inbox displays messages received from users within the last 30 days.

The Inbox is sorted by the Received Date column, starting with the most recent messages.
Tip: To sort the Inbox by date, select
 Ascending or
  Descending order to the right of the Received Date header.
 About the Inbox table
The Inbox table displays messages sent from subscribers to Mobile Commons within the last 30 days.
Column Description Phone Displays the mobile phone number, username, and email of the mobile user who sent the message, which links to their profile. If the username and email are unavailable, it displays "No Name" and "No Email." For more information, see Accessing user data.
Note: If the user name is unavailable, then the mobile phone number is displayed in the Phone column.
Type The type of message:
-
 Answer
 -
 Duplicate Opt-in
 -
 Help
Help -
 Info response
 -
 mConnect
 -
 mData
mData -
 Opt-in
 -
 Opt-out
 -
 Reply
Reply -
 Unknown
Message body The content of the message.
Tip: To see a long message, hover your cursor over the message body entry.
MMS Yes or No:
-
Yes indicates has the message was sent in MMS (multimedia message service) format, containing multimedia content, including images, animated gifs, and video.
-
No indicates that it was sent in SMS (short message service) text format.
Originator It displays the short code, 10DLC long code, or RCS agent used to send the message. Campaign A link to the campaign and a link to the message. Received Date The date and time when the message was received by Mobile Commons, plus a link to the message details. Actions The following actions are available for incoming messages:
-
Opt out profile unsubscribes the user from the campaign.To reactivate the profile after opting out, select Reactivate Profile.
-
Message this profile sends an individual message to the user.
-
Start chat initiates a pop-up chat directly with the user.
For more information, see Assisting users.
Filter options are located above the table. For more information, see Filtering Inbox messages.
If the table is longer than one page, use the page-navigation options on the lower-right to select the number of rows per page and to navigate to the
 next or
  previous page.To navigate directly to a specific page, select the page field, enter the page number, and then press ENTER.
 -
From the Inbox:
You can also assist users directly from the Inbox by chatting directly with the user, sending a reply to a user, and opting a subscriber out of a campaign. For more information, see Assisting users.
You can select Go to Outbox in the upper-right corner, to access outbound messages in the Outbox. For more information, see Working with the Outbox.
Searching the Inbox
You can search the messages in the Inbox by phone number.
To search the Inbox:
-
Select
Text Messaging in the left pane, and then select Inbox. -
Above the Inbox table, on the right, enter all or part of phone number and then select
 Search.
The Inbox table displays the matching messages.
Saving a search for later use
You can save a search for later use, for example, in an RSS feed. For more information, see Creating an RSS feed.
To save searches for later use:
-
Select
Text Messaging in the left pane, and then select Inbox. -
Above the Inbox table, on the right, enter all or part of a phone number and then select
Search.Check the search results to ensure that they are accurate and complete.
-
Above the Inbox table, select Actions and then select Save Search.
The Saved Searches & RSS Feeds page opens.
-
Select
 Edit at the bottom of the page.
The Editing form opens.
-
Specify the options for the saved search:
Saved Search option Description Name (recommended) Enter a descriptive name for the saved search or select a name from the drop-down list.
Note: Even though this name is available to internal users only, take the opportunity to assign a descriptive name that is meaningful to your organization.
Campaign (optional) You can choose to publish from all campaigns or to only publish from the active campaign you select from the drop-down menu.
Search term (optional) Change the search term or full search expression into the Search term box. Start time (optional) Set a start time to begin pulling messages from the Inbox. For example, if you have an event that starts at 8 am on 9/26/23, you can set the start time to coincide with the event start by entering the date and time in YYYY-MM-DD HH:MM:SS UTC format (2023-09-26 08:00:00 UTC).
Tip: Be sure to adjust the time from your time zone to UTC.
End time (optional) Set a stop time when you stop pulling new messages. For example, if you have an event that ends at 9 pm on 9/26/23, you can set the end time to just that by entering the date and time in YYYY-MM-DD HH:MM:SS UTC format (2023-09-26 21:00:00 UTC).
Tip: Be sure to adjust the time from your time zone to UTC.
Sort by Select a sort option from the drop-down list:
-
Newest first
-
Oldest first
-
Approval Time
-
-
In the Show Message Type(s) section, limit the type of messages to add to the search.
Note: If you leave this option blank, all of the message types will be included in the search results.
- Opt-in: opt-in message, the first step in double opt-in, in response to a CTA (Call to action) promotion.
-
Opt-out: opt-out message, canceling the user's subscription to a campaign.
-
Reply: message in response to a message from a campaign.
-
Info response: message providing information requested by a message from a campaign.
-
Help: request for information.
-
mConnect message in response to mConnect requests.
-
mData: message received in response to an mData.
-
Answer: message received in response to a multiple-choice question.
-
Duplicate opt-in: opt-in response received after the user has already opted in to a campaign.
-
Unknown: Mobile Commons is unable to determine which campaign the subscriber is responding to, or the message contains an invalid response to a multiple-choice question.
-
MMS: message sent via MMS, usually including images or other graphic media.
-
When you are done, select Update.
The updated Saved Searches & RSS Feeds page opens.
Working with a saved search
To work with a shared search:
-
Select
Text Messaging in the left pane, and then select Inbox. -
Above the Text Message Inbox table, select Actions and then select Saved Searches.
The Saved Search page opens.
-
Locate the saved search on the page, and then select
 Load this Search at the bottom of the page.
The Inbox displays the search results in the order you selected.
Creating an RSS feed
You can save incoming messages to your RSS reader.
To create an RSS feed:
-
Select
Text Messaging in the left pane, and then select Inbox. -
Select the search options to identify messages to add to your RSS feed, and then select Search.
Check the search results to ensure that they are accurate and complete.
-
Above the Inbox table, select Actions and then select Save Search.
The Saved Searches & RSS Feeds page opens.
-
Select
Edit at the bottom of the page. -
Make your changes to refine the search. For more information, see Saving a search for later use.
-
When you are done, select Update.
The updated Saved Searches & RSS Feeds page opens.
-
Select the
 RSS URL at the bottom of the page.
 -
Work with your RSS Reader to set up a feed using the URL for incoming messages.
Deleting a saved search
To remove a saved search from the Inbox:
-
Select
Text Messaging in the left pane, and then select Inbox. -
Above the Inbox table, select Actions and then select Saved Searches.
The Saved Search page opens.
-
Locate the saved search on the page, and then select
 Delete Search at the bottom of the page.
 -
Select OK to confirm.
The saved search is removed from the list.
Filtering Inbox messages
You can display all of the messages or narrow the list by one of the preset filters:
-
Select
Text Messaging in the left pane, and then select Inbox. -
Above the Inbox table, on the right, select
 Filter.
 -
Select Campaign and then select one or All campaigns from the drop-down list.
-
Select Message Type and then select one or more of the following checkboxes:
-
Opt-in: opt-in message, the first step in double opt-in, in response to a CTA (Call to action) promotion.
-
Opt-out: opt-out message, canceling the user's subscription to a campaign.
-
Reply: message in response to a message from a campaign.
-
Info response: message providing information requested by a message from a campaign.
-
Help: request for information
-
mConnect: message in response to mConnect requests.
-
mData: message received in response to an mData.
-
Answer: message received in response to a multiple-choice question.
-
Duplicate opt-in: opt-in response received after the user has already opted in to a campaign.
-
Unknown: Mobile Commons is unable to determine which campaign the subscriber is responding to, or the message contains an invalid response to a multiple-choice question.
-
MMS: message sent via MMS, usually including images or other graphic media.
-
-
Select Date Range then specify a date/time range:
-
Select the From field, and then select a date and time from the calendar selector. The search results will contain results received after this date/time.
-
Select the To field, and enter a date and time from the calendar selector. The search results will contain results received before this date/time.
-
-
When you are done, select Apply.
Tip: To save your filters for later use, select ![]() Filter and then select Save Search at the top of the Inbox.
Filter and then select Save Search at the top of the Inbox.
Opting out profiles in bulk
-
Select
 Text Messaging in the left pane, and then select Inbox.
 -
Select the checkbox in the "Profile" column header to opt out all profiles or use the checkbox next to each profile to opt out individually.
-
Above the Inbox table, on the right, select
 Opt out to opt out the selected profiles.
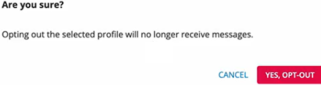
Note: The
Opt-Out icon becomes active when at least one profile is selected.A confirmation message appears to confirm opting out the selected profiles.
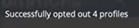
Once confirmed, a flash message appears on the Inbox page, confirming the exact number of profiles that have been successfully opted out.
Opted-out profiles will no longer have a checkbox for selection. To reactivate a profile, select Reactivate Profile from the profile action menu.

Exporting messaging records
To save selected messages in a CSV (comma-separated values) file:
-
Select
Text Messaging in the left pane, and then select Inbox. -
(Optional) Arrange the Inbox table to display the messages to export. For more information, see Searching the Inbox and Filtering Inbox messages.
-
Above the Inbox table, select Actions and then select Save as CSV.
The contents of the Inbox, filtered or all data, plus the subscriber's profile data, are saved in a CSV file containing the following columns:
Column Description phone_number The user's mobile phone number. direction Incoming: The message was sent from the user from Mobile Commons. when The date and time when the message was sent by the user. body The content of the message. message_type The message type:
-
opt_in
-
opt_out
-
reactivation
-
opt_in_declination
-
ftaf_response
-
ftaf_opt_in_confirmation
-
reply
-
info_response
-
help_request
-
mconnect
-
mdata_query
-
question_response
-
invalid_question_reponse
-
duplicate_opt_in
sms_parts The number of parts to the message. If a message is longer than the 160 character limit, it is broken into parts that are reassembled upon delivery.
This column is not applicable when exporting RCS messages.
status A description of the status of the message. originator The shortcode on which the message was sent (applies to messages other than RCS). For RCS messages, it shows the agent's name. id The identifier for the user. message_id The identifier for the message. campaign_name The name of the campaign. For more information on the profile fields, see Exporting profile records.
-
-
To download the CSV file, select
 Home in the left pane, and then select Reports.
 -
Locate the CSV file in the Exports table, select the link in the Name column, and then open the downloaded file.
Exporting MMS image files
If your campaigns include MMS messages, you can export the attached image files.
-
Select
Text Messaging in the left pane, and then select Inbox. -
Above the Inbox table, on the right, select
Filter. -
Select Campaign and then select one or All campaigns from the drop-down list.
-
Select Message Type and then select the MMS checkbox.
-
(Optional) Select Date Range then specify a From/To date/time range.
-
When you are done, select Apply.
Only those text messages sent as MMS (Multimedia Messaging Service) display in the Inbox. MMS messages contain multimedia content such as images, animated gifs, and video.
-
To export MMS image files individually, select Actions above the Inbox table and then select MMS Export.
The contents of the Inbox, filtered or all data, plus the subscriber's profile data, are downloaded in a compressed (ZIP) file.
Tip: If you see a message, select the file link to open the downloaded file.