Install and modify OLRP clients
Note: Before installing and configuring OLRP clients, you must create an API Key or keys that the clients can use to send jobs to the server. See Manage accounts for instructions about creating API keys.
-
Download and double-click the MSI file to start the installation.
-
Review the End User License Agreement and Limited Warranty. You must accept the terms to continue.
-
The default installation type is Configure manually or from local file. Settings are automatically read from
OLRPClient.ini, if it is present and located in the same folder as the installer. If previous versions or theOLRPClient.inifile are present, the installer may display warning messages for the following situations:-
If you are upgrading from a previous version, including OL Connect Send, the installer removes the previous installation as part of the setup process.
-
If you are upgrading from a previous version, and using an
OLRPClient.inifile with multiple printers configured, all printers are upgraded. To upgrade only specific printers, or change settings for specific printers, Cancel the installation, modify theOLRPClient.inifile to remove printers or change settings, and run the installation again. -
If this is a new installation, and you are using an
OLRPClient.inifile with multiple printers configured, all printers are installed. To install only specific printers, or change settings for specific printers, Cancel the installation, modify theOLRPClient.inifile to remove printers or change settings, and run the installation again. -
The steps below are for a manual configuration. If using the
OLRPClient.inifile, some or all of the values are populated from that file. For more information about preparing anOLRPClient.inifile and mass installation, see Install and modify the OLRP Client for silent or mass installations.
-
-
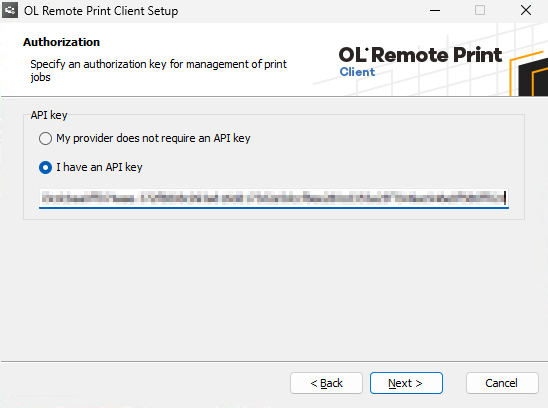
Select I have an API key and provide the key you created when you created the printing account in OLRP Server. You can view and copy the key value in the Key management tab of the OLRP Management console. Copy the value in the Key column, not the value in the Key ID column. A copy icon is available to easily copy the value. It is possible to not use an API key, but this is not recommended.
-
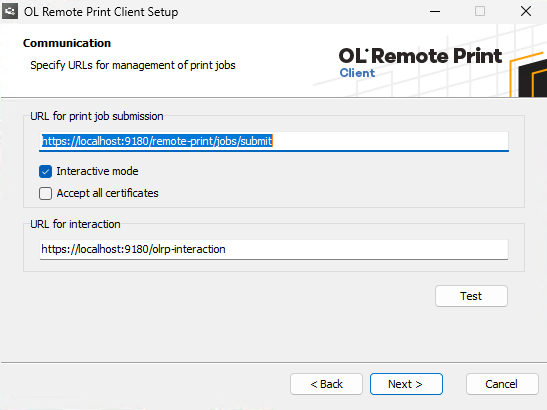
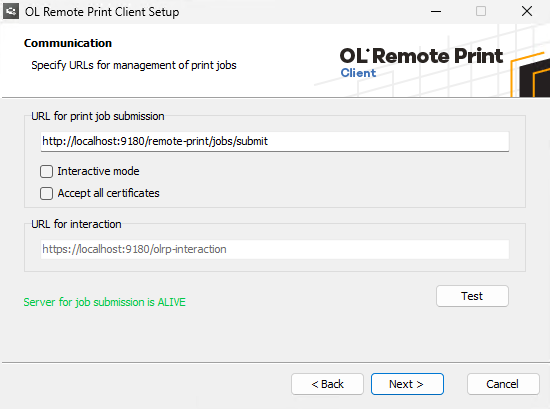
Set the URLs, and ports if applicable, for submitting jobs and for receiving interactive information about the jobs:
-
The job submission URL must point to the /remote-print/jobs/submit endpoint on the OLRP server, for example, https://127.0.0.1:9180/remote-print/jobs/submit.
-
The interaction URL is not handled by the OLRP server itself and must instead point to a different server that will provide a response to the client when that client sends a job.
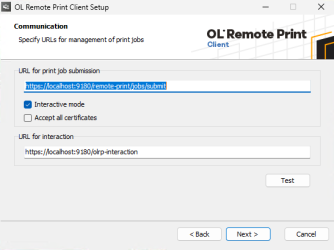
-
-
Test the URLs. The URLs default to https connections, but secure connections require certificates on the OLRP server for print job submission, and the interaction server. The server must be running, and http connections enabled, for communication with the OLRP Client to work. Different error messages advise you if the server is down, or the server is operating but the URL is not found. The response message is green when the connection is valid. The screenshot below is for an OLRP Server that does not use a certificate, and an installation that does not have interaction with print jobs.

-
Set a name for the printer. The name should be representative of the process that the client triggers, for example,
OLRP-InvoicesorOLRP-Marketing. The name is mandatory, cannot be an existing printer, and cannot contain a space, comma, or backslash. The default printer name will have#nappended if an existing printer is found with the default printer name. -
Select the desired logging level. The options are:
-
DEBUG
-
INFO
-
WARN (default)
-
ERROR
-
-
Complete the installation. It may be necessary to allow networks to access the application.
-
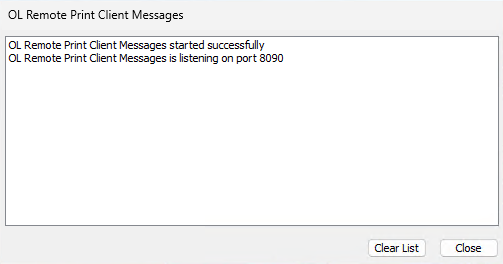
A message from the OLRP Client Notifier confirms installation, and an icon for the notifier appears in the system tray. See OLRP Client Notifier for more information about the notifier.
-
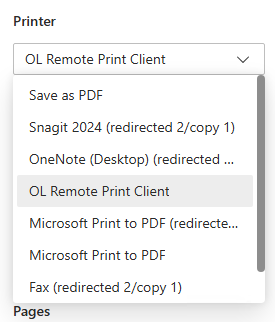
Once the OLRP Client is installed on a computer, the printer can be selected in the list of printers for that computer.

For more information about logging, see View log files.

Note: If the Submission URL, Interaction URL, or Printer Name fail to pass the validation checks, this does not stop the Port Monitor, Port, and Printer Client from being installed. The user will find that one (or more) of their printers are not setup on the machine, and the installation log will contain an entry stating why the printer(s) failed to install.
Add another printer
-
Go to Windows Add or remove programs, locate OLRP Client, and select Modify.
-
On the Program Maintenance window, Select Add printer.
-
Continue following from Step 3 of the installation process above.
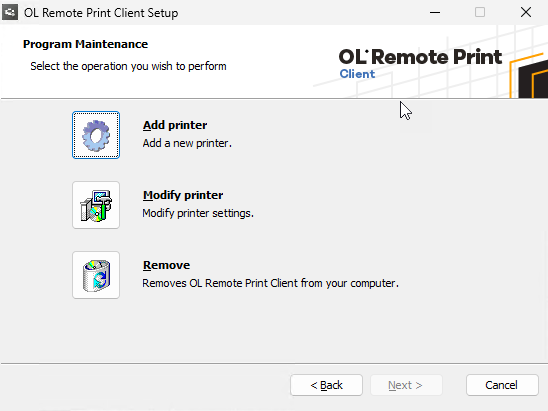
Modify an installed printer
-
Go to Windows Add or remove programs, locate OLRP Client, and select Modify.
-
On the Program Maintenance window, Select Modify Printer.
-
Select the printer to modify from the list of installed printers.
-
Continue following from Step 4 of the installation process above. You cannot change the name of an installed printer.
Remove an installed printer
-
Go to Windows Add or remove programs, locate OLRP Client, and select Modify.
-
On the Program Maintenance window, Select Remove.
-
Click Remove all, or click Select printer and select the printer to remove from the list of installed printers.