View Gate Information on the Summary Page
The gate panels at the top of the Summary page display information on the selected gate. To see gate information, users simply need to select Show more directly below the panels:

Note: Users can select previously advanced / skipped gates (without reactivating them) in order to view their details. However, future gates cannot be selected.
The panels feature three tabs:

Conditions
This tab displays two columns. The first is the "Conditions" column, which lists each of the Pre-Advance Conditions that have been associated to the gate by an administrator. These Conditions need to be satisfied in order to request a gate advance approval (unless the gate is skipped).
Note: Depending on your Project role and the phase advance settings, you may see a button to advance a gate when conditions have been met and the gate has not yet been approved or does not require approval. See Gate Advance Configuration for information on how phase advancement settings are configured by administrators.
The listed Conditions on the gate panel contain hyperlinks that bring the user directly to a page that allows them to resolve them.
Example: Imagine the current gate has a Pre-Advance Condition that requires there be no open Risks on the gate. The listed Condition now contains an arrow icon that serves as a hyperlink:
Selecting this arrow will bring the user directly to the Risks page. From here, the Risks can be closed.
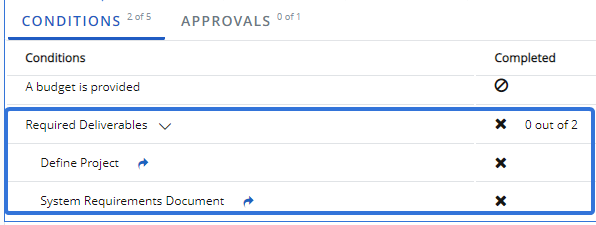
If the gate has any required Deliverables associated with it, a "Required Deliverables" drop-down menu will appear as an additional Condition under the column:

When expanded, the drop-down menu will display each of the required Deliverables (as pictured above).
The second column displayed on the Conditions tab is the "Completed" column, which indicates whether the listed Condition has been completed or not. There are three indicator icons that can be displayed:
 : The Condition has been fulfilled.
 : The Condition has not yet been fulfilled.
 : The Condition does not apply to the gate or Project so it does not need to be fulfilled. For example, a Condition that requires a budget to be provided will not be applicable on a Project with "Control Cost" set to "No".
Actions
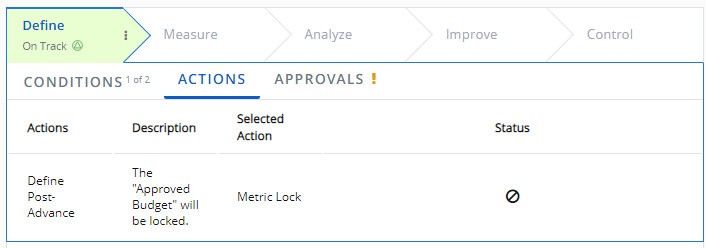
PowerSteering administrators can add Post-Advance Actions to gates. These actions will take place after the gate is advanced.
The gate's Post-Advance Actions can be seen under the "Actions" tab:

The "Status" column displays an icon that reflects one of the following statuses:
 : The action has not been applied yet.
Actions on current gates will always display this symbol because the gate will not have been advanced yet.
 : The action was not successfully applied after the gate was advanced.
 : The action was successfully applied after gate advance.
Tip: Users can click directly on the icon to view more details. This is especially useful when actions fail to apply ( )because it allows users to see the reason(s) behind the failure:
Tip: This feature should be used in conjunction with the gate advance banner. For example, the banner might claim that certain actions failed to be applied after a gate advance:
When this occurs, simply select the previous gate and open the "Actions" tab to view details on the failures:
Click thumbnail to play.
Approvals
This tab lists all of the gate's approvers and their approval action on the gate

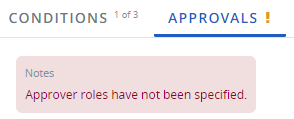
If approver roles have not yet been specified, the tab will display an exclamation mark icon next to it. Once the tab is selected, it will notify the user that the gate requires approval roles to be set:

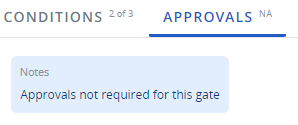
If approvals are not required for the gate, the tab will display "N/A" next to it. Once the tab is selected, it will notify the user the gate does not require any approvals:

Note: See Assign Approval Roles for more information.