Add a New Work Generation Template
Work Generation gives a user the ability to transform objects or templates into different objects or templates. It can also be used to copy one object or template to several locations at once.
Before users can use Work Generation, administrators need to create a Work Generation Template. This will determine how the source item will transform into a new work item.
Note:
To create a new Work Generation template:
Before You Start: Only PowerSteering administrators and users with the
-
Select Admin → Templates → Work Generation from the Navigation Menu:
Click to enlarge.
-
Click the Add New button:

-
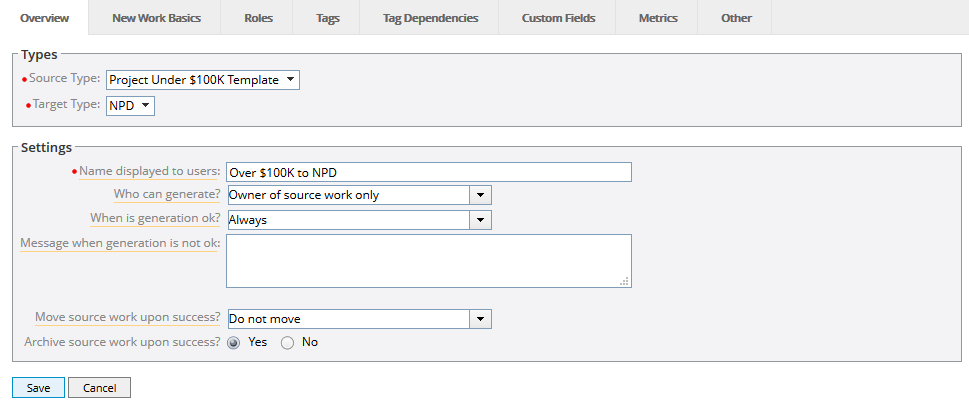
Enter information into the "Overview" tab:

Source Type: The object type or template that is the source of the work generation template (what the object is before Work Generation).
Target Type: The object type or template that is the target of the work generation template (what the object will become after Work Generation).
Name displayed to users: The name displayed in the Work Generation menu.
Tip: Work can have more than one Work Generation option, so make your name as descriptive as possible.
Who can generate?: Defines which users will be able to use the Work Generation:
- Anyone: Any user can use the Work Generation.
- Owner of source work only: Only the owner of the source work can use the Work Generation.
- Administrators only: Only Administrators can use the Work Generation.
- No one: No one is able to use the Work Generation. This is a way to retire the Work Generation template without deleting it.
- Custom...: Allows you to use the Formula Builder to define which users can generate work using the template such as a specific group of people or a someone in a specific role. See The Formula Builder for more information on how to use the Formula Builder.
When is generation ok?: Defines when permitted users are able to use the Work Generation.
- When source work is completed/approved: Work can be generated once the source work is completed and/or approved.
- Always: Work can always be generated.
- Never: Work can never be generated. This is another way to retire the Work Generation template without deleting it.
- Custom...: Allows you to use the Formula Builder to define when work can be generated. For example, maybe you are using a DMAIC process and don't allow Work Generation after the Measure phase is completed. See The Formula Builder for more information on how to use the Formula Builder.
Message when generation is not ok: When work generation is not ok, the menu item is disabled. When users hover over the menu item, the text you enter in this field will be displayed.
Move source work upon success?: Defines whether the source work is automatically moved to a particular location in the Work Tree after a successful work generation.
- Do not move: Source work will remain in its current location after a successful work generation.
- Custom...: Allows you to use the Formula Builder to define a location in the Work Tree where source work will be automatically be moved after a successful work generation. See The Formula Builder for more information on how to use the Formula Builder.
Archive source work upon success?: Defines whether the source work is automatically archived after a successful work generation.
-
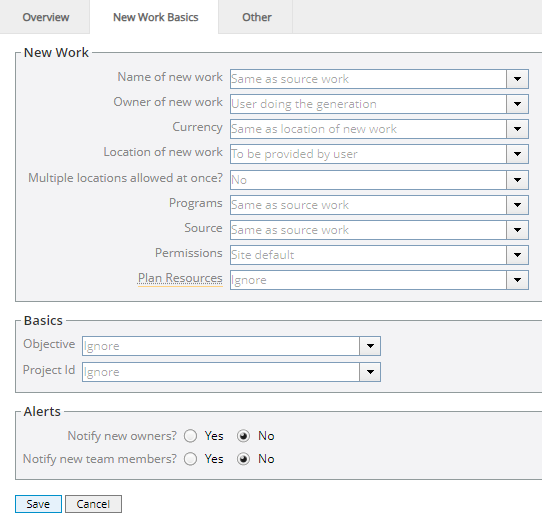
Enter information into the "New Work Basics" tab:

Name of new work: Defines how the target work will be named:
- Same as source work: The target work will be named the same as the source work.
- To be provided by user: The user generating the work will be prompted to enter a new name for the target work.
- Custom...: Allows you to use the Formula Builder to define how the target work will be defined. See The Formula Builder for more information on how to use the Formula Builder.
Owner of new work: Defines the owner of the target work.
- User doing the generation: The user generating the work will become the owner of the target work.
- Same as source work: The target work will have the same owner as the source work.
- Same as location of new work: The target work's owner will be the same as the owner of its location in the Work Tree.
- To be provided by user: The user generating the work will be prompted to identify the owner of the target work.
- Custom...: Allows you to use the Formula Builder to define the owner of the target work. See The Formula Builder for more information on how to use the Formula Builder.
Currency: Defines what currency the target work will use.
- Same as source work: The target work will use the same currency as the source work.
- Same as location of new work: The target work's currency will be the same as the currency used for its location in the Work Tree.
- Site default: The target work will use the site default currency (see Add an Exchange Rate Table).
Location of new work: Defines where the target work will be located in the Work Tree.
- To be provided by user: The user generating the work will be prompted for the location of the target work in the Work Tree.
- Same as source work: The target work will be located in the same place as the source work.
- Custom...: Allows you to use the Formula Builder to define where the target work will be located in the work tree. See The Formula Builder for more information on how to use the Formula Builder.
Multiple locations allowed at once?: Defines whether the target work can exist in multiple Work Tree locations at one time.
- No: Target work cannot exist in multiple Work Tree locations at one time.
- Yes: Target work can exist in multiple Work Tree locations at one time.
- Administrators only: Only Administrators can generate target work to multiple Work Tree locations at one time.
- Custom...: Allows you to use the Formula Builder to define when target work can exist in multiple Work Tree locations at one time. See The Formula Builder for more information on how to use the Formula Builder.
Programs:Defines which Program(s) the target work will belong to:
- Same as source work: The target work will automatically inherit the Program(s) of the source work.
- To be provided by user: The user who triggers a Work Generation using the template can decide which Program(s) the target work will belong to.
-
Ignore: Target work will not inherit any Program(s). Instead, the "Program" field on the target work's Summary page will remain empty until edited:

Source: Defines whether or not the source work will be displayed on the target work's Summary page:
-
To be provided by user: The user who triggers a Work Generation using the template must decide whether or not to include the source work on the Summary Page of the newly created work.
-
Same as source work: The source work will be displayed on the Summary page of the target work.
-
Ignore: The source work will not be displayed on the Summary page of the target work.
Permissions: Defines how the new Work Item will inherit its permissions:
- Copy permissions from source work: The existing permissions from the source work will automatically be copied to the new target work.
-
Site default: The permissions of the new Work Item will match those that are defined for the target object type. For example, if the Work Generation was being used to create a Project, the new Work Item would have the default "Project" permissions attached to it.
Plan Resources: Determine how Resource data in Project Central will be carried from the source work to the target work.
-
Copy and Replace all resources from source to target: Any Resources that have been planned through Project Central on the source work will appear on the target work. The source work's Resources will replace any Resources that have been planned on the work template of the target work.
Example: Imagine that Josiane has been assigned as a Developer for the source work:

Also, Jack has been assigned as a Contributor on the template of the target work:
After Work Generation, the Resource plans from the source work will totally replace the plans from the template. This means Jack will not be assigned as a Contributor on the target work, but Josiane will be assigned as a Developer:
-
Merge resources from source to target: Any Resources that have been planned through Project Central on the source work will appear on the target work. Any Resources that have been planned on the work template of the target work will be included as well.
Example: Imagine that Josiane has been assigned as a Developer for the source work:

Also, Jack has been assigned as a Contributor on the template of the target work:
After Work Generation, the Resource plans from the source work will merge with the plans from the template. This means both Jack and Josiane will be assigned to the new work in their respective Roles:
-
Ignore: None of the Resource plans from the source work will be copied onto the new work. Only Resource plans from the template of the target work will be included.
Run Scheduler on Generation: Selecting this checkbox will automatically run the scheduler upon saving the new Work Generation.
Note: If the "Run Scheduler on Generation" checkbox is not visible on the New Work Basics tab, contact PowerSteering Application Support to enable this function. Please note that Application Support is only available to administrators.
Objective: Defines how the objective is handled.
Note: The "Objective" field must be enabled by PowerSteering before it can be visible on your site.
- Ignore: The objective will not be copied over to the target work.
- Same as source work: The target work will have the same objective as the source work.
- Custom: Allows you to use the Formula Builder to define how the objective will be handled. See The Formula Builder for more information on how to use the Formula Builder.
Project Id: Defines how the Project Id is to be handled.
Note: The Project Id field must be enabled by PowerSteering before it can be visible on your site.
- Ignore: The Project Id will not be copied over to the target work.
- Move: The Project ID is moved from the source work to the target work.
- Custom: Allows you to use the Formula Builder to define how the Project Id will be handled. See The Formula Builder for more information on how to use the Formula Builder.
Notify new owners?: Defines whether owners of target work receive an alert in their PowerSteering Inbox when work is generated. New owners will receive email and PowerSteering Inbox notifications after work generation regardless of this setting.
Notify new team members?: Defines whether team members of target work receive an alert in their PowerSteering Inbox when work is generated. Users that have been assigned to work will receive email and PowerSteering Inbox notifications after Work Generation regardless of this setting.
-
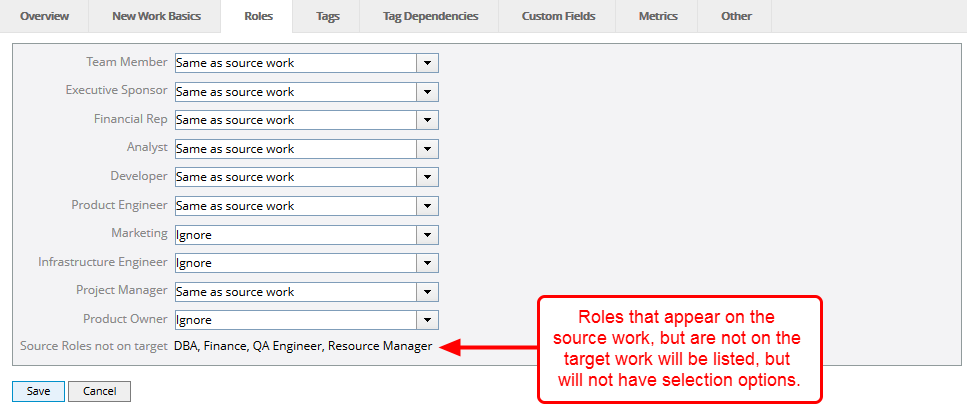
Enter information into the "Roles" tab:

Note: The Roles that appear on this tab are the Roles that have been associated to the target work type by a PowerSteering administrator.
Each associated Role has four options for handling Role assignments on the target work:
- Ignore: The user(s) assigned to the Role(s) will be applied as if the work was created new: either empty or by the value in the template.
- Same as source work: The user(s) assigned to the Role(s) on the source work will be copied over to the target work.
- Same as location of new work: The user(s) assigned to the Role(s) on the target work's parent work item will be copied over to the target work. If the Role does not exist on the parent work, this Role will be blank on the new work.
- Custom: Allows you to use the Formula Builder to define how the user(s) assigned to the Role should be handled. See The Formula Builder for more information on how to use the Formula Builder.
-
Enter information into the "Tags" tab:

Note: The Tags that appear on this tab are the Tags that have been associated with the target work type by a PowerSteering administrator.
Each associated Tag has four options for handling Tag values on the target work:
- Ignore: The Tag value will be applied as if the work was created new: either empty or the value in the template.
- Same as source work: The Tag value on the source work will be copied over to the target work.
- Same as location of new work: The Tag value on the target work's parent work item will be copied over to the target work.
- To be provided by user: The user generating the work will be prompted to enter the Tag values to be set for the target work.
- Custom: Allows you to use the Formula Builder to define how the Tag values should be handled. See The Formula Builder for more information on how to use the Formula Builder.
Note: Visibility rules apply to the Tag's appearance. For more information, see Edit Visibility of Tag or Custom Field.
-
Enter information into the "Tag Dependencies" tab:

Note: The Tag Dependencies that appear on this tab are the dependencies that have been associated with the target work type by a PowerSteering administrator.
Each associated Tag Dependency has four options for handling tag values on the target work:
- Ignore: The Tag value that would occur if the work was created new: either empty or the value in the template.
- Same as source work: The Tag value on the source work will be copied over to the target work.
- Same as location of new work: The Tag value on the target work's parent work item will be copied over to the target work.
- To be provided by user: The user generating the work will be prompted to enter the Tag Dependency values to be set for the target work.
- Custom: Allows you to use the Formula Builder to define the Tag Dependency value. See The Formula Builder for more information on how to use the Formula Builder.
Note: Visibility rules apply to the Tag's appearance. For more information, see Edit Visibility of Tag or Custom Field.
-
Enter Information into the "Custom Fields" tab:

Note: The Custom Fields that appear on this tab are the Custom Fields that have been associated with the target work type by a PowerSteering administrator.
Each associated Custom Field has four options for handling tag values on the target work:
-
Ignore: The Custom Field value that would occur if the work was created new: either empty or the value in the template.
- Same as source work: The Custom Field value on the source work will be copied over to the target work.
- Same as location of new work: The Custom Field value on the target work's parent work item will be copied over to the target work.
- To be provided by user: The user generating the work will be prompted to enter the Custom Fields to be set for the target work.
Note: Visibility rules apply to the Custom Field's appearance. For more information, see Edit Visibility of Tag or Custom Field.
- Custom: Allows you to use the Formula Builder to define the Custom Field value. See The Formula Builder for more information on how to use the Formula Builder.
-
-
Enter information into the "Metrics" tab:

Note: For Work Templates, the Metrics available on this tab are the Metrics attached to both the source and the target work template's root work. For basic work types, the Metrics available on this tab are the Metrics that are auto-associated with both the source and target works.
Note: Keep in mind that different exchange rates might affect how Metric values appear on the target work.
Each associated Metric Template ("Probability of Success" and "Financials" in the image above) has four options for handling how Metrics will appear on the target work:
- Ignore: None of the Metric values or locks from the source work will be copied over to the target work. If the target work is a template, it will inherit the Metric settings that are applied to the template itself.
- Populate everything: All data and line items for the Metric on the source work will be copied over to the target work. In addition, the line items selected on the source Metric will display on the new Metric (all hidden lines are available, if needed).
- Populate everything, keep metrics locked: All data and line items for the Metric on the source work will be copied over to the target work and all Metric views that are locked on the source work will remain locked on the target work. In addition, the line items selected on the source Metric will display on the new metric (all hidden lines are available, if needed).
Advanced: For each Metric view that appears, ignore the Metric or copy data from a Metric view on the source work over to a specific view on the target work.

In this example, numeric data from the "Initial Estimate" view of the source work will be copied onto the "Approved Budget" view of the target work.
The "Advanced" selection is currently not functioning correctly in PowerSteering. Metric data does not correctly copy from the indicated Metric view of the source work to the indicated Metric view of the target work. In the image above, data from the "Initial Estimate" view of the source work is expected to be copied onto the "Approved Budget" view of the target work. Unfortunately, data will not switch from one view to another after Work Generation takes place.
Keep metrics locked: If selected, the Metric view on the target work will retain any locks from the view on the source work.
Note: This does not include locks on Metric Custom Fields or Tags.
All lines: Data from all lines on the indicated Metric view of the source work will be copied onto the indicated Metric view of the target work.
Specific lines: Only data from specific lines will be copied from the Metric view of the source work to the Metric view of the target work. Use the checkboxes that appear to determine which line items will be copied to the target work.
-
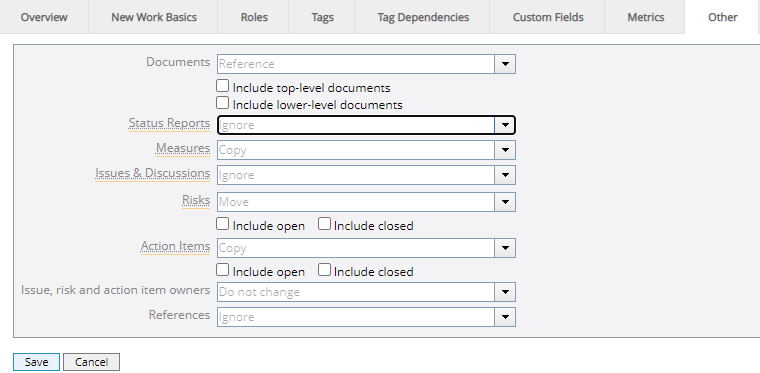
Enter information into the "Other" tab:

Documents: Defines what should happen to documents that exist on the source work.
- Ignore: Nothing happens to the documents that exist on the source work.
- Reference: Documents remain on the source work and a reference link is added to the target work.
- Move: Documents are moved from the source work to the target work.
- Copy: Documents remain on the source work and copies are added to the target work.
Include top-level documents: Determines whether documents associated with the root work of the source work should be referenced or not.
Include lower-level documents: Determines whether documents associated with all non-root work of the source work should be referenced or not.
Note: When converting gated work to basic, non-gated work, empty document placeholders and any other non-document work deliverables on the source work will not be transferred to the target work.
Status Reports: Defines what should happen to status reports from the source work.
- Ignore: Nothing happens to the status reports that exist on the source work.
- Move: Status reports are moved from the source work to the target work.
Measures: Defines what should happen to measures on the source work.
- Ignore: Nothing happens to the measures that are attached to the source work.
- Move: Measures are moved from the source work to the target work.
- Copy: Measures remain on the source work and copies are added to the target work.
Issues & Discussions: Defines what should happen to issues and discussions on the source work.
- Ignore: Nothing happens to the issues and discussions that exist on the source work.
- Move: Issues and discussions are moved from the source work to the target work.
Risks: Defines what should happen to risks on the source work.
- Ignore: Nothing happens to the risks that exist on the source work.
- Move: Risks are moved from the source work to the target work.
- Copy: Risks remain on the source work and copies are added to the target work.
Include open: Select this check box to move or copy risks that are open.
Include closed: Select this check box to move or copy risks that have been closed.
Action Items: Defines what should happen to action items on the source work.
- Ignore: Nothing happens to the action items that exist on the source work.
- Move: Action Items are moved from the source work to the target work.
- Copy: Action Items remain on the source work and copies are added to the target work.
Note: The Copy and Move actions will not include any Workflow action items from the source work.
Include open: Select this check box to move or copy action items that are open.
Include closed: Select this check box to move or copy action items that have been closed.
Issue, risk and action item owners: Determines the ownership of issues, risks, and actions items that are brought over from the source work.
- Do not change: Issues, risks, and action items brought over to the new work will have the same owner as they did on the source work.
- Set to owner of new work: Issues, risks, and action items brought over to the new work will have the same owner as the target work.
References: Defines what should happen to references on the source work.
- Ignore: Nothing happens to the references that exist on the source work.
- Copy: References remain on the source work and copies are added to the target work.
-
Click the Save button.
After clicking Save, your new Work Generation Template will be complete. It can be used on any work type that matches the source work, provided that the "Who can generate?" and "When is generation ok?" fields from the "Overview" tab allow it.
