Business units can be defined as a way of classifying large organizations into smaller units that are related to one another.
This article details how to setup a Business Unit.
- From the Icon Bar click Setup
 .
. - From the Navigation Menu click Organization.
- From the available options select Business Units.
- Upon the Business Units list page displaying, click the Create Business Unit button; this brings up the Business Unit Edit page.
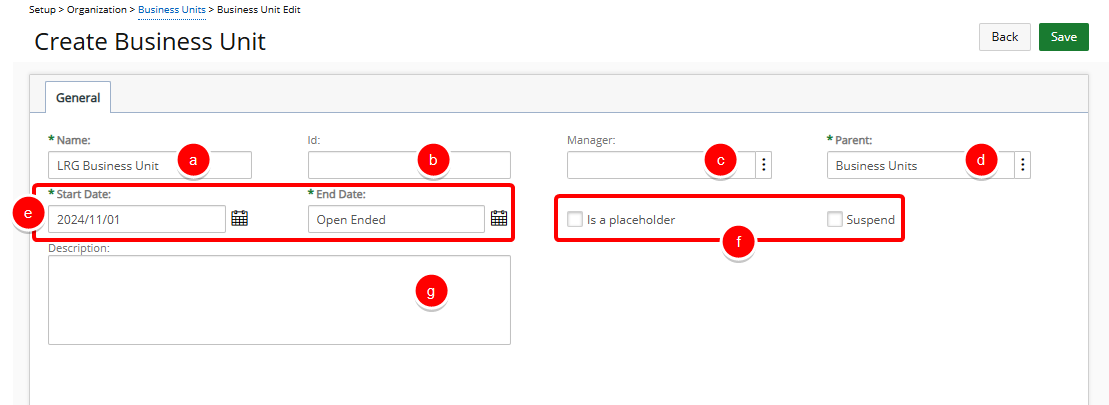
- Enter or select required information:
- Name*: Enter a Name for the Business Unit.
- Id: If there is an ID, enter it in the Id box.
- Parent*: Click the browse button to select and designate, from the Business Units list page, under which Parent the business unit is to be displayed.
- Manager: Click the Browse button to select a user from the User List page.
- Start Date* / End Date*: Select a Start date and End date for the business unit.
- Is a placeholder/Suspend: If the business unit is a placeholder, or needs to be suspended, select the appropriate Is a Placeholder or Suspend boxes.
- Description: If there is a description for the business unit, enter it in the Description box.
- Click Save to apply your changes.
Note: Upon saving the Business Unit the following tabs are then available
- Attachments: for further details refer to Attach Documents & Links.
- Integration: Each OBS or WBS element linked to any of the integrated software packages has this button on its Edit page. To set up a link between a business unit and other integrated software, use the Integration button. This opens the Integration page. The fields located on this page contain the unique identifier from each package. They are populated when the import is complete.
- Click the Back button to return to the Business Units list page, where you can see your newly created Business Unit listed.