PSA – QuickBooks Online Integration
This article describes the procedures for setting up the integration between QuickBooks Online and PSA, as well as exporting Payable Batches, Invoices, and Invoice Batches from PSA.
Note: PSA – QuickBooks Online integration does not support a multi-company feature; as a result, all objects included in the Payable Batch, as well as the Invoice and Invoice Batches are automatically associated to the default Company.
PSA Technical Support is a team of Application Support Analysts trained to use, configure, and troubleshoot PSA in your specific enterprise environment.
If you have any questions, you can reach us by sending us an email.
The PSA Software license agreement was reviewed and accepted during the installation procedure of this software in your environment. ©2026 Upland Software, Inc. All rights reserved. You may not photocopy or share this document with any other party without express written permission from Upland Software Inc..
Table of Contents:
- Supported QuickBooks Online versions
- Object Mapping
- Setting Up the Integration
- Prerequisites
- Setting Up the Connection
- Enable Export Summarized Transactions to QuickBooks Online
- Importing Objects to PSA
- Mapping Objects Between PSA and QuickBooks Online
- Mapping Objects at the Global Level
- Mapping Entries at the Object Level
- Setting Up Purchase Taxes (Exporting Expense Reports to QuickBooks)
- Setting Up Sales Taxes (Exporting Invoices to QuickBooks)
- Exporting Objects to QuickBooks Online
- PSA Key Exporting Features
Supported QuickBooks Online versions
The following lists the QuickBooks Online versions that are currently supported by PSA.
- QuickBooks Online Essentials and Plus (US, Canada)
- QuickBooks Online Advanced
Object Mapping
The following objects are mapped between QuickBooks Online and PSA:
| QuickBooks Online Object | Maps to PSA Object | Direction |
|---|---|---|
| Taxes | Tax Groups and Tax Details | Import into PSA |
| Customers | Clients | Bi-Directional |
| Chart of Accounts | Chart of Accounts | Import into PSA |
| Products and Services (Income) | Work Types | Bi-Directional |
| Products and Services (Expenses) | Expenses | Bi-Directional |
| Products and Services (Other Expenses) | Charges | Bi-Directional |
| Employees | Users | Bi-Directional |
| Vendors | Users | Export into QuickBooks Online |
| Class | Class | Import into PSA Database tables only |
Invoicing
Invoices are used within PSA to prepare a summary of entries that can be billed to a given Client.
Invoices follow an approval process based on the Workflow designed by the system administrator. Once the Invoice has reached a point where it is considered approved, the Invoice can then be exported into QuickBooks Online, containing details of Accounts Receivable and Revenue transactions as well as populating an Invoice within QuickBooks Online.
The following objects need to be mapped to QuickBooks Online to utilize the Invoicing integration:
- Employees as Users: Import/Export Employees as Users for whom you are invoicing their billable entries.
- Chart of Accounts: Import the Chart of Accounts from QuickBooks Online.
- Customers as Clients: Import/Export Customers as Clients whom you are invoicing.
- Products and Services (Income) as Work Types: Import/Export Products and Services (Income) as Work Types to track billable entries.
- Products and Services (Expenses) as Expenses: Import/Export Products and Services (Expenses) items as Expenses if you are invoicing Expenses.
- Products and Services (Other Expense) as Charges: Import/ExportProducts and Services (Other Expense) items as Charges if you are invoicing additional entries.
Payables
Payable Batches are used within PSA to prepare a summary of entries that can be reimbursed to a given User. Payable Batches can be exported into QuickBooks Online and contain details of Accounts Payable and Cost transactions as well as populating a Bill within QuickBooks Online.
The following objects need to be mapped to QuickBooks Online to utilize the Payable Batch integration:
- Vendors as Users: Export Users as Vendors for individuals who are reimbursed for Expenses.
- Chart of Accounts: Import the Chart of Accounts from QuickBooks Online.
- Products and Services (Income) as Work Types: Import/Export Products and Services (Income) as Work Types to track reimbursable entries.
- Products and Services (Expenses) as Expenses: Import/Export Products and Services (Expenses) items as Expenses to create Expense Entries to reimburse.
- Products and Services (Other Expense) as Charges: Import/Export Products and Services (Other Expense) items as Charges if you are reimbursing additional entries.
Customer – Job Integration
Each Job will represent a Project within PSA and must be imported into the system.
The option Export Invoices and Payable Batches to QuickBooks Jobs located under the Accounting System subtab (Setup > Financial > System > Accounting) allows you to specify whether Invoices and Payable batches should be exported to Jobs.
- With this option enabled, Payable Batch exports will map directly to the selected Job instead of the main customer.
- Invoice exports will also assign the invoice to the Job when the checkbox is selected.
For further details refer to:
Class Integration
A Class represents a grouping type within the QuickBooks Online system. This grouping can also be represented within PSA by selecting an object in PSA that will represent the Class and then selecting the Class value when creating billable / payable entries within the PSA system. The integration does not allow setting an association to a Class for a given record and having that propagate through when exporting invoices, payable batches, or payroll; the Class must be selected per entry.
For further details refer to:
Setting Up the Integration
The primary/secondary model is a communication protocol that is used to determine which solution (QuickBooks Online or PSA) controls and updates the objects of the other solution (known as the primary). For integration purposes, QuickBooks Online is always the primary and PSA the subordinate application (secondary).
The primary/secondary model ensures that only one set of data exists in both applications. Therefore, if any changes are applied to an object already imported in PSA, such as a change of telephone numbers for an employee in QuickBooks Online, then re-importing (updating) the users ensures that both applications have the updated information.
The integration consists of the following steps:
- Prerequisites
- Setting Up the Connection
- Importing Objects to PSA
- Mapping Objects
- Mapping Objects at the Global Level
- Mapping Entries at the Object Level
- Setting Up Purchase Taxes (Exporting Expense Reports to QuickBooks)
- Setting Up Sales Taxes (Exporting Invoices to QuickBooks)
Note:
- The updates are performed by the primary, which in this case is QuickBooks Online.
- Payroll items are not available in the QuickBooks Online version.
Prerequisites
The preconditions to successfully connect to QuickBooks Online are:
- An Intuit account.
- An App Token, which will allow the migration of your data.
- Client Id
- Client Secret
Setting Up the Connection
Before users can connect to QuickBooks Online, communication must first be established between QuickBooks Online and PSA.
- From the Icon Bar click Setup
 .
. - From the Navigation Menu click Financial to expand the corresponding menu.
- From the Financial menu items, click System.
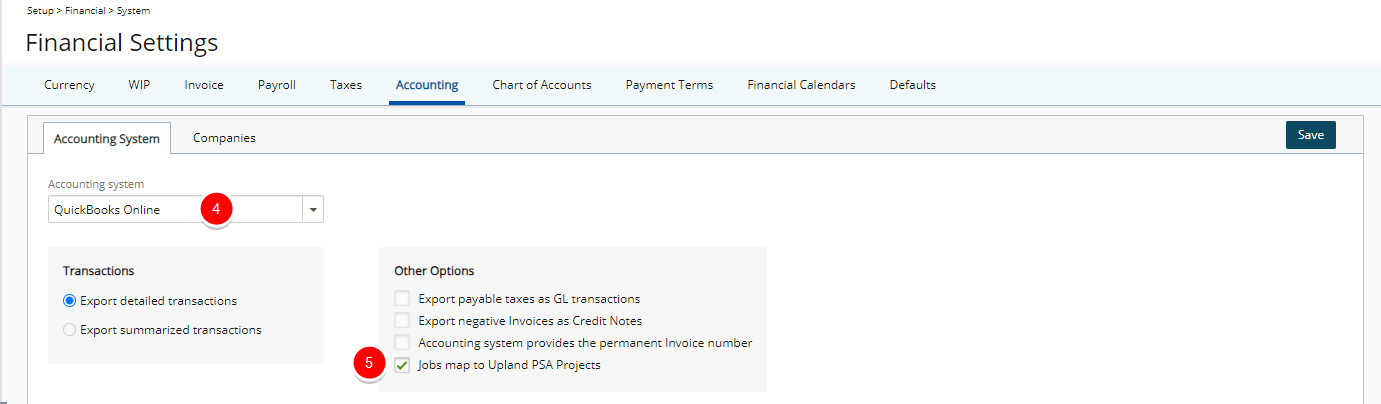
- Upon the Financial System page displaying, click the Accounting tab.
- Select QuickBooks Online from the Accounting system list.
- Within the Transactions box, maintain the default option Export detailed transactions as selected.
- If required, select the Jobs map to PSA Projects selection box, to import Jobs from Quickbooks Online and automatically create PSA Projects upon importing.

- Click Save to save the selections.
The Company acts as a connector to the databases existing in the accounting software.
- From the Icon Bar click Setup .
- From the Navigation Menu click Financial to expand the corresponding menu.
- From the Financial menu items, click System.
- Upon the Financial System page displaying, click the Accounting tab.
- Navigate to the Companies sub-tab.
- Click the Main Accounting System link, or the one applicable to your organization, to open the Company Edit page.
- From the General tab enter or select the appropriate information based on your requirements:
- Name *: Enter a preferred company Name, if different from the default, “Main Accounting System”. The company acts as a connector to the databases existing in the accounting software.
- Id: Enter a company Id.
- The Currency field cannot be changed after a Company is created. It can only be selected during the creation of a new Company.
- Calendar *: Select the Financial Calendar.

- From the Invoice Number section, select the Override global Payable number option to override the Invoice number at the company level and then manually enter the:
- Invoice number prefix
- Current Invoice number
- Invoice - number of digits

- From the Payable Batch Number section, select the Override global Payable number option to override the Payable number at the company level and then manually enter the:
- Payable number prefix
- Current Payable number
- Payable - number of digits

- From the Payroll Batch Number section, select the Override global Payroll number option to override the Payroll number at the company level and then manually enter the:
- Payroll number prefix
- Current Payroll number
- Payroll - number of digits

- From the Revenue Batch Number section, select the Override global Revenue number option to override the override the Revenue number at the company level and then manually enter the:
- Revenue number prefix
- Current Revenue number
- Revenue - number of digits

- In the Address section enter or select the following: Phone, Address Line 1, Address Line 2, City, Country, State and Zip Code
- When finished click Save.
- From the Company Edit page (Setup > Financial > System > Accounting tab > Companies sub-tab), click the Properties tab to open the QuickBooks Online Integration Properties page.
- Specify the QuickBooks Online Connection Properties:
- Consumer Key*: Enter the QuickBooks Online app Client ID.
- Consumer Secret*: Enter the QuickBooks Online app Client Secret.
- Connected to: This is a read-only field that is automatically populated once the connection is successfully established.

- Click Save. Upon saving:
- Note that the Connect to QuickBooks button is now available.
- The Default Accounts, Invoice Export Options, Expense Payable Export Options and Tax Mapping Options will be displayed.

- Click Connect to QuickBooks.
- Use your Intuit Account credentials to sign in to QuickBooks.
Note: If you are already signed into your QuickBooks Online account you will be automatically taken to step 4.b below. Otherwise, you will be prompted to sign in.
- Select your QuickBooks Online Company.
- Click Next. The Intuit sign in page will close and you will return to the QuickBooks Online Integration Properties page.

- Use your Intuit Account credentials to sign in to QuickBooks.
- Upon successfully connecting to QuickBooks Online you will see the green button that reads "Connect to QuickBooks". You can now specify the QuickBooks Online Integration Properties from each of these sections:
- Default Accounts
- Invoice Export Options
- Expense Payable Export Options
- Tax Mapping Options

- From the Default Accounts section, select the accounts used by PSA when exporting various items to QuickBooks Online; either accept the defaults (no account selection) or select specific QuickBooks Online accounts from the listed options for the following:
- Work Type: Create Work Type Product/Service in QuickBooks Online using the selected account
- Expense: Create Expenses Product/Service in QuickBooks Online using the selected account
- Charge: Create Charge Product/Service in QuickBooks Online using the selected account

- From the Invoice Export Options section choose the appropriate options:
- Invoices will be printable in QuickBooks: Select this option to be able to print the invoices in QuickBooks.
- Override QuickBooks Invoice Item’s description with PSA Reference information: Select this option for the PSA Invoice Reference information to overwrite the following:
- QuickBooks Items description, when exporting invoices, and/or
- QuickBooks bill’s description (referred to as Memo in QuickBooks Pro, Premier and Enterprise) for each transaction line in the bill, when exporting Payables.
Note: The Override QuickBooks Invoice Item’s description with PSA Reference information option is unchecked by default, for new installations, but is checked for upgraded clients.
- Export PSA Invoice Number to QuickBooks “Invoice #” field: When selected, upon exporting an Invoice/Invoice Batch to QuickBooks Online, the PSA Invoice Number is exported and displayed as the QuickBooks Online Invoice #. If the option is not selected, the PSA Invoice Number will not be exported and the QuickBooks Online Invoice # will be set by QuickBooks.

- From the Expense Payable Export Option section choose the appropriate options:
- Export billable flag for Payable Batch exported to QuickBooks Online
- Exclude Payable Batch Taxes at export time
- Export PSA Expense Report Tracking Number to QuickBooks Online “Ref. No.” field. When selected, upon exporting an PSA Expense Payable Batch, the corresponding Expense Report Tracking Number(s) is exported and displayed as the QuickBooks Online Ref. No.

- From the Tax Mapping Options section enter the appropriate tax mapping value for:
- Default Tax
- Exempt Tax

- Click Save.
- Click the Back link to return to the Company List page.
Enable Export Summarized Transactions to QuickBooks Online
You can activate exporting of Summarized Transactions to QuickBooks Online, which results in the consolidation of transactions linked to the same account, resulting in a more manageable number of summarized records. For further details refer to Enable Export Summarized Transactions to QuickBooks Online.
Importing Objects to PSA
After successfully setting up the connection to the QuickBooks Online database, you can now import the objects from QuickBooks Online. For further details refer to:
- From the Icon Bar click Tools
 .
. - Click Import to expand the Import menu options.
- Then select QuickBooks Online to open the Import page.
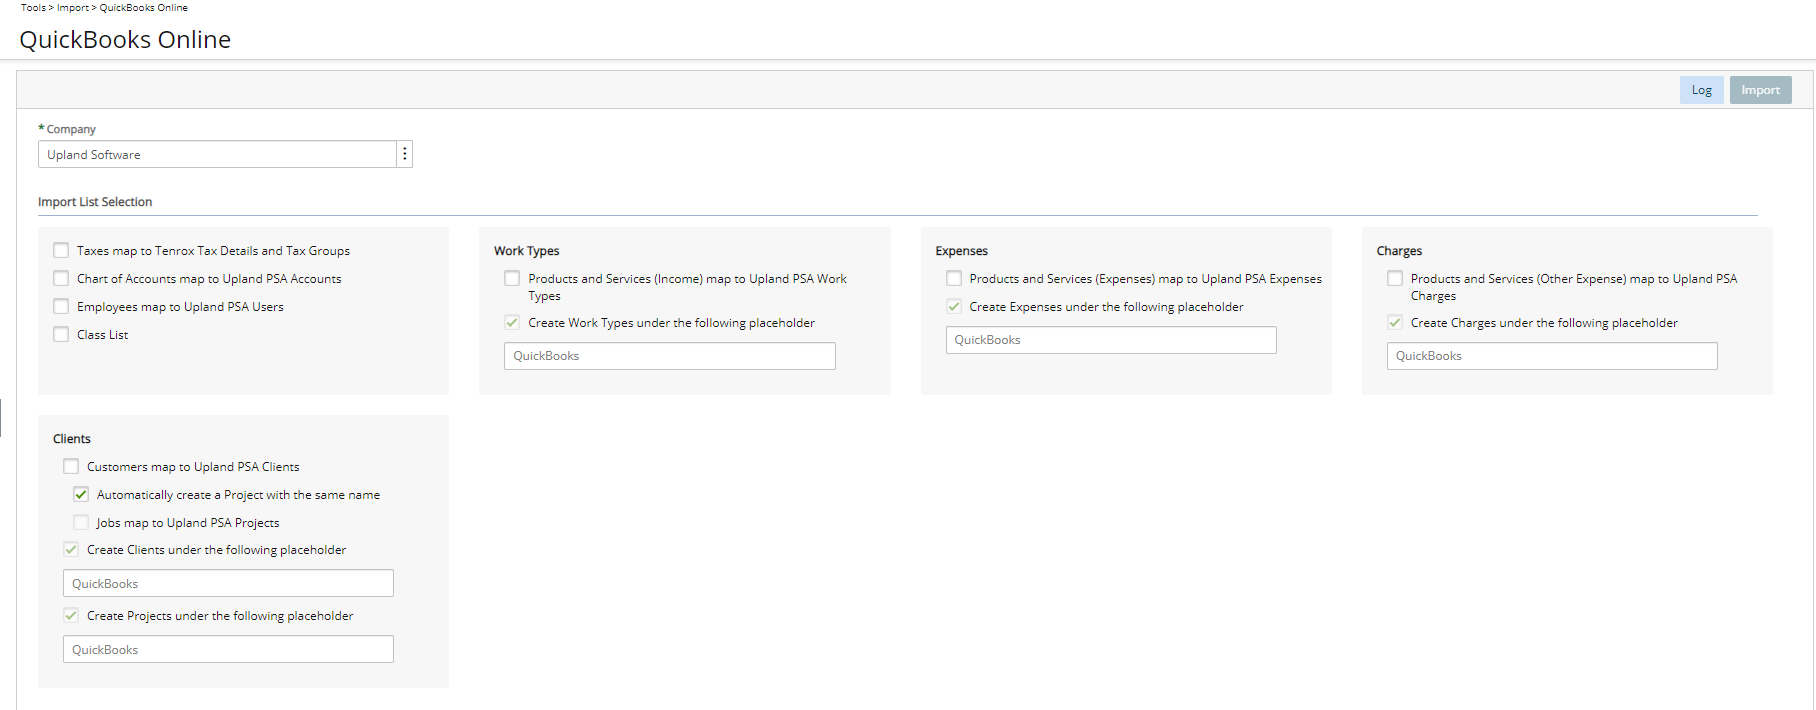
- Company: The Company box displays the default company from which all the selected QuickBooks Online objects are imported; for information on setting up the company connection, see to Setting up the connection. .
- Select the objects to import from the Import List Selection; for more information on object mapping, see the table Object Mapping Between QuickBooks Online and PSA
- Taxes map to PSA Tax Details and Tax Groups: Select this option to import the list of Taxes from QuickBooks Online.
- Chart of Accounts map to PSA Accounts: Select this option to import the chart of accounts from QuickBooks Online.
- Employees map to PSA Users: Select this option to import the employees from QuickBooks Online.
- Class List: Select Class List to import the Classes from QuickBooks Online into PSA, for as long as they don’t already exist in the PSA.
- Under Work Types:
- Select Products and Services (Income) map to PSA Work Types to import the Work Type items from QuickBooks Online.
- When selected, the Create Work Types under the following placeholder selection box will be checked with "QuickBooks" as the default Placeholder name. You can modify this as needed.
- Under Expenses:
- Select Products and Services (Expenses) map to PSA Expenses to import the Expense items from QuickBooks Online.
- When selected, the Create Expenses under the following placeholder selection box will be checked with "QuickBooks" as the default Placeholder name. You can modify this as needed.
- Under Charges:
- Select Products and Services (Other Expense) map to PSA Charges to import the charge items or products and services (other expense) from QuickBooks Online.
- When selected, the Create Charges under the following placeholder selection box will be checked with "QuickBooks" as the default Placeholder name. You can modify this as needed.
- Under Clients:
- Select Customers map to PSA Clients to import the list of customers from QuickBooks Online. Then choose:
- Automatically create a Project with the same name to allow PSA to automatically create a Project with the same name as the imported customers.
Note:
- When importing customers from QuickBooks Online, the customers’ associated jobs are also displayed in the list of customers.
- Create Clients under the following placeholder and Create Projects under the following placeholder and selected by default when Customers map to PSA Clients is checked. The default value for both Placeholders is QuickBooks. You can modify this as needed.
OR
- Jobs map to PSA Projects
Note: The Jobs map to PSA Projects option must be selected (Setup > Financial > System > Accounting) to enable this new feature. If this option is:
- Unchecked at the system level, Projects map to QuickBooks Jobs will be disabled and unchecked.
- Checked at the system level, Projects map to QuickBooks Jobs will be checked and locked.
Caution: The selection of this option does not reset existing mapping. It is recommended not to change this setting after importing/exporting objects to/from QuickBooks. Please refer to the Scenario for more information.
Scenario:
- If the option is un-selected: QuickBooks Online Customers are imported as PSA Clients. You have the option to create a PSA Project with the same name. QuickBooks Online Jobs are imported as PSA Clients. You have the option to create a PSA Project with the same name.
- If the option is selected: QuickBooks Online Customers are imported as PSA Clients and QuickBooks Online Jobs are imported as PSA Projects.
- Selecting this option does not reset existing mappings. Changing options after importing or exporting objects can cause duplicate data..
- Automatically create a Project with the same name to allow PSA to automatically create a Project with the same name as the imported customers.
Note:
- To complete the mapping, see Setting Up the Connection for details on setting up the Class mapping.
- The Classes will not appear in either the PSA Organizational Breakdown Structure (OBS) or the PSA Work Breakdown Structure (WBS).
- A placeholder allows users to design a hierarchy and organize the tree structure to locate Clients, Work Types, Expenses and Charges Imported from QuickBooks Online by grouping the objects under specific placeholders. If an object is set as a placeholder, it cannot be used as a regular object.
- Select Customers map to PSA Clients to import the list of customers from QuickBooks Online. Then choose:
- Upon selecting the Objects to import, click the Import button to display the information of all imported objects, including the names and the total number of objects imported, as well as any warning or error messages encountered during the import process.
Note: After the objects are successfully imported from QuickBooks Online locate the transferred objects in the PSA; for more information see View Imported Objects in PSA.
When Jobs Map to PSA Projects option isselected, you can import Jobs from Quickbooks Online and automatically create PSA Projects upon importing.
- From the Icon Bar click Setup .
- From the Navigation Menu click Financial to expand the corresponding menu.
- From the Financial menu items, click System.
- Upon the Financial System page displaying, click the Accounting tab.
- Ensure that QuickBooks Online is chosen for the Accounting system.
- Select Jobs map to PSA Projects option.
- Click yes to the confirmation message that reads: "If you are switching from a QuickBooks Jobs/PSA Clients setting to QuickBooks Jobs/PSA Projects setting, no previously existing PSA Projects will be mapped to the QuickBooks Jobs. Please ensure that all existing QuickBooks Jobs are mapped to the appropriate PSA Projects. Are you sure you would like to proceed?"
- From the Icon Bar click Tools .
- Click Import to expand the Import menu options.
- From the available options click QuickBooks Online.
- Select the required Company from the available options.
- Select the Customers map to PSA Clients option.
- Click Import.
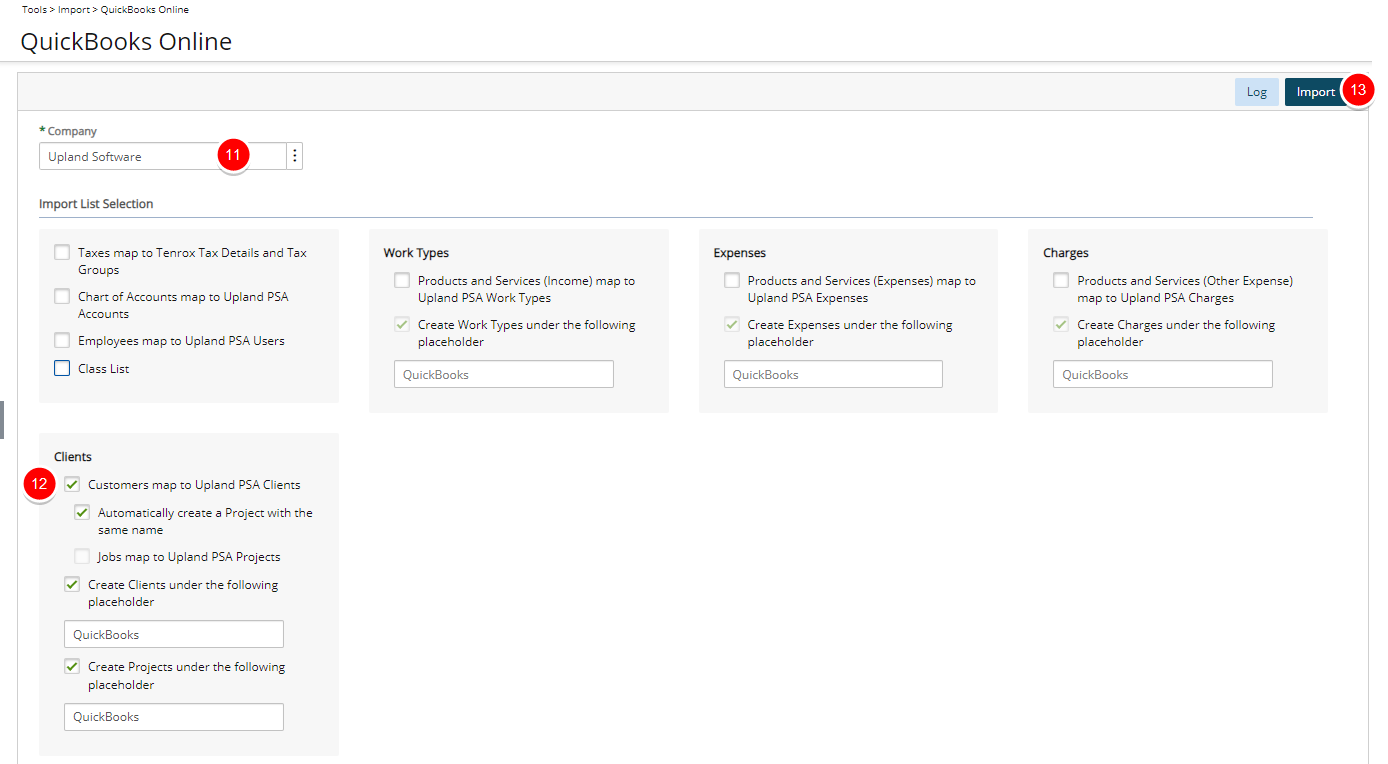
- Note that the success message will be displayed in the log and all imported Customers and Sub-Customers will be displayed.
Verify Imported Customers as Clients in PSA
- From the Icon Bar click Setup .
- From the Navigation Menu click Work to expand the corresponding menu.
- From the Work menu items, click Clients.
- Search for the imported Customers and note that they imported and listed as Clients in PSA.
Verify Imported Jobs as Projects in PSA
- From the Icon Bar click Project List
 .
. - Search for the imported Jobs and note that they imported and listed as Projects in PSA.
From the Class Mapping page accessed through the QuickBooks Online Integration Properties (Setup > Financial > System > Accounting System > Company List > Company Edit) you can choose to map the following:
- QuickBooks Online Invoice Class with PSA Time, Charge, Expense and Product.
- QuickBooks Online Expense Class with PSA Expense and Charge.
Note: The imported Classes are saved in the PSA database and are not available on the user interface.
- From the Icon Bar click Setup .
- From the Navigation Menu click Financial to expand the corresponding menu.
- From the Financial menu items, click System.
- Upon the Financial System page displaying, click the Accounting tab.
- Ensure that QuickBooks Online is chosen for the Accounting system.
- Navigate to the Companies sub-tab.
- Click Properties and then click Class Mapping.
- From the Invoice Class Mapping section, associate Expense with Task.
-
From the Expense Class Mapping section, associate Expense with Project.
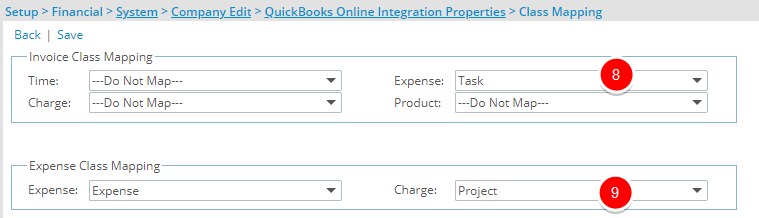
-
Click Save.
- From the Icon Bar click Tools .
- Click Import to expand the Import menu options.
- From the available options click QuickBooks Online.
- Select Class List.
- Click Import.

The following objects are mapped between QuickBooks Online and PSA:
| QuickBooks Online Item | PSA Item | Import options |
|---|---|---|
| Taxes | Tax Details and Tax Groups | Taxes mapped to PSA Tax Details and Tax Groups |
| Customers | Clients |
Customers map to PSA Clients
|
| Chart of Accounts | Accounts |
Chart of Accounts map to PSA Accounts |
| Products and Services (Income) | Work Types |
Products and Services (Income) map to PSA Work Types |
| Products and Services (Expenses) | Expenses | Products and Services (Expenses) map to PSA Expenses |
| Products and Services (Other Expense) | Charges | Products and Services (Other Expense) map to PSA Charges |
| Employees | Users | Employees map to PSA Users |
| Class | Class List | Class List |
The table lists the imported Objects and their respective paths in PSA.
| Object | Navigation |
|---|---|
| To view Financials |
|
| To view Clients |
|
| To view Work Types |
|
| To view Expenses |
|
| To view Charges |
|
| To view Users |
|
Mapping Objects Between PSA and QuickBooks Online
For QuickBooks Online integration, no actual segmentation is required; instead the segmentation setup indicates to PSA which objects are used in the Accounts Receivable (AR) and Accounts Payable (AP) transactions.
Note:
- If Segmentation is setup both at global and object level. The object level Segmentation will have precedence over the global one. As a result, on the Transaction page the Segmentation value at the object level, will be displayed for the Transaction Debit column.
- If a selection has been made for the Account option at the object level, it takes precedence over any other segmentation.
- In order to display any object level Account, the respective object must be selected at the global level Segmentation.
Mapping Objects at the Global Level
The mapping of the PSA Organization Breakdown Structure (OBS) and Work Breakdown Structure (WBS) objects to specific chart of accounts ensures that the chart of accounts are accurately mapped to objects in PSA before mapping the entries to the accounts in QuickBooks Desktop. The term object mapping is used to describe which objects are imported or exported to and from PSA.
- Import the chart of Accounts; for more information, see Importing Objects.
- From the Icon Bar click Setup .
- From the Navigation Menu click Financial to expand the corresponding menu.
- From the Financial menu items, click System.
- Upon the Financial System page displaying, click the Chart of Accounts tab.
- Click the Segmentation button to open the Segmentation Setup dialog box.
- From the General tab, you can define the default segmentation rules.
- Segment Length: Defines the fixed length of each segment used to construct segmented values. Each segment is truncated or padded to match the specified length before the segments are combined. Segment lengths are applied sequentially from Segment 1 through Segment 10.
- Segment Padding: Specifies how segment values are padded when the source value is shorter than the defined segment length.
- Padding character: Specifies the character (space or zero) used to pad a segment when the segment value is shorter than the required length.
- Pad from the: Specifies the direction in which padding is applied.
- Left pads characters at the beginning of the Segment value.
- Right pads characters at the end of the Segment value.
- Segment separator: Specify the character used to separate individual segments when constructing the final segmented value.
-
Navigate to the Segment Item tab, where you can define the maximum length allowed for each segment type. This setting limits the number of characters that can be used for segment values associated with accounts, groups, sub-accounts, projects, sites, work types, users, clients, expense items, purchase items, charges and products, and vendors.
- Navigate to the Receivable Transactions to configure accounts receivable mapping for different transaction types. The tab contains the Time Entry, Expense Entry, and Charge and Product Entry sub-sections.
- Select an object from the Segment 1 list to determine how time entries are mapped; for example, select Accounts then copy your Accounts Receivable (A/R) ID from the Chart of Accounts tab (for example, if the ID is 84, copy it into the Segment 1 Account field).

Note: The setup process for Expense Entry and Charge and Product Entry is the same as for Time Entry, and segments can be configured in the same way.
- Select an object from the Segment 1 list to determine how time entries are mapped; for example, select Accounts then copy your Accounts Receivable (A/R) ID from the Chart of Accounts tab (for example, if the ID is 84, copy it into the Segment 1 Account field).
- Click Save to apply your changes.
- Navigate to the Payable Transactions tab to configure the accounts payable mapping for different transaction types. The tab contains the Expense Entry, Charge Entry, and Purchase Entry sub-sections.
- Select an object from the Segment 1 list to determine how expense transactions are mapped; for example, selecting Accounts allows you to copy the first part of your Accounts Payable (A/P) ID from the Chart of Accounts tab (for example, if the ID is 33, copy it into the Segment 1 Account field).
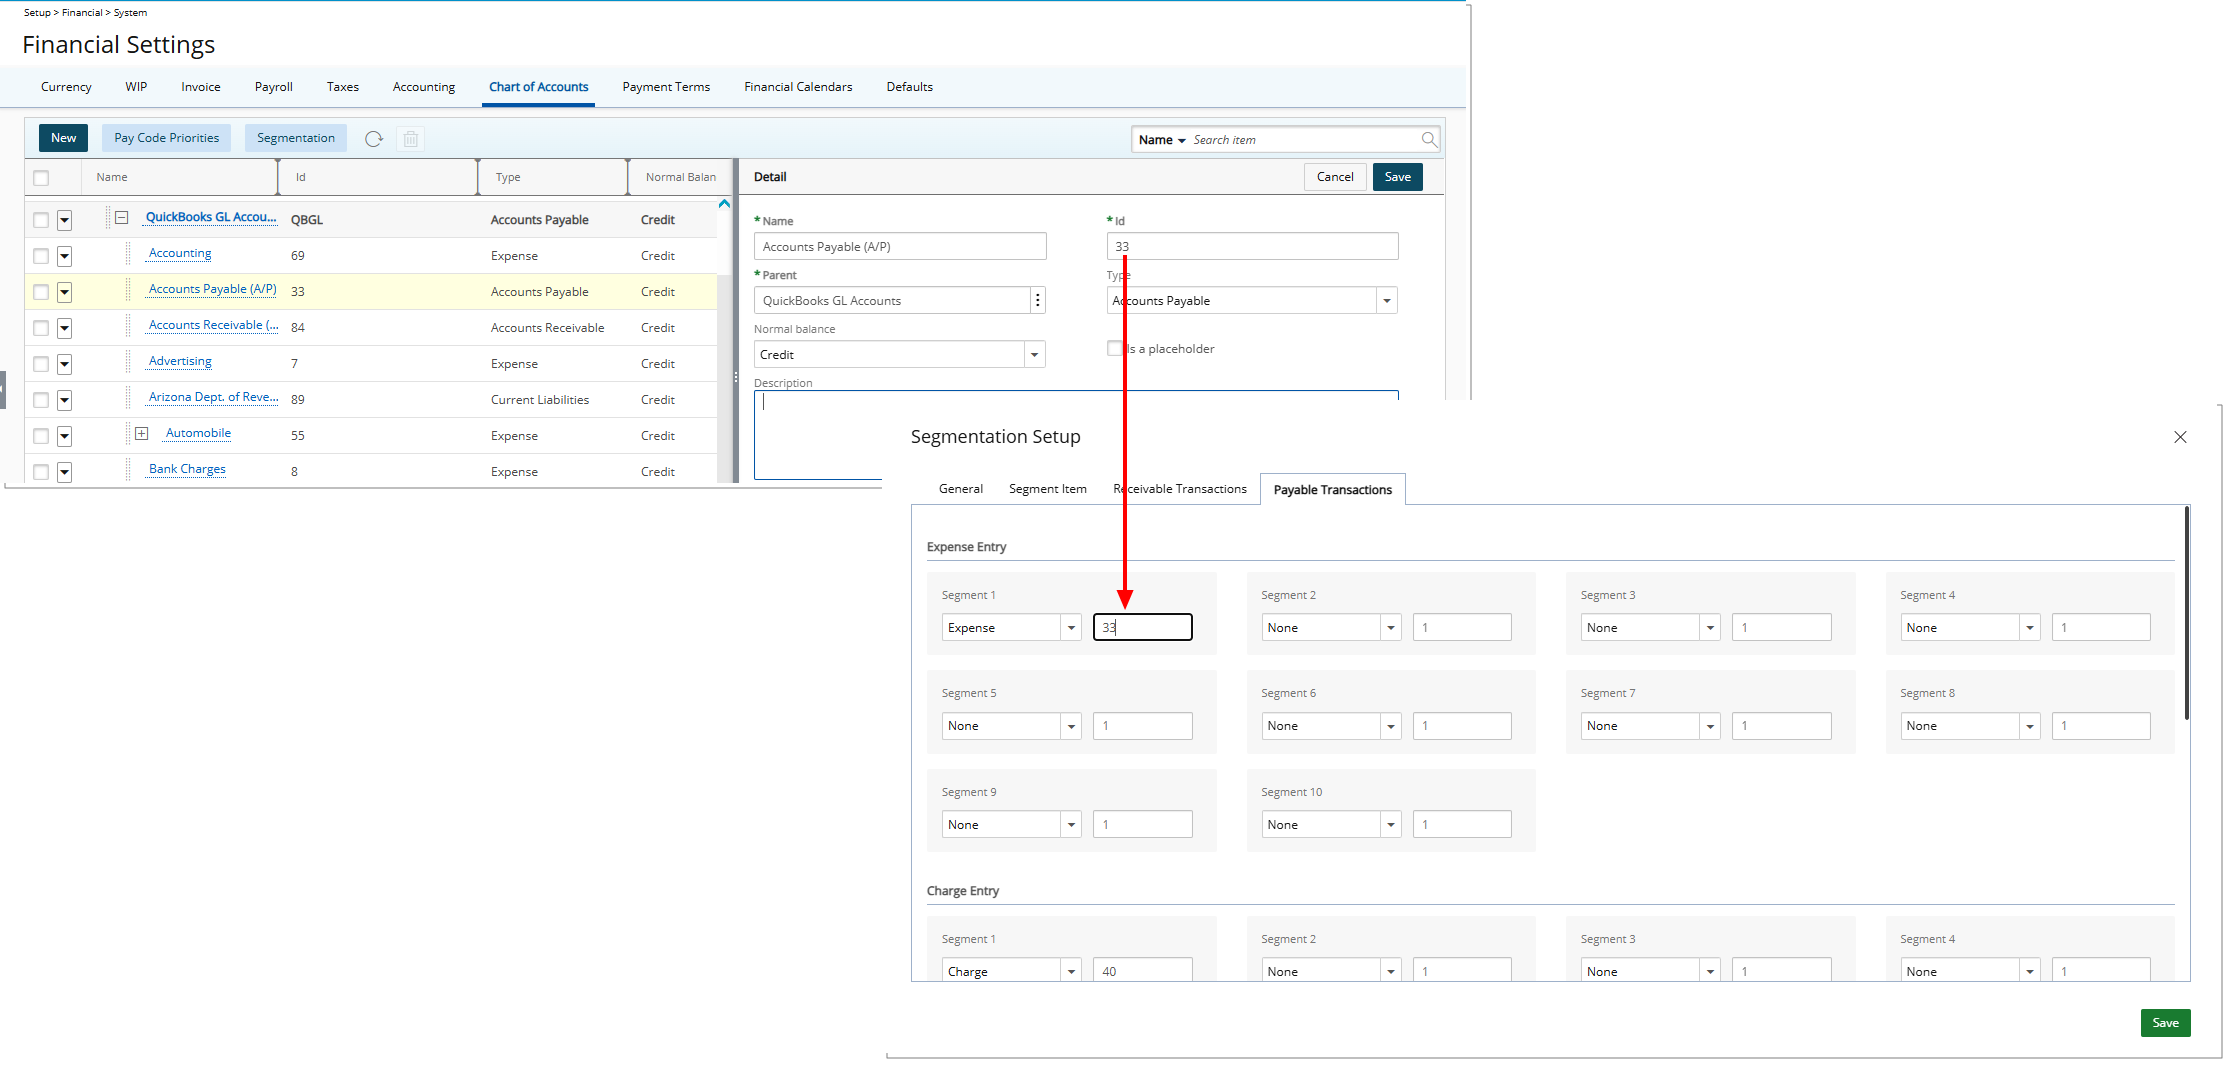
Note: The Charge Entry and Purchase Entry sub-sections are set up in the same way as Expense Entry. For each segment, select an object and map it to the appropriate part of the Accounts Payable ID.
- Select an object from the Segment 1 list to determine how expense transactions are mapped; for example, selecting Accounts allows you to copy the first part of your Accounts Payable (A/P) ID from the Chart of Accounts tab (for example, if the ID is 33, copy it into the Segment 1 Account field).
- Click Save to apply your changes.
- Click the Close
 button to exit the dialog box.
Mapping Entries at the Object Level
After the entries are mapped at the global level, then the information can be mapped correctly to the accounts in QuickBooks Online. For example, after mapping the time and expense entries to the Client and Group at the global level respectively, the Entries can then be mapped at the Client and Group object levels.
- From the Icon Bar click Setup .
- From the Navigation Menu click Work to expand the corresponding menu.
- From the Work menu items, click Clients.
- From the Clients list that displays, click the Name of the client you wish to access.
- Expand the Financial menu item and click Accounting to open the Accounting edit page.
- From Receivable Transactions, select the Account option
- Then click the browse button (...) to open the Account List page that lists all the accounts in PSA, including the accounts imported from QuickBooks Online.
- Select the account that the transaction should map to in the QuickBooks Online G/L account.
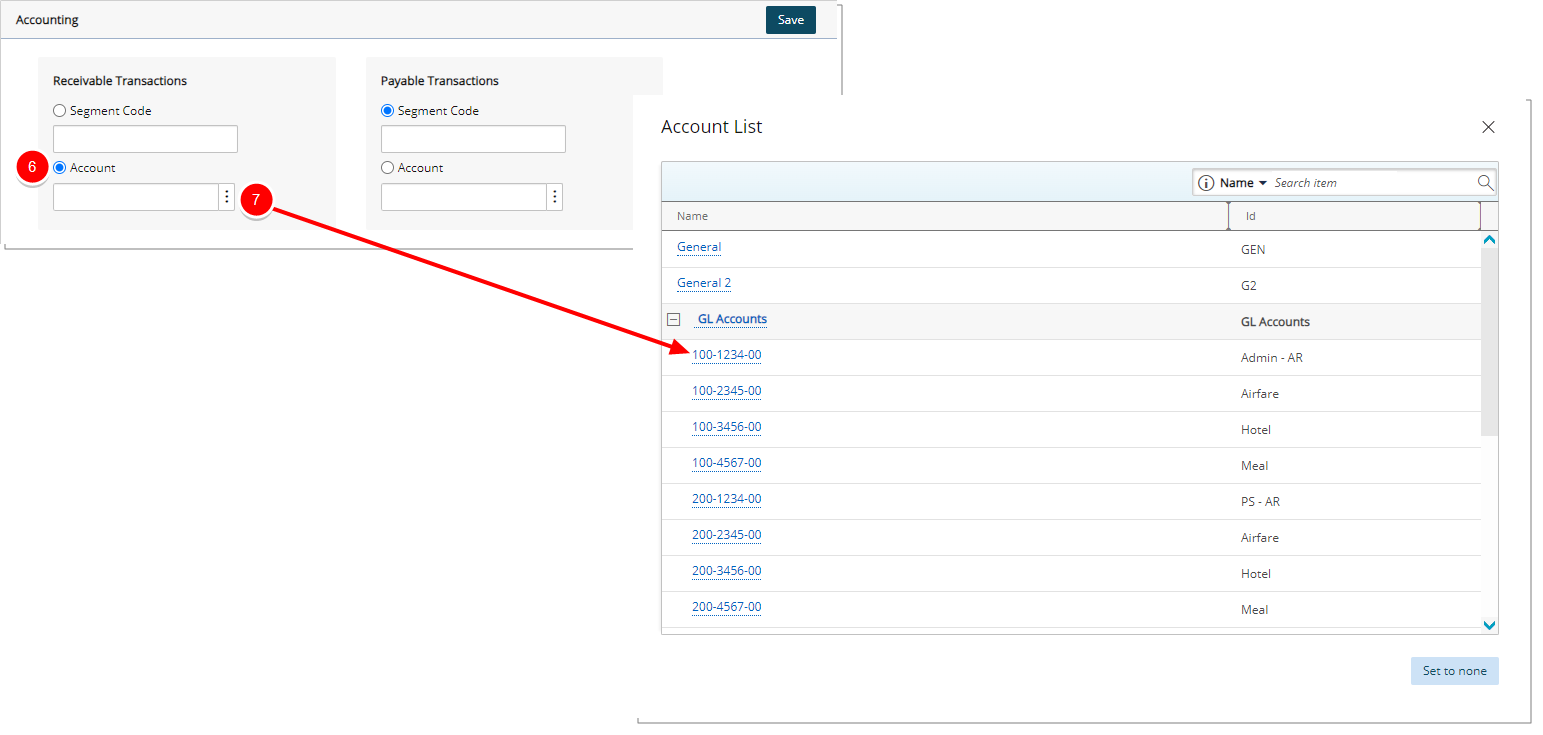
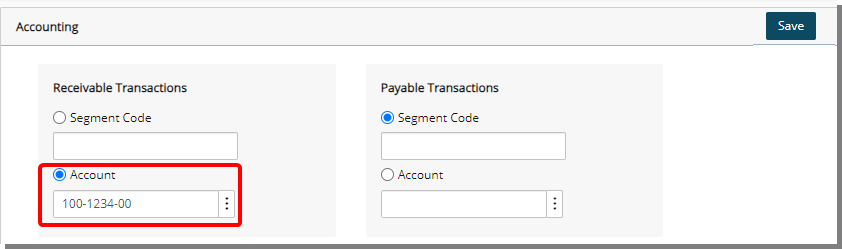
Note: The Accounting Edit page automatically updates to display the selected account.
- Click Save and then Back to save your changes and return to the previous page.
- From the Icon Bar click Setup .
- From the Navigation Menu click Organization.
- From the available options select Groups.
- Click a group from the list to open the Group Edit page.
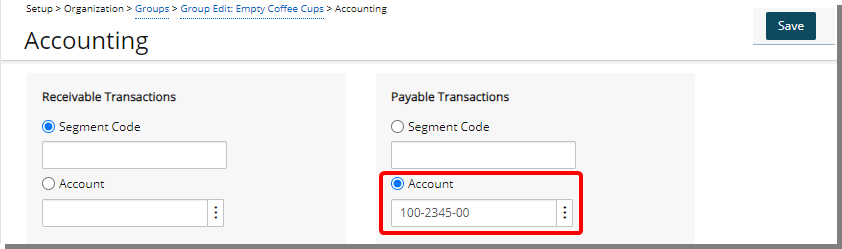
- Click the Accounting button to open the Accounting Edit page.
- From Payable Transactions, select the Account option
- Then click the browse button (...) to open the Account List page that lists all the accounts in PSA, including the accounts imported from QuickBooks Online.
- Select the account that the transaction should map to in the QuickBooks Online G/L account.
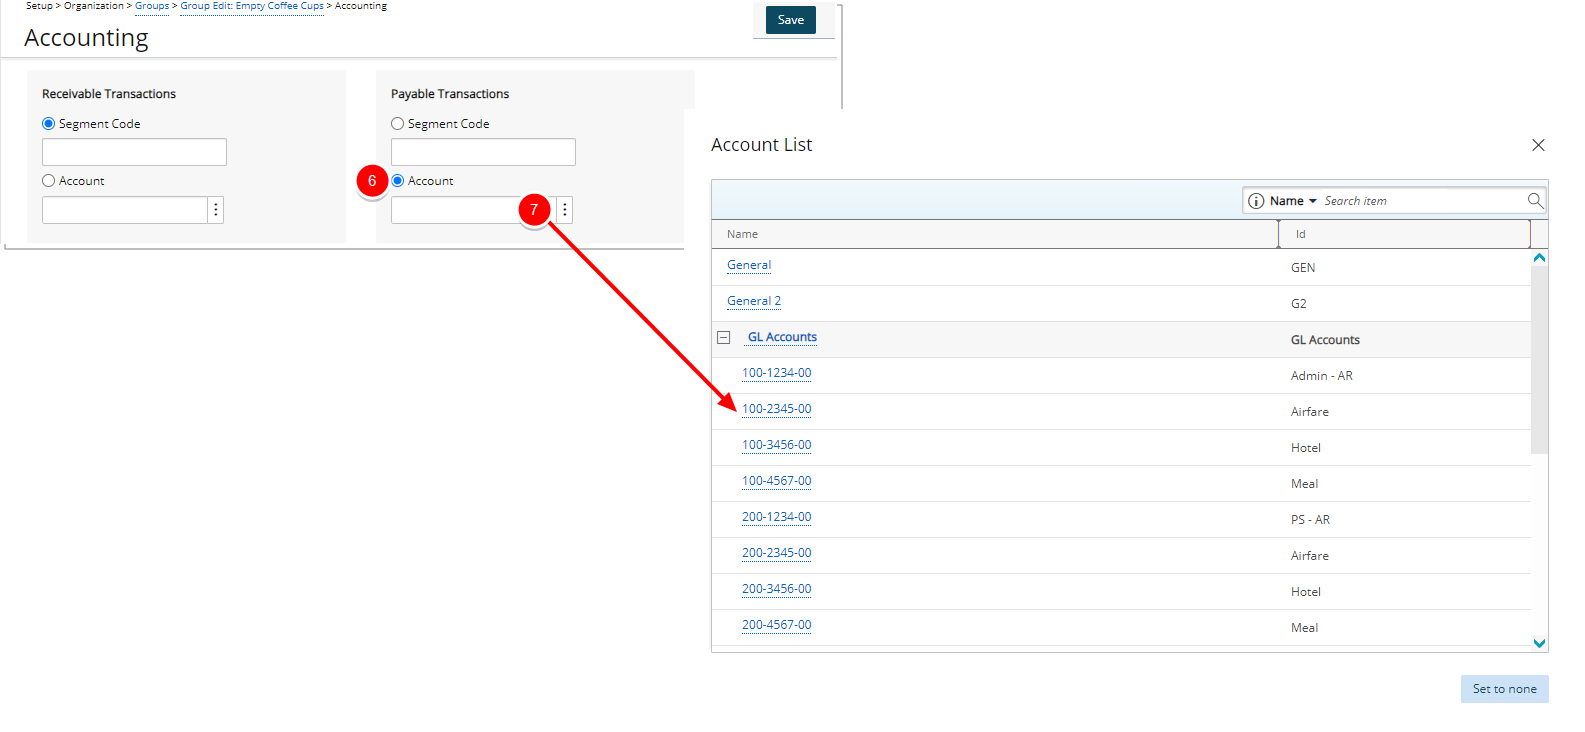
Note: The Accounting Edit page automatically updates to display the selected account.
- Click Save and then Back to save your changes and return to the previous page.
Setting Up Taxes
Before exporting Expense Reports to QuickBooks Online, verify that the Purchase Taxes are mapped to the appropriate Accounts in QuickBooks Online.
- From the Icon Bar click Entries
 .
. - From the Navigation Menu click Expense Manager.
- Select the All Reports tab to view a list of all Expense Reports.
- Click the Tracking # link of an expense report from the list to open the selected Expense Report.
- From the Detail tab located in the right pane take note of the QuickBooks Online purchase Tax Group associated to the Expense Entry.
Note: A tax imported from QuickBooks Online should be selected to map the tax properly.
- Click Save to apply your changes.
- From the Icon Bar click Setup .
- From the Navigation Menu click Financial to expand the corresponding menu.
- From the Financial menu items, click System.
- Upon the Financial Settings page displaying navigate to the Taxes tab.
- Navigate to the Tax Groups sub-tab.
- Click a specific Tax Group to access the Tax Group edit page and take note of the purchase Tax listed in the right pane.
Note: In the right pane, all the taxes associated to the specific tax group are listed.
- Click Save and then Back to save your changes and return to the previous page.
- From the Taxes tab of the Financial Settings page navigate to the Tax Details sub-tab.
- Click the specific tax name to view the Detail on the right pane.
Note: If there are two taxes with the same name listed, ensure that the tax of type Purchase is selected.
- Verify that Purchases is specified in the Type box since payable batches are being exported.
- Click the browse button (...) beside the Account box to open the Account List page and then click the appropriate QuickBooks Online account under the QuickBooks Online GL Accounts placeholder to associate it to the purchase Tax.
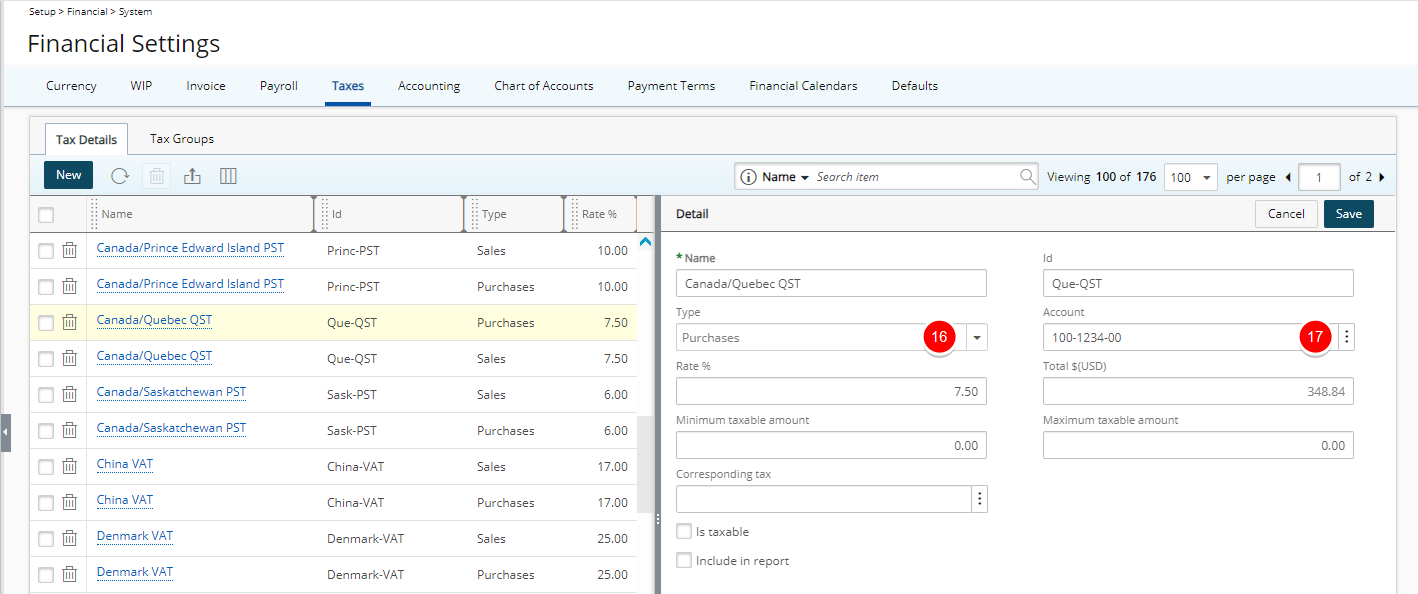
Note: The Account field is automatically updated.
- Click Save to apply your changes. The taxes are mapped to the QuickBooks Online account.
Before exporting invoices to QuickBooks Online, verify that the sales taxes are mapped to the appropriate accounts in QuickBooks Online.
Note: A tax imported from QuickBooks Online should be selected to map the tax properly.
- From the Icon Bar click Setup .
- From the Navigation Menu click Work to expand the corresponding menu.
- From the Work menu items, click Clients.
- From the Clients list that displays, click the Name of the client you wish to access.
- Expand the Financial menu item and click Invoice Options to open the Invoice Options page.
- From the General tab, verify that the Sales Tax group associated to the Client is displayed in the Tax Group box.
- Navigate to the Expense Invoicing tab and take note of the Sales Tax displayed under the Corresponding Taxes table.
Note: When generating an Invoice with Billable Expense Entries that are also taxable, settings can be defined on the Expense Invoicing tab. To determine how taxes are viewed and handled, see Viewing the Invoice Summary and Exporting Invoices with Taxable Expenses.
- Click Back link return to the Clients list.
- From the Icon Bar click Setup .
- From the Navigation Menu click Financial to expand the corresponding menu.
- From the Financial menu items, click System.
- Navigate to the Taxes tab.
- Click a specific Tax to view the Detail on the right pane.
Note: If there are two taxes with the same name listed, ensure that the tax of type Sales is selected.
- Verify that Sales is specified in the Type box since the invoices or multi-client invoices are being exported.
- Click the browse button (...) beside the Account box to open the Account List page and then click the appropriate QuickBooks Online account under the QuickBooks Online GL Accounts placeholder to associate it to the Sales Tax.
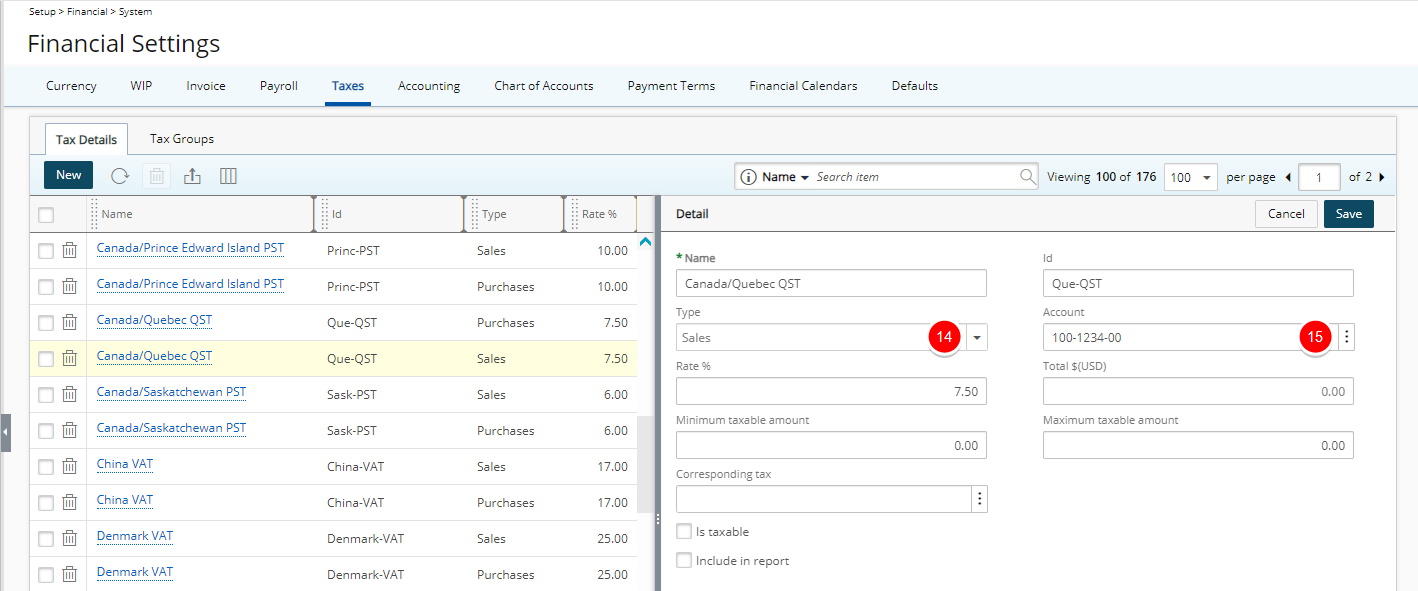
Note: The Account field is automatically updated.
- Click Save to apply your changes.
Exporting Objects to QuickBooks Online
Exporting refers to the transfer of information from PSA to QuickBooks Online. Before exporting objects from PSA to QuickBooks Online, ensure that the QuickBooks Online accounting setup is completed. For information on mapping the objects, see Mapped Objects table and Mapping Objects Between PSA and QuickBooks Online.
- From the Icon Bar click Tools .
- Click Export to expand the Export menu options.
- Then click QuickBooks Online to open the Export page.
- Click the Company browse button to select the Company.
- Select the objects to export from the Export List Selection; for more information, see the Object Mapping Between QuickBooks Online and PSA table.
- Select Clients map to QuickBooks Customers and click the corresponding Select button to select the Clients from the list, then click Back to return to the Export page.
- Select Work Types map to QuickBooks Products and Services (Income) and click the corresponding Select button to select the Work Types from the list, then click Back to return to the Export page.
- Select Expenses map to QuickBooks Products and Services (Expenses) and click the corresponding Select button to select the Expenses from the list, then click Back to return to the Export page.
- Select Charges and Products map to QuickBooks Products and Services (Other Expenses) and click the corresponding Select button to select the Charges from the list, then click Back to return to the Export page.
- Select Users, then click the corresponding Select button to choose users from the list. Click Back to return to the Export page.
Note: The User Browse option is enabled only after the User check box is selected.
Users can be exported as either employees or vendors
- Select Map to QuickBooks Employees to export the users as Employees.
- Select Map to QuickBooks Vendors to export the users as Vendors.
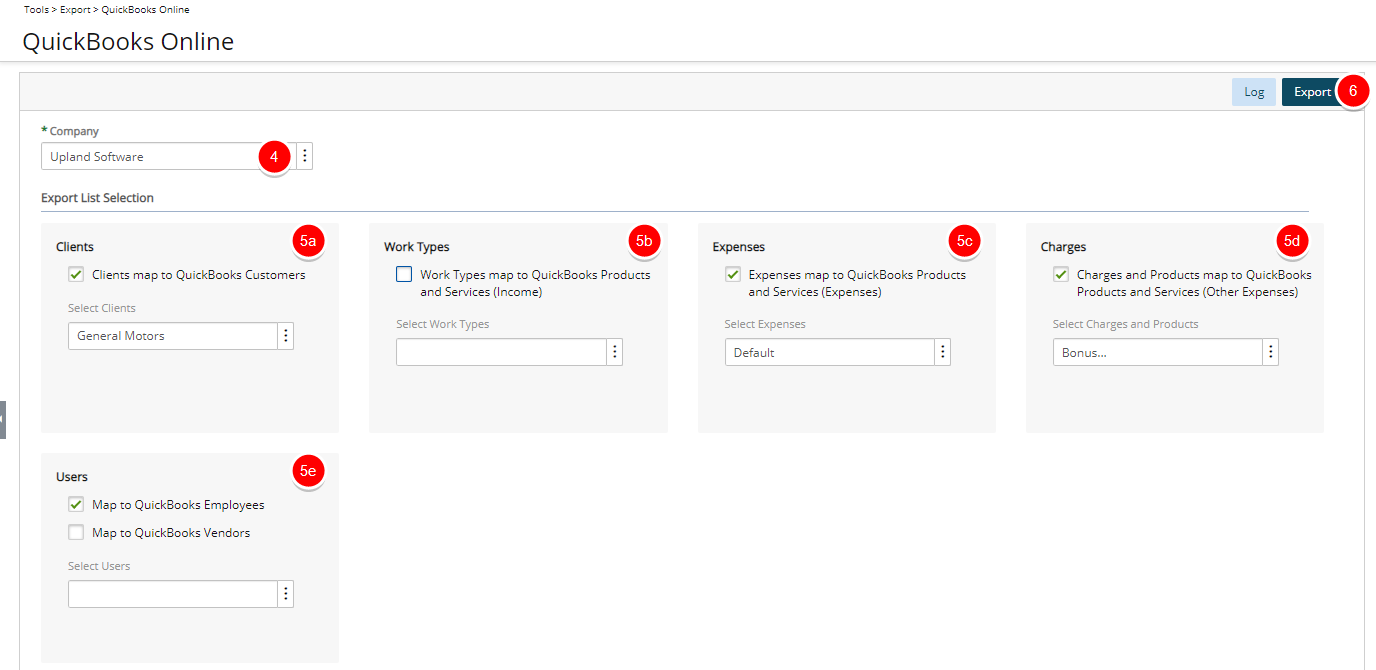
- Click the Export button to display the information of all exported objects, including the names and the total number of objects exported, as well as any warning or error messages encountered during the export process.
| Object | Navigation |
|---|---|
| To view Clients | Click Company Navigator > Customer Hub > Customers |
| To view Work Types | Click Company Navigator > Sales & Get Paid > Products and Services |
| To view Expenses | Click Company Navigator > Sales & Get Paid > Products and Services |
| To view Charges | Click Company Navigator > Sales & Get Paid > Products and Services |
| To view Users * |
To view users exported as employees, click Team > Employees Canadian Company: To view users exported as vendors, click Get Paid & Pay > Suppliers US Company: To view users exported as vendors, click Get Expenses & Bills > Vendors |
| * Users can be exported from PSA to QuickBooks Online as either Employees or Vendors. | |
PSA Key Exporting Features
This section describes the following export operations supported in PSA:
- Payable exporting: allows PSA to export user payable expenses and charges to the QuickBooks Online list of transactions (bills); for more information, see Exporting Payable Batches
- Invoice exporting: allows PSA to export invoices (billable information) generated in PSA to the QuickBooks Online list of transactions (invoices); for more information, see Exporting Invoices and Multi-Client Invoices
Exporting Payable Batches
In PSA, a payable is defined as a collection of payable amounts that need to be reimbursed to the user (expenses and charges). With the PSA payable exporting feature, user payable expenses and charges can be exported to the QuickBooks Online bills.
Note: When Export Invoices and Payable Batches to QuickBooks Jobs (Setup > Financial > System > Accounting) is enabled, payable batch exports are assigned to the corresponding Job. If a Project included in a Payable Batch does not exist in QuickBooks Online, the batch exports under the associated Client instead, even when this option is enabled.
Overview of the process for exporting Payable batches to QuickBooks Online:
- Import objects from QuickBooks Online: For further details refer to Importing Objects to PSA
- Set Up the Segmentation: For further details refer to Mapping Objects Between PSA and QuickBook Online
- Create Expense Reports: Expense reports must first be created and then submitted for approval. After the expense reports are approved, they can then be exported to QuickBooks Online. When creating an expense entry, ensure that it is associated to a Tax Group and an expense item imported from QuickBooks Online. The expense entry must also be marked as Payable; otherwise, it will not appear in the payable batch.
- Set up Taxes: Before exporting expense reports to QuickBooks Online, verify that the Purchase Taxes are mapped to the appropriate Accounts in QuickBooks Online. For further details refer to Setting Up Purchase Taxes.
- Export Users as Vendors: In QuickBooks Online, only vendors can be reimbursed for all the expenses reported. Therefore, the users must be exported as vendors from PSA before exporting a payable batch. For more information on exporting users as vendors, see Exporting Objects from PSA into QuickBooks Online.
- Generate a Payable Batch: For further details refer to Generating Payable Batches.
- Export Payable Batch to QuickBooks: For further details refer to Export Payable Batch to QuickBooks.
Generating Payable Batches
When an Expense Report is in the Approved and the Include entries in Payable Batch states of the Expense Workflow, and not already posted it can be included in a Payable Batch.
Note: When generating a payable batch, select the Company for which the payable batches are being processed to ensure that only the users associated with the selected company are displayed.
- From the Icon Bar click Financial
 .
. - From the Navigation Menu click Expense Payable Manager.
- Upon the Expense Payable Batches page displaying, click Create Batch. For further details refer to Creating a new Expense Payable Batch.
Export Payable Batch to QuickBooks
After generating the payable batch, it can then be exported from PSA into QuickBooks.
Note: Class mapping must be completed before exporting a Payable Batch to QuickBooks Online.
The following objects must be imported from QuickBooks Online before exporting the payable batches. For more information on importing, see Importing Objects to PSA.
- Chart of Accounts: Import G/L accounts from QuickBooks Online.
- Employees: Export Users included in a Payable Batch as Vendors to QuickBooks Online.
- Work Types as Service Items or Products and Services (Income): import service items or products and services (income) as Work Types to select tasks originating from the QuickBooks Online work type in the Expense Reports and Charge Entries.
- Expenses as Non-Inventory Items or Products and Services (Expenses): import non-inventory items or products and services (expenses) as expense items to create expense entries.
- Charges as Products and Services (Other Expense): import products and services (other expense) as charges to create charge entries against payable charges.
- From the Icon Bar click Financial .
- From the Navigation Menu click Expense Payable Manager.
- Upon the Expense Payable Manager page displaying, click the Batch Number to open the Payable Batch page.
- Click Transactions to open the Transactions page, which displays all financial transactions. The information displayed includes the account number, account name, debit, credit, currency type, date and reference.
- Verify there is no account information on the Financial Transactions page displayed in red.

Note: Account information appears in red font color if the accounts are not properly associated. Click here to view the how do I map objects between PSA and Quickbooks Online for more information.
- Click Post/Unport to open the Post Payable Batch page.
- Click the Calendar
 button beside the Post Date box to select a new date if the date is not correct.
 - Select a template from the Payable template list.

- Click the Preview link to view the payable batch information (optional).
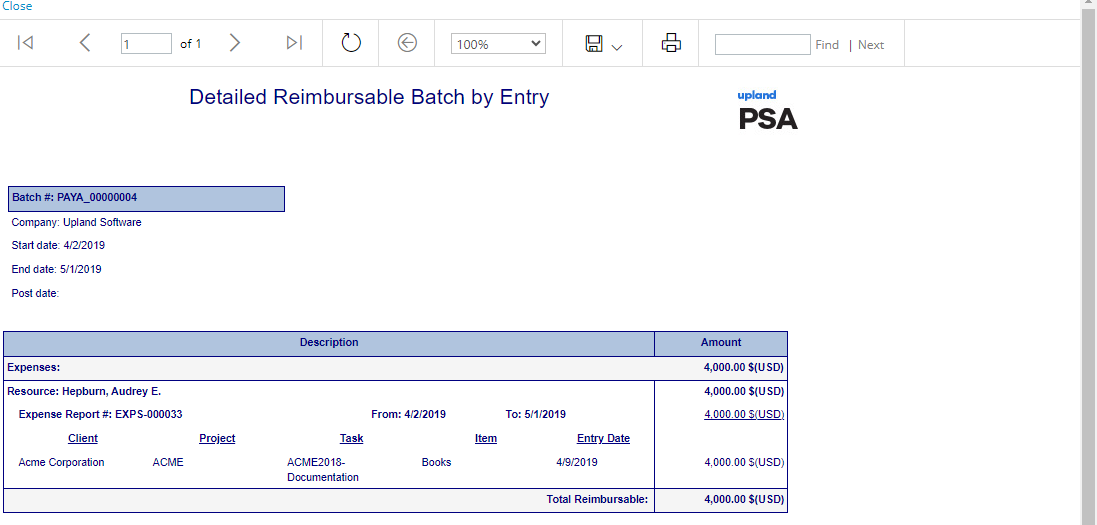
Note: The Overview section is read-only and displays the total of all expense and charge entries included in the payable batch.
- Click the Export button to open the Payable Export to QuickBooks Online page that displays the status of the export process. Below are the settings the system will verify during the process:
- When the Task is related to a Client that was either imported into PSA or exported out to QuickBooks Online, the corresponding Customer:Job will display on the QuickBooks Online Bill.
Example: In QuickBooks Online there is a Customer: "Smith, John" with an associated Job referred to as :"330 Main St". Then an Expense entry is created, In PSA , against a Task related to either a PSA client 'Smith, John' (QuickBooks Online Customer) or '330 Main St' (QuickBooks Online Job). When exporting this Expense entry, as part of a Payable Batch, to QuickBooks Online Bills, the related Customer:Job will appear on the bill as either ‘Smith, John' (if the Task only related to the Customer, or ‘Smith, John:330 Main St'.
- Select Account whose account Type is other than "Accounts payable (A/P)"; for example select account that its account type is "Expense" and "Income".
Note: Ensure to select the Account Type that is supported by QuickBooks Online.
- When the Task is related to a Client that was either imported into PSA or exported out to QuickBooks Online, the corresponding Customer:Job will display on the QuickBooks Online Bill.
- After the Payable batch is exported, the Payables Export to QuickBooks Online page indicates that the payables were successfully exported. If the export process fails, an error message indicates the problems and possible solutions.
- Click Back to return to the Payable Batch edit page.
- Click Post to post the payable batch (make all expense entries as paid off) and upon being prompted to confirm the posting of the payable batch, click either:
- Yes to proceed with the posting
- No to cancel the request.
Exporting Invoices and Multi-Client Invoices
PSA incorporates a comprehensive invoicing module that includes multi-currency processing and an extensive rate engine to generate fully functional invoices that are easily exported to the QuickBooks Online list of invoices.
Note: When Export Invoices and Payable Batches to QuickBooks Jobs (Setup > Financial > System > Accounting) is enabled, invoice exports are assigned to the corresponding Job. If a Project included on an Invoice does not exist in QuickBooks Online, the invoice exports under the associated Client instead, even when this option is enabled.
- Import objects from QuickBooks Online: For further details refer to Importing Objects to PSA
- Set Up the Segmentation: For further details refer to Mapping Objects Between PSA and QuickBook Online
- Set up Taxes: Before exporting Invoices to QuickBooks Online, verify that the Sales Taxes are mapped to the appropriate Accounts in QuickBooks Online. Setting up Sales Taxes.
- Generate an Invoice/Multi Client Invoice: When all billable entries are approved, they can be included in an Invoice or Multi-Client Invoice and billed to the appropriate Clients. The Invoice Manager allows you to generate Invoices and Multi-Client invoices in PSA respectively. For further details refer to Generating Invoices or Multi-Client Invoices.
Note: When generating an Invoice or multi-client invoice, select the Company for which the invoices are being processed to ensure that only the projects associated with the selected company are displayed.
- Exporting Invoices and Multi Client Invoice Batches:
Generating Invoices or Multi-Client Invoices
When all billable entries are approved, they can be included in an Invoice or Multi Client Invoice Batch and billed to the appropriate clients. The Invoice Manager allows you to generate Invoices and Multi Client Invoice Batches in PSA respectively.
To generate an Invoice or Multi Client Invoice Batch:
- From the Icon Bar click Financial .
- From the Navigation Menu click Invoice Manager.
- Navigate either to the Batches or Invoice tab For further details refer to Creating a new Invoice or Creating a Multi Client Invoice Batch
Note: When generating an Invoice or Multi Client Invoice Batch, select the Company for which the invoices are being processed to ensure that only the Projects associated with the selected Company are displayed.
Exporting Invoices and Multi Client Invoice Batches
Invoices must be in the Allow Invoice to be exported State of the Invoice Workflow. Invoices can be exported to QuickBooks Online as:
- Individual Invoices; for more information, see Exporting Invoices.
- Multi Client Invoice Batches; for more information, see Exporting Multi Client Invoice Batches.
Prior to exporting Invoices/Multi Client Invoice Batches, ensure that the following objects are imported from QuickBooks Online . For more information on importing, see Importing Objects to PSA.
- Chart of Accounts: import G/L accounts from QuickBooks Online.
- Customers as Clients: import customers for whom invoices are generated.
- Taxes: import tax details and tax groups to associate them to Clients you are invoicing.
- Service Items or Products and Services (Income) as Work Types: import service items or products and services (income) as Work Types to create billable time entries against the task originating from the QuickBooks Online work type.
- Non-Inventory Items or Products and Services (Expenses) as Expenses: import non-inventory items or products and services (expenses) as expenses only if exporting billable expense entries.
- Products and Services (Other Expense) as Charges: Import products and services (other expense) as charges only if exporting billable charge entries.
Note: If Taxes and Clients are imported at different times, then Taxes must be imported first and subsequently Clients to ensure that the imported Clients are always associated to the correct Taxes. If Taxes and Clients are imported at the same time (during the same import process), the tax association is automatic.
Exporting Invoices
PSA allows users to export individual invoices to QuickBooks Online from either the Post Invoice or Invoice Manager page.
- From the Icon Bar click Financial .
- From the Navigation Menu click Invoice Manager.
- Navigate to the Invoices tab.
- Click an Invoice # to open the Invoice Edit page for the selected invoice.
- Click the Transactions tab to open the Financial Transactions page, which displays all financial transactions. The information displayed includes the account number, account name, debit, credit, currency type, date and reference.
Note: Debit and Credit amounts should balance to zero.
- Click Post/Unpost to open the Post Invoice page.
- Click the Calendar button beside the Post Date box to select a new date if the date is not correct.
- Select a template from the Invoice template list and then click Preview to view the layout of the invoice report.
Note: When downloading an Invoice Report in Excel, PDF, or Word format, the file name will follow the same naming convention defined for the Invoice File Name field, located within the Invoice tab of the Financial system setup page (Setup > Financial > System).
- Click the Export button to open the Invoices Export to QuickBooks Online page that displays the status of the export process.
Note: The Invoice Summary tab is read-only and displays the total of all expense and charge entries included in the Invoice.
- Upon successful export of the Invoice:
- The PSA Invoice Number appears in the Note to customer field of the QuickBooks Online version.
- Specific information, including the average rate and number of hours/quantity, are mapped to QuickBooks Online as follows:
Time QB Invoice Rate: The average of all billable time/time charges appearing on the invoice per transaction.
Example: On a time entry of 10 hours, wherein 8 hours are billing at 100$ and the remaining 2 hours are billing at 120$, therefore the average billing rate for this entry (transaction) will be (100$ + 120$)/2 = 110$
QB Invoice QTY: The sum of billable time/time charges appearing on the PSA invoice per transaction.
Example: A 4 hour time entry on the same day as a 4 hour time charge, since these are considered 2 separate transactions, each of them would have a QB Invoice QTY of 4.
QB Invoice Amount: This reflects each individual PSA transaction Credit amount, specifically Total Amount divided by Number of Hours.
The QB Invoice Amount per transaction may not reflect the QB Invoice QTY
multiplied by QB Invoice Rate since an average rate is used.
Example: A specific time entry has 8 hours at 100$ and 2 hours at 120$, the QB Invoice QTY Rate would show 110$ (the average), but the QB Invoice Amount reflects the actual amount in PSA, therefore the calculation is:
(8hrs X 100$) + (2hrs X 120$) = 1040$ divided by Number of Hours
and, NOT
10hrs X 110$ = 1100$ divided by Number of HoursExpense QB Invoice Rate: Left blank for each transaction.
QB Invoice QTY: Always a value of 1.
QB Invoice Amount: The amount of each PSA Expense Entry.
Charge QB Invoice Rate: Left blank for each transaction.
QB Invoice QTY: Always a value of 1.
QB Invoice Amount: The amount of each PSA Charge Entry.
Product QB Invoice Rate: This reflects the billing price, Product Unit Price Billing, of each billable Product that appears in the PSA Invoice, specifically the value under the Amount column within the Product tab.
QB Invoice QTY: This reflects the number of billable Products, Product Items, of each billable Product that appears in the PSA Invoice, specifically the value under the # of items column within the Product tab.
QB Invoice Amount: This reflects the total for each Product transaction, specifically the value under the Total column with the Product tab of the PSA Invoice.
Note: The export of individual invoices is also performed from the Invoice Manager page by selecting the check box of an Invoice # and then clicking the Export button. After an invoice is exported, the Invoice Export to QuickBooks Online page indicates that the invoice was successfully exported. If the export process fails, an error message indicates the problems and possible solutions.
- Click Back to return to the Invoice Edit page and then click Back again to return to the Invoice Manager page.
- Select the check box for an Invoice # and click the Post button to post the invoice (marks all entries as billed).
- Upon being prompted to confirm the posting of the invoice, click either:
- Yes to proceed with the posting.
- No to cancel.
The Invoice Summary tab displays an overview of the invoice information, including:
- Last invoice number.
- Last invoice date.
- Total amount of charges, items, expenses, taxes and services included in the invoice.
- Current invoice number.
- Start and end date of the period.
- From the Icon Bar click Financial .
- From the Navigation Menu click Invoice Manager.
- Navigate to the Invoices tab.
- Click an Invoice # to open the Invoice Edit page for the selected invoice.
- Navigate to the Summary tab to display the invoice summary information for the selected invoice.
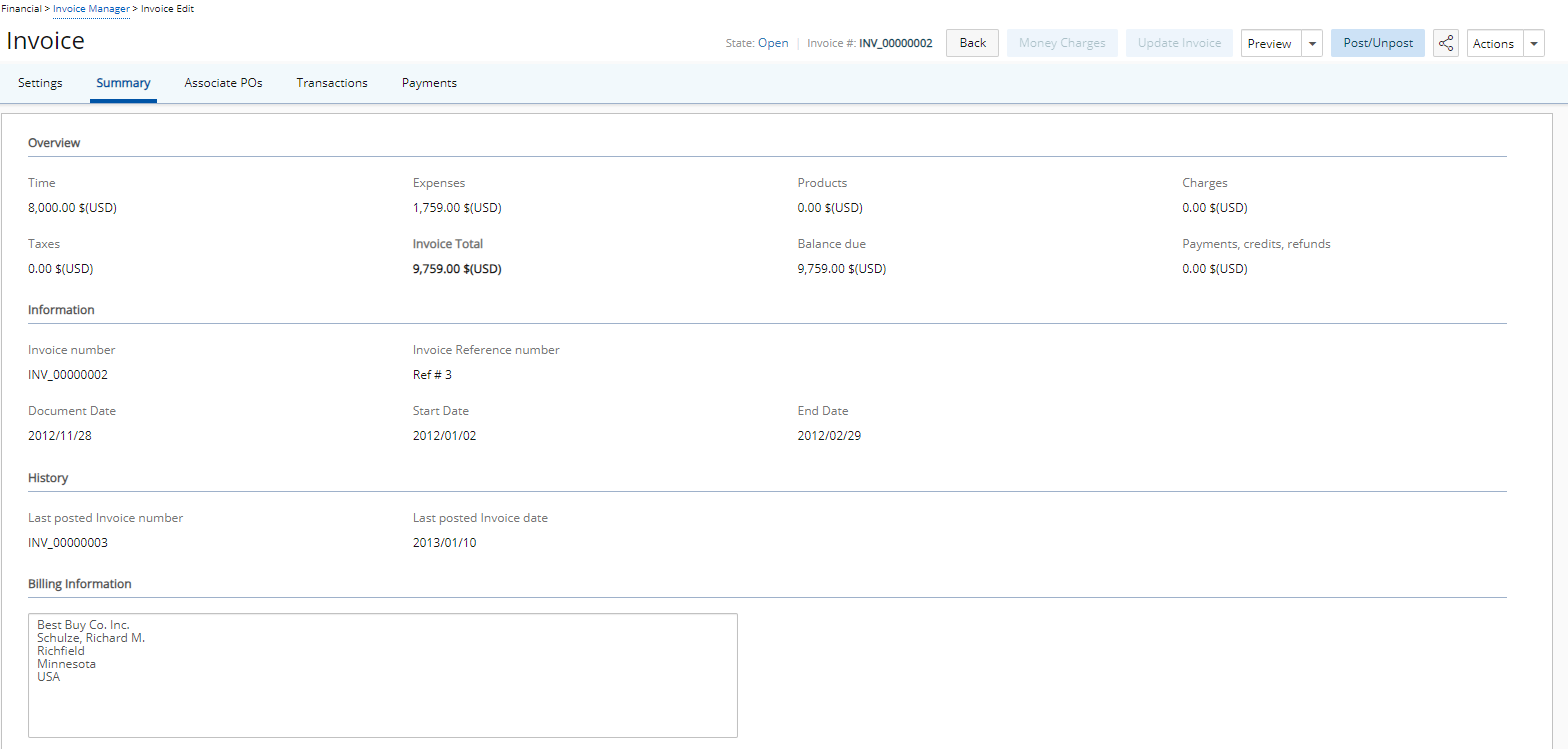
Note: The information on the Invoice Summary page is read-only and cannot be modified.
When generating an invoice with billable expense items that are also taxable, there are three ways the taxes can be handled and viewed in an Invoice Summary.
Note: To handle and view the taxes as described in the procedure of setting up the invoice summary expense entry display options, the correspondence between the sales tax details used at Client level (Setup>Work>Clients>Client Edit>Invoice Options>Tax Group List) and purchase tax details used at Expense Entry level (Entries>Expense Report>Expense Report List>Expense Entry Edit) must be set.
- From the Icon Bar click Setup .
- From the Navigation Menu click Work to expand the corresponding menu.
- From the Work menu items, click Clients.
- From the Clients list that displays, click the Name of the client you wish to access.
- From the left hand side navigation click Invoice Optionswhich is located under Finanacial menu.
- Navigate to the Expense Invoicing sub-tab to determine how the billable expense items that are taxable are displayed on the Invoice Summary page.
- For each of the listed taxes within the Corresponding Taxes section:
- Select the Exclude From Invoice check box to not calculate the taxes incurred from the taxable expense entry and to only display the expense entry’s Net Amount in the Expenses box of the Invoice Summary page.
- Select the Include in Amount check box to calculate the Gross Amount of the expense entry and display the expense entry’s Net + Tax total in the Expenses box of the Invoice Summary page.
Note: If both the Exclude From Invoice and the Include in Amount check boxes are cleared, then the Expense Entry amount and the Expense Entry Tax Amount appear in the Expenses and Total taxes boxes of the Invoice Summary page respectively.
- Click Save to apply your changes.
Exporting Multi Client Invoice Batches
The multi-client invoice feature allows the generation of one invoice for multiple clients and projects. Multi-client invoices can be reviewed and approved collectively, as well as exported to a financial system in a single operation. To export a multi-client invoice, all invoices in the multi-client invoice must be in the Approved and Allow Invoice to be exported state of the Invoice Workflow.
- From the Icon Bar click Financial .
- From the Navigation Menu click Invoice Manager.
- Navigate to the Batches tab.
- From the Batches tab, click the expand
 button located against the required batch to expand the row and view the associated Invoices.
 - From the expanded row click the Invoice # to access the Invoice Edit page.
- Navigate to the Transactions tab which displays all financial transactions. The information displayed includes the account number, account name, debit, credit, currency type, date and reference.
- Click Back again to return to the Batches tab.
- Repeat steps 4-6 for each of the associated invoices for each invoice batch you wish to export.
- Then select the check box of the Batch to export.
- Click Export to open the Invoices Export to QuickBooks Online page that displays the status of the export.
- The PSA Invoice Number appears in the Note to customer field of the QuickBooks Online version.
- Specific information, including the average rate and number of hours/quantity, are mapped to QuickBooks Online as follows:
Time QB Invoice Rate: The average of all billable time/time charges appearing on the invoice per transaction.
Example: On a time entry of 10 hours, wherein 8 hours are billing at 100$ and the remaining 2 hours are billing at 120$, therefore the average billing rate for this entry (transaction) will be (100$ + 120$)/2 = 110$
QB Invoice QTY: The sum of billable time/time charges appearing on the PSA invoice per transaction.
Example: A 4 hour time entry on the same day as a 4 hour time charge, since these are considered 2 separate transactions, each of them would have a QB Invoice QTY of 4.
QB Invoice Amount: This reflects each individual PSA transaction Credit amount, specifically Total Amount divided by Number of Hours.
The QB Invoice Amount per transaction may not reflect the QB Invoice QTY
multiplied by QB Invoice Rate since an average rate is used.
Example: A specific time entry has 8 hours at 100$ and 2 hours at 120$, the QB Invoice QTY Rate would show 110$ (the average), but the QB Invoice Amount reflects the actual amount in PSA, therefore the calculation is:
(8hrs X 100$) + (2hrs X 120$) = 1040$ divided by Number of Hours
and, NOT
10hrs X 110$ = 1100$ divided by Number of HoursExpense QB Invoice Rate: Left blank for each transaction.
QB Invoice QTY: Always a value of 1.
QB Invoice Amount: The amount of each PSA Expense Entry.
Charge QB Invoice Rate: Left blank for each transaction.
QB Invoice QTY: Always a value of 1.
QB Invoice Amount: The amount of each PSA Charge Entry.
Product QB Invoice Rate: This reflects the billing price, Product Unit Price Billing, of each billable Product that appears in the PSA Invoice, specifically the value under the Amount column within the Product tab.
QB Invoice QTY: This reflects the number of billable Products, Product Items, of each billable Product that appears in the PSA Invoice, specifically the value under the # of items column within the Product tab.
QB Invoice Amount: This reflects the total for each Product transaction, specifically the value under the Total column with the Product tab of the PSA Invoice.
- Click Back to return to the Batches tab and then select the check boxes of the batches to post.
- Click the Post button to post the multi-client invoice (makes all entries included in the invoice as billed).
- Upon being prompted to confirm the posting of the Invoice Batches, click either:
- Yes to proceed with the posting.
- No to cancel the request and return to the Invoice Manager page.
- Click the Back link to return to the Batches tab.