You can easily enter time for all your projects for a given Timesheet Period and quickly see your Total Hours as well as how much time you have spent on specific Assignments.
This article details how to pick an Assignment from My Timesheet to enter time against.
Note: To allow Users access to the new and improved My Timesheet in your Sandbox/Implementation/production environments, you must add them to the New Timesheet list. For further details refer to Adding users to the New Timesheet list. If you prefer, you can choose to enforce the use of New Timesheet for all Users at the global level.
Note: The Timesheet Template you have been assigned determines how you enter your time and the fields available to you.
- From the Icon Bar click Entries
 .
. - From the Navigation Menu click My Timesheet.
Tip: You can access your timesheet through different avenues, which are further detailed in Accessing My Timesheet.
- Navigate to the Period you wish to copy from by following one of these steps:
- Click the Calendar button and select the appropriate period.
- Click the Next/Previous buttons to navigate to next/previous Period.
- Click Today to navigate to current Period.

- Click the +Assignment button make your selections.
- Depending on your Timesheet Display Settings:
- The Inline Assignment Mode: When Inline is chosen, upon clicking the +Assignment button you can pick your assignment directly from your Timesheet. Clicking Save
 will add the assignment to your Timesheet.
Or - Modal Window Assignment Mode: When Modal Window is chosen, upon clicking the +Assignment button, a modal window will be displayed allowing you to pick your Assignment.
- The Inline Assignment Mode: When Inline is chosen, upon clicking the +Assignment button you can pick your assignment directly from your Timesheet. Clicking Save
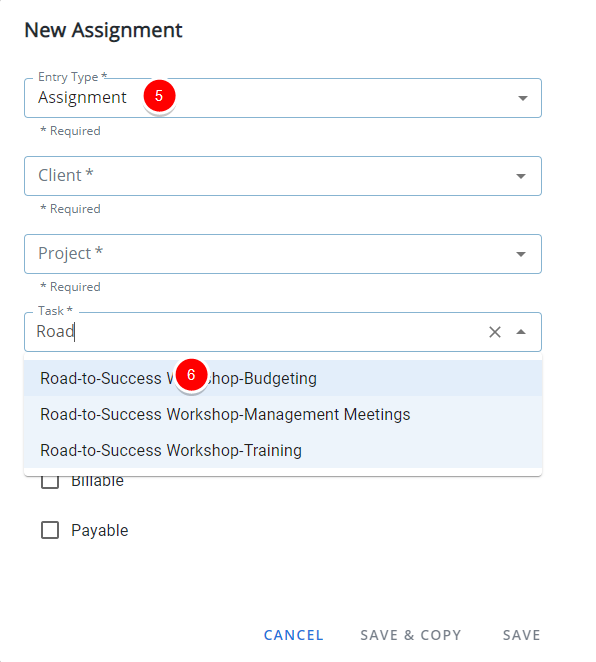
- Select Assignment from the Entry Type list. The available options to you are: Assignment, Adjustment and Non-Working Time.
Note: By default, Assignment is selected.
- If you know the name of the Task for which you wish to make a Time Entry, you can begin entering the name in the Task box and the list will automatically begin to filter based on your entry. This works in the same manner with Client Portfolio and Project list boxes. For further details refer to Timesheet Assignment article.

Note: The Client selection box exclude Clients without any active Projects from the list, displaying an uncluttered list allowing you to efficiently select the required Client.
Tip: You can use the keyboard Tab key to move between selection boxes and then use your keyboard Up and Down arrows to select from the available options.
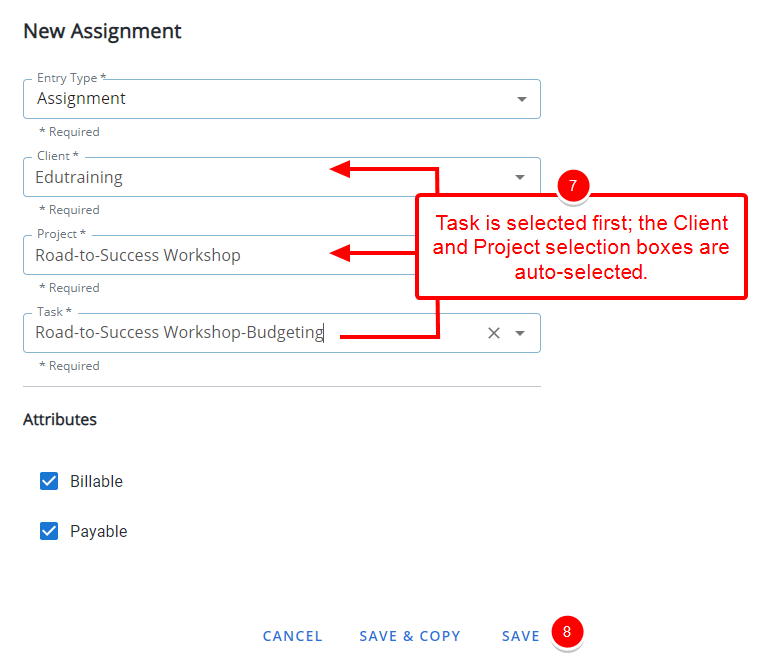
- Select the Required Task. Note that the Client and Project boxes are auto-selected
- Task, the Project and Client boxes will automatically populate based on the association to the selected Task.
- Project, the Client box will automatically populate based on the association to the selected Project, and the Task selection box is filtered accordingly to only show Tasks belonging to the chosen Project.
- Client, the Project selection box is filtered accordingly to only show Projects belonging to the chosen Client.
- Click SAVE. The New Assignment dialog box will close and your Timesheet will be displayed with the newly picked Assignment.
- You can now enter your time against the chosen Assignment. For further details refer to Entering Regular Time.

Higher level options are auto-selected and the next lower level selection box is filtered. As an example, when you select a: