You can quickly create a Leave Request from the Timesheet page with minimal navigation.
This article details how to create a Leave Request through My Timesheet.
Example: Audrey would like to submit a Leave Request to her approval manager immediately after entering time. She can now do so by clicking the link and immediately proceed with creating and submitting a Leave Request.
Note: To allow Users access to the new and improved My Timesheet in your Sandbox/Implementation/production environments, you must add them to the New Timesheet list. For further details refer to Adding users to the New Timesheet list. If you prefer, you can choose to enforce the use of New Timesheet for all Users at the global level.
- From the Icon Bar click Entries
 .
. - From the Navigation Menu click My Timesheet.
Tip: You can access your timesheet through different avenues, which are further detailed in Accessing My Timesheet.
- Navigate to the required Period:
- Click the Calendar button and select the appropriate period.
- Click the Next/Previous buttons to navigate to next/previous Period.
- Click Today to navigate to current Period.

- Click the ellipsis
 button to access My Timesheet context menu.
 -
From the available options click Create Leave Request.
Note: Depending on how the administrator has configured the Timesheet, the fields and/or naming conventions for the links may differ.
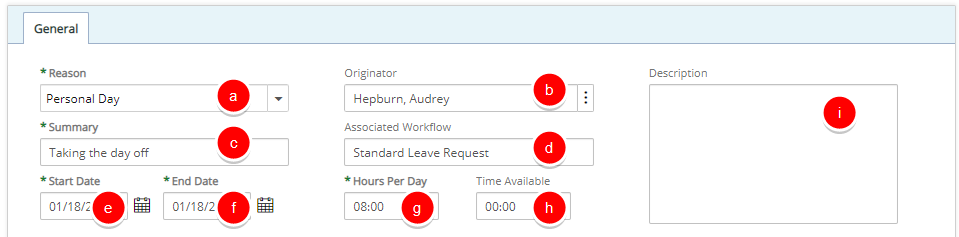
- From the Leave Request edit page, select or enter the following information:
- Reason: Click to select a Reason from the list of available options.
- Originator: Select the Originator of the Leave Request.
- Summary: Enter a Summary for the Leave Request (maximum of 255 characters with spaces).
- Associated Workflow: Default value (Read only).
- Start Date: Enter or select the Start Date of your Leave Request.
- End Date: Enter or select the End Date of your Leave Request.
- Hours Per Day: Enter the number of Hours Per Day if different from the Default value as set in the Timesheet Template.
- Time Available: Default value (Read only).
- Description: Enter a Description for the Leave Request (maximum of 255 characters with spaces).
- Click Save to create the Leave Request or Back to discard your changes. Selecting this option will save the Leave Request without exiting the Leave Request edit page.
You can optionally click the arrow button to access the Save context menu. The available options from the Save context menu are:- Save & Close: Selecting this option will save the Leave Request and close the Leave Request edit page.
- Save & New: Selecting this option will save the Leave Request and close the Leave Request edit page giving you the option to create a new one.
Note: Upon saving, the Leave Request navigation menu items Assignments, Attachments and History are now available to you. For further details refer to: Adding Note(s) & Note Attachment(s) to Leave Requests and Adding Documents & Attachment(s) to Leave Requests
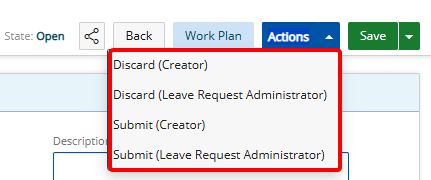
You can also click the Action button to view the available Transitions and to move the Leave Request to the next State. - Click the Actions button to view the available Transitions and to move the Leave Request to the next State.