Expense Manager
The Expense Manager page is a central, easy-to-use area for viewing and managing Expense Reports. It provides quick access to all reports based on your role and assignment.
The Expense Manager includes three out-of-the-box Views:
- All Expense Reports – Provides a list of all Expense Reports for all Users.
- My Expense Reports – Provides a list of your Expense Reports.
- Assigned Expense Reports – Provides a list of all Expense Reports that are assigned to and are awaiting action from you.
These out-of-the-box system Views may not be deleted. However you can:
- Create/Edit Details/Manage/Delete your own Private Views.
- Create/Edit Details/Manage/Delete Public Views provided you are granted the respective Public Expense Manager View right(s) located within Setup > Organization > System > Security > Security Profile> Management > Time.
This article details:
- Accessing the Expense Manager
- Security Permissions Tied to Expense Manager Views
- The out-of-the-box Views:
Note: The pages and/or format in which the page(s) is/are shown in this article may differ from yours as your organization may have required a different set up altogether.
Accessing the Expense Manager
- Access the Expense Manager page:
- Within the My Assigned Items web part of the Home Page: Click the Expense Reports link.
OR - From the Icon bar: Click Entries
 then select Expense Manager from the Navigation menu.
- Within the My Assigned Items web part of the Home Page: Click the Expense Reports link.
- View the Expense Manager page, where you can quickly Create Expense Reports, Import Transactions, Manage Exceptions or Close/Reopen Period.
- From the View context menu choose.
Security Permissions Tied to Expense Manager Views:
- The Administration Security Permission under Management > Expense determines access to the All Expense Reports View.
- The Assigned Reports Security Permission under Entry > Expense determines access to the Assigned Expense Reports View.
- The Expense Reports List with My Expense Reports View Security Permission under Management > Central determines access to the My Expense Reports View.
- The Public Expense Manager View Security Permission under Management > Central determines a User's ability to Modify, Create, or Delete Public Expense Manager Views.
- The Read-Only Access to All Expense Reports Security Permission under Management > Expense determines a User's ability to view All Expense Reports View without making any modifications.
Note: This permission allows administrators to grant visibility into all Expense Reports View while preventing unauthorized changes. The Read-only Access to All Reports permission is dependent on the Administration permission which must be granted as well.
The out-of-the-box Views
The out-of-the-box Views in the Expense Manager help you quickly access and manage Expense Reports based on your role or responsibility. Whether you're reviewing reports assigned to you, checking your own submissions, or viewing all reports across the organization, each View is designed to streamline your workflow and support efficient expense management.
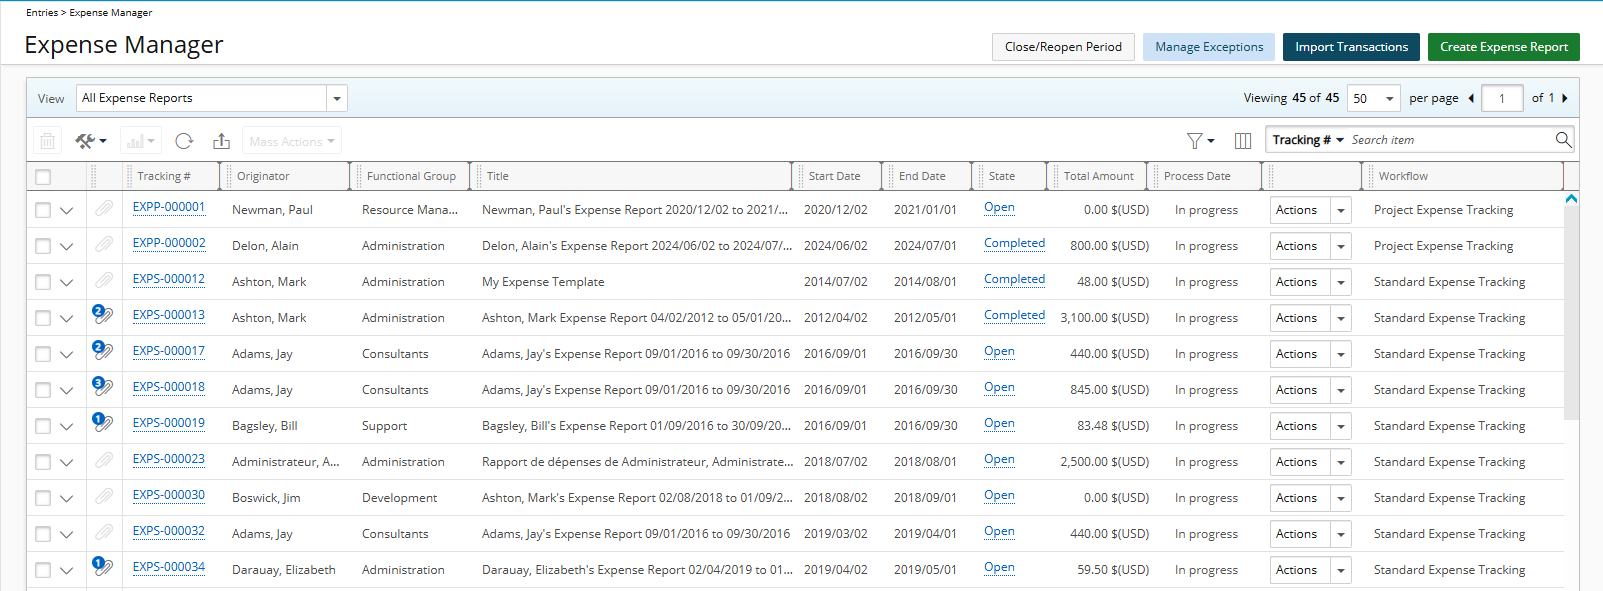
All Expense Reports View
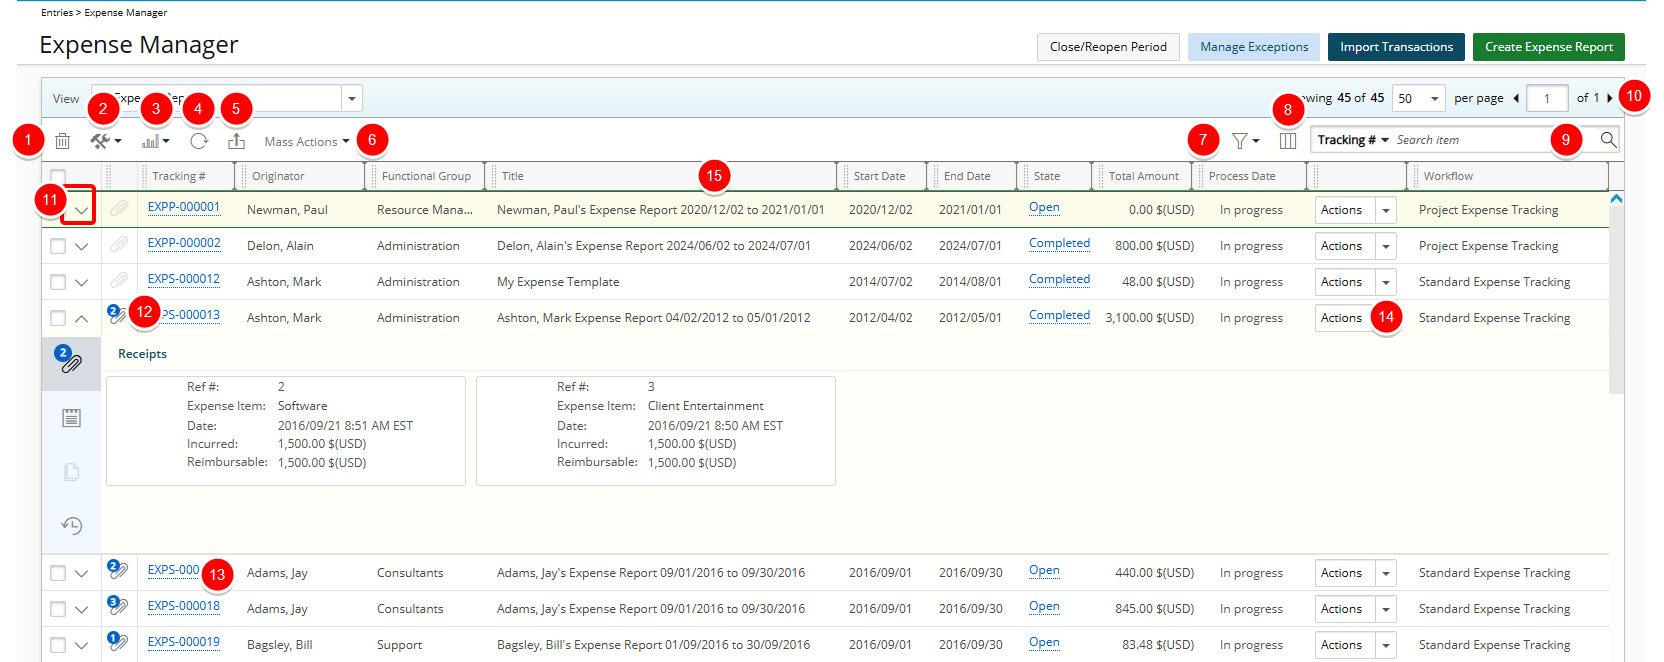
The All Expense Reports provides a list of all Expense Reports for all Users.
- Click Delete
 to delete the selected Expense Report(s).
 - Access the Tools
 context menu. The available options from the Tools context menu are:
 - Import Transactions
- View All Receipts
- Copy
- Reassign Report.
- The Reports
 context menu is available upon selecting an Expense Report from the list. The available options are Detailed Personal Expense Report and Summarized Personal Expense Report.
 - Click to Refresh
 the page.
 - Click Export to Excel
 to export all the Expense Reports listed, and as displayed, to Excel. Note that numeric columns are formatted as number or currency in the exported Excel files, allowing you to perform calculations directly on the data. For further details refer to Export to Excel.
 - From the Mass Actions context menu you can Approve or Reject multiple Expense Reports.
Note: The Mass Actions button is only active when all selected Expense Reports are in the same Workflow State.
- The available on page Filter
 options are In Progress and Period Closed. By default In Progress is selected.
 - Click Column Selection
 to open the Column Selection dialog box where you can add or remove columns to display on the Expense Report Manager My Reports tab.
The default, the following columns are displayed: Number of Attachments, Tracking #, Originator, Functional Group, Title, Start Date, End Date, State, Total Amount, Process Date, State ID (This the Action column) and Workflow.
You can choose to include the following columns in the layout: Amount Due, Approval Group, Cash Advance, Creator, First Name, In Progress, Last Name, Payable Batch #, Total Amount Reimbursed, Total Billable , Total Capitalized, Total Funded, Total Payable, Total R&D, Total Reimbursable, and User Id. - To search for Expense Report(s), click the Search down arrow, select a criterion and then enter the corresponding value. You can search by: Tracking #, Originator, Functional Group, Title, Start Date, State, Workflow, Last Name, First Name, User Id, Approval Group, Creator and Payable Batch#.
- Pagination is included at the top to facilitate function.
- Click the Show/Hide Expanded Row to show hide the Expanded Rows.
- The counter displays the total number of Attachments (Receipts and Documents) in the Expense Report.
- Clicking the Tracking Number will allow you to access the
- Easily Action on the Entry.
- From the table header:
- You can easily sort the columns by ascending or descending order simply by clicking a column header. Note that an arrow indicates the descending (
 ) or ascending (
 ) order applied to the column.
 - Click
 and move a column to the desired position.
 - You can dynamically resize column(s), to your preferred width. Simply move your cursor to the column boundary (
 ) you want to resize. When the cursor becomes a resize cursor, click and drag the column accordingly.
- You can easily sort the columns by ascending or descending order simply by clicking a column header. Note that an arrow indicates the descending (
My Expense Reports View
From the My Reports tab, Expense Reports belonging to the logged user can be accessed.
- Click Delete to delete the selected Expense Report(s).
- Access the Tools context menu. The available options from the Tools context menu are:
- Import Transactions
- View All Receipts
- Copy
- Reassign Report.
- The Reports context menu is available upon selecting an Expense Report from the list. The available options are Detailed Personal Expense Report and Summarized Personal Expense Report.
- Click to Refresh the page.
- Click Export to Excel to export all the Expense Reports listed, and as displayed, to Excel. Note that numeric columns are formatted as number or currency in the exported Excel files, allowing you to perform calculations directly on the data. For further details refer to Export to Excel.
- The available on page Filter options are In Progress and Period Closed. By default In Progress is selected.
- Click Column Selection to open the Column Selection dialog box where you can add or remove columns to display on the Expense Report Manager My Reports tab.
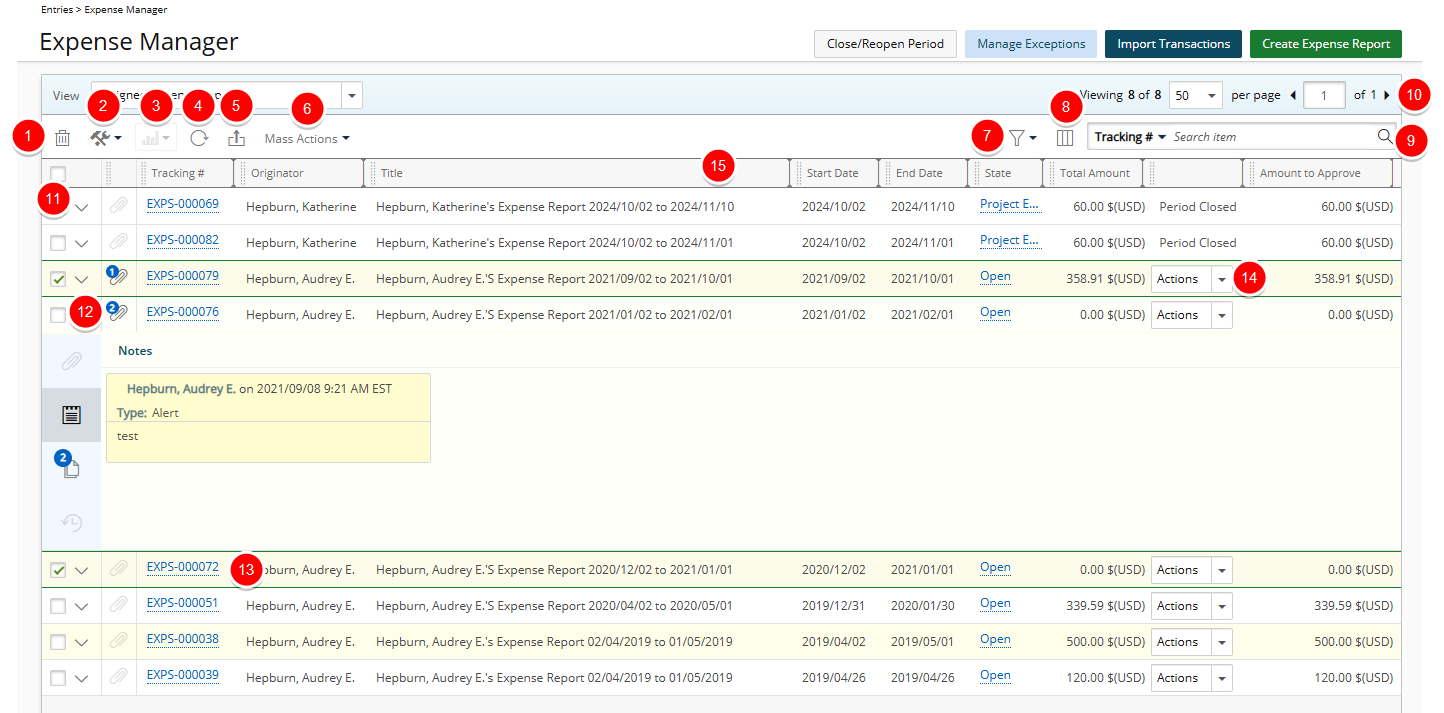
The default, the following columns are displayed: Number of Attachments, Tracking #, Title, Start Date, End Date, State, Total Reimbursable, Process Date, State ID(This the Action column) and Workflow.
You can choose to include the following columns in the layout: Amount Due, Approval Group, Cash Advance, Creator, First Name, Functional Group, In Progress, Last Name, Originator, Payable Batch #, Total Amount Reimbursed, Total Billable and User Id. - To search for Expense Report(s), click the Search down arrow, select a criterion and then enter the corresponding value. You can search by: Tracking #, Title, Start Date, State, Workflow, Originator, Functional Group, Last Name, First Name, User Id, Creator, Approval Group and Payable Batch#.
- Pagination is included at the top to facilitate function.
- Click the Show/Hide Expanded Row to show hide the Expanded Rows.
- The counter displays the total number of Attachments (Receipts and Documents) in the Expense Report.
- Clicking the Tracking Number will allow you to access the
- Easily Action on the Entry.
- From the table header:
- You can easily sort the columns by ascending or descending order simply by clicking a column header. Note that an arrow indicates the descending () or ascending () order applied to the column.
- Click and move a column to the desired position.
- You can dynamically resize column(s), to your preferred width. Simply move your cursor to the column boundary () you want to resize. When the cursor becomes a resize cursor, click and drag the column accordingly.
- You can easily sort the columns by ascending or descending order simply by clicking a column header. Note that an arrow indicates the descending (
Assigned Expense Reports View
From the Assigned Reports tab, Expense Reports assigned to the logged user can be accessed.
- Click Delete to delete the selected Expense Report(s).
- Access the Tools context menu. The available options from the Tools context menu are: Import Transactions, View All Receipts and Reassign Report.
- The Reports context menu is available upon selecting an Expense Report from the list. The available options are Detailed Personal Expense Report and Summarized Personal Expense Report.
- Click to Refresh the page.
- Click Export to Excel to export all the Expense Reports listed, and as displayed, to Excel. Note that numeric columns are formatted as number or currency in the exported Excel files, allowing you to perform calculations directly on the data. For further details refer to Export to Excel.
- From the Mass Actions context menu you can Approve or Reject multiple Expense Reports.
Note: The Mass Actions button is only active when all selected Expense Reports are in the same Workflow State.
- The available on page Filter option is Period Closed. By default it is unselected.
- Click Column Selection to open the Column Selection dialog box where you can add or remove columns to display on the Expense Report Manager My Reports tab.
The default, the following columns are displayed: Number of Attachments, Tracking #, Originator, Title, Start Date, End Date, State, Total Amount, State ID(This the Action column) and Workflow.
You can choose to include the following columns in the layout: Amount Due, Amount to Approve, Approval Group, Cash Advance, Creator, First Name, Functional Group, Last Name, Payable Batch #, Process Date, Total Amount Reimbursed, Total Billable, Total Capitalized, Total Funded, Total Payable, Total R&D, Total Reimbursable and User Id. - To search for Expense Report(s), click the Search down arrow, select a criterion and then enter the corresponding value. You can search by: Tracking #, Originator, Title, Start Date, State, Workflow, Approval Group, First Name, Functional Group, Last Name, User Id and Payable Batch#.
- Pagination is included at the top to facilitate function.
- Click the Show/Hide Expanded Row to show hide the Expanded Rows.
- The counter displays the total number of Attachments (Receipts and Documents) in the Expense Report.
- Clicking the Tracking Number will allow you to access the
- Easily Action on the Entry.
- From the table header:
- You can easily sort the columns by ascending or descending order simply by clicking a column header. Note that an arrow indicates the descending () or ascending () order applied to the column.
- Click and move a column to the desired position.
- You can dynamically resize column(s), to your preferred width. Simply move your cursor to the column boundary () you want to resize. When the cursor becomes a resize cursor, click and drag the column accordingly.
- You can easily sort the columns by ascending or descending order simply by clicking a column header. Note that an arrow indicates the descending (