Bulk Upload Content Records
If you respond to RFPs, you may have already developed an RFP answer database. These answers can serve as an excellent jump-start to build a Q&A database in Qvidian. Bulk loading takes a single Microsoft Word document with the Question and Answer pairs and creates a content record with each Q&A pair. You can also bulk load Microsoft PowerPoint slides to create a content record for each PowerPoint slide. Bulk loading content records is a two-step process. Format your content and upload it to Upland Qvidian.
Note: For more information on downloading and applying style templates and merge codes before bulk loading your content records, see Download Microsoft Word and PowerPoint templates and Download Merge Codes.
Step 1: Format your content
Before you bulk-load content, you must format the content in Word or PowerPoint. Formatting ensures your content loads correctly and saves the effort of formatting or styling the answers for every response. It also gives the flexibility to edit the look of the content.
The first paragraph in the document is considered the title. The system ensures that the styling applied to the first paragraph is unique to the title styling and always denotes a title. Text following the title is considered the body. Each title and the text following it becomes a record. For example, if your first paragraph uses Word's "Heading 1" style, any other text that uses the "Heading 1" style will be considered a title and hence a new, unique record.
-
To format a Word file, apply a Word style to the first paragraph used as the title and not the text body.
Note: For more information on downloading templates stored in Qvidian and applying those templates, see Download Templates and Using Microsoft templates with your Qvidian content.
For best results, you should also format your document using the tips below.
- Make a copy of the file.
- Organize your question-and-answer pairs into separate documents based on the folders you want to store. When you bulk load the documents, you can select the required folder. If you do not separate the pairs into different documents, you have to reorganize the records after bulk-loading.
- Instead of using the question as the title of the question-and-answer record, use a simple concept to help users locate the content. For example, change "How many people does your company employ?" to "Number of employees." The finished documents using the records do not include the title but only the answer from the question-and-answer records.
- Remove extraneous content, such as headers, footers, tables of contents, instructions, and section headings.
- Remove extra spaces and section breaks. The content will display the same in Upland Qvidian as it does in the document.
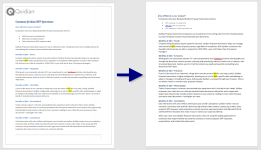
An example of a document before and after the extraneous content and spaces were removed. Click to enlarge. - Edit for persuasiveness, grammar, spelling, punctuation, and jargon.
- Insert merge codes to customize your content. For more information, see Merge Codes.
- Anchor graphics to the answer section of the pair and set it to move with the content. Do not anchor graphics to the title.
- Compress graphics. You can do this using the Compress Pictures option in the Adjust group of the Format tab in Word.
- Limit your document to no more than 50 pages or 500 KB.
When you bulk load PowerPoint presentation, each slide will become a separate record.
- To format a PowerPoint slide, add a title to each slide. The title of each slide will be used as the title of the content record. If there is no title, Upland Qvidian will give it an automatically generated title, such as "upload234." You can edit titles after the slides are loaded.
For best results, you should also format your slides using the tips below.
- Organize your slides into separate PowerPoint files based on the folders you want to store. When you bulk load a file, you can select the required folder for the set of slides. If you do not separate them into different files, you have to reorganize the records after bulk-loading.
- Apply a template to your slides. For more information on downloading templates stored in Qvidian and applying those templates see Download Templates and Using Microsoft templates with your Qvidian content.
- To download a style template from the library, select Download Style Templates from the More Options menu to the right of the Search bar. For more information, see Download Templates.
- To apply a template, also known as a theme, in PowerPoint, select a theme from the Theme ribbon on the Design tab. For more information on styles, see the Microsoft Support Website.
- Download your organization's PowerPoint template from Upland Qvidian, cut and paste your slides into the template and then apply the layouts in the template to the slides. This will ensure that the slides you load are consistent with others in your library which allow you, and other users, to mix and match the slides in created presentations.
- Edit for persuasiveness, grammar, spelling, punctuation, and jargon.
- Limit file size to no more than 300MB.
- Remove extraneous content, such as title slides, closing slides and dividers.
- Insert merge codes to customize your content. For more information, see Merge Codes.
- Compress graphics. You can do this using the Compress Pictures option in the Adjust group of the Format tab in PowerPoint.
Step 2: Load your file
- Open the Folders tab in the library.
- Hover over the folder where you want to bulk load your file.
- Click the More Options
 menu and select one of the following:
- Upload Content to Folder > Bulk Load Word Files. The "Bulk Load Word Content" page displays.
- Upload Content to Folder > Bulk Load PowerPoint Files. The "Bulk Load PowerPoint Content" page displays.
- Click the Details tab to add information to the content record.
- To upload any additional files, do one of the following:
- Drag and drop the file(s) directly into the panel. The "Submit New Content" page will appear.
- Click the Submit New Content button. The "Submit New Content" page will appear.
- To remove a file from, click Delete on the listed file.
- Enter the content record Title. If a title was not specified when the content record was uploaded, the title will default to the file name.
- Select a Content Type from the dropdown menu:
Use the Select Folder field to determine the folder where the content record will reside. You will be prompted to load the Default Content Permissions of the folder. Click Load or click Cancel if you do not want to load the default permissions of the folder.
- If you selected a folder earlier, that folder name appears in the Select Folder field. To remove a folder, click X.
- If you do not select a folder, the content record will be unassigned, which means that it is not stored in a library folder.
Note: Unassigned content can only be found by running the default Unassigned saved search. Content will also become unassigned if you delete a folder but choose not to delete the content in the folder. You may choose not to select a folder when you are uploading multiple content records to be stored in multiple folders and plan to assign folders after the content has been uploaded.
- Select a Language from the dropdown menu. The language associated with a record indicates the language in which the content is written and determines the language that is used to index the content for searches.
- Click in the Expiration Date field to set when the content will expire. You can set the expiration date by specifying the date or specifying the numbers of days in which the content will expire. The titles of expired content records are displayed in red and have a expiration status icon that is illuminated when a record is expired; content with an expired status can still be used.
- Select the Submitted checkbox if a record must be reviewed prior to general use. Records marked as Submitted are not visible to users whose permissions allow them to view only enabled content but can be found by other users through search or by using the built-in default saved search "Submitted Content".
- Select the Enabled checkbox to make a record available for general use and visible to all users with view permissions.
- Select the Lock Content After Build checkbox to lock the content after it is built when the Lock After build Architecture setting is set to "Content Marked as Locked". Locked content within a document or package cannot be edited without a password. Only Microsoft Word records can be locked.
- Select the content Owners from the dropdown menu. The owner of a content record is, by default, the creator of the record. Owners automatically have the "Manage" security permission for the record, and can use the "My..." built-in public saved searches to find all expiring content that they own. Owners may receive an email notification when the content is edited, feedback about the content is submitted, or if the content has expired or is due to expire soon.
- Enter any Comments about the content. Comments may be added to give users additional information about the content.
- Enter the Contact Info for Subject Matter Experts or other users who can answer any questions on the content and verify its accuracy.
- Select the Alert Enabled checkbox to display an alert when users perform one of these actions on the record: Save to Clipboard, Accept Answer, Library Reference, Preview, Generate URL, Copy, or Download. It will also display when dragging and dropping from the library to a slice in a project RFP or automatically or manually inserting the record into an RFP using AutoFill.
- If alerts are enabled, enter an Alert Message. This text will display when you drag and drop the record from the library to a slice in a project RFP and when you automatically or manually insert the record into an RFP using AutoFill.
Note: If you add a file that does not match the selected Content Type, such as adding a slide file after selecting Q/A, the file will be highlighted in red and the following message will display beneath the Add Files box: " Files highlighted in red will not be uploaded." If you try to save the content, an Import Content box will display with the following message: "At least one file must be selected for import in the Content Details tab."
Note: If you upload multiple files, we recommend you leave the Title field blank to avoid creating records with the same title. The file name When the field is left blank, the file name is set as the title. You can modify the title later. If you add several files, each will become a separate content file with its unique Content ID but with the same properties (content type, language expiration date, etc).
File Type Supported Extensions File doc, docm, docx, ppt, pptm, pptx, xls, xlsm, xlsx, pdf, jpg, jpeg, jpe, jfif, png, gif, bmp, tif, tiff, txt, log Slide ppt, pptm, pptx Item doc, docm, docx, ppt, pptm, pptx Q/A doc, docm, docx Example: Searches can be filtered against Content Type, so the selection can be used as a way to categorize content. Q/A is intended to be used for Question/Answer content, Item is intended to be used for content that is used in document type architecture, Slide is intended for PowerPoint content, and File is intended for content that doesn’t fall into any of the other categories.
Tip: Because the maximum file size for individual files to be uploaded to the library is 300MB, it is considered best practice to link to a video rather than embedding it into your presentation. This keeps file sizes smaller, reducing build and download time. Be aware that if you link your video you will need an internet connection when you present.
Tip: You can include additional file formats by adding them as values using the "SelectFileAllowedFileExtensions" Global settings. For more information, see below.
Note: Records may also be disabled (not explicitly chosen, but the state of being neither enabled nor submitted), but the record will not be found by the Submitted Content built-in public saved search.
Note: Project participants can still edit the locked content within their projects but cannot edit the content record itself. For more information, see Lock documents and packages.
Note: Alerts are an excellent way to display information that is critical to consider when including a given content record in a document or presentation, such as a requirement to check with Compliance prior to using an RFP answer, a reminder to include additional line items in the customer’s pricing or a warning that an item may have just become outdated.
- To upload any additional files, do one of the following:
- (Optional) Click the Custom Metadata tab, and enter the appropriate information into the custom fields. The Custom Metadata tab displays the fields for any custom metadata defined for your organization.
Note: Content managers can associate users with content records by creating custom metadata fields with the “User” data type. Once created and enabled, these "User" metadata fields will appear on the Custom Metadata tab of the Content Properties dialog where different users in your organization can be identified with their intended purpose (e.g. SME, North America Reviewer, Europe Reviewer, etc.). This is particularly useful when creating workflow steps in Projects; managers can auto-assign users associated with these content record Custom Metadata fields when used in a questionnaire response.
Note: Click
 to update any "Date" type custom metadata fields.
 - (Optional) Click the Keywords tab. Keywords are words or phrases explicitly assigned to content records to categorize them. Keywords support legacy functionality and are not recommended for most environments.
- To search for a keyword, enter text into the search box at the top right of the grid, and click the Search
 icon or Enter.
 - To add a new keyword, click + in the header. The "Add Keywords" dialog will display. Once a keyword is selected, a blue checkmark will appear next to it.
- To remove a keyword, hover over the row and click —.
- To sort columns chronologically or alphabetically, click the column header name. Click the name again to switch from ascending to descending order.
- To filter the grid, hover over the column header and click the Filter
 icon and set the filter parameters.
 - At the bottom right of the grid, use the "Rows per page" dropdown menu to select the number of rows that you want to be displayed.
- To search for a keyword, enter text into the search box at the top right of the grid, and click the Search
- (Optional) Click the Learned Terms tab. When users acknowledge that a content record returned in a search is an appropriate match for the search text by using the record, search terms are automatically added to record as learned terms to improve search results. For more information, see search terms.
- To search for a learned term, enter text into the search box at the top right of the grid, and click the Search icon or Enter.
- To add a new learned term, click + in the header. The "Add Learned Term" dialog will display. Enter the term into the field and click Add.
- To remove a learned term, hover over the row and click —.
- To edit a learned term hover over the learned term to display the actions menu. Click Edit all instances of the terms button. Edit the learned term and click Done.
- To do a find and replace of learned terms text click the Find and Replace text in all terms for this content record
 icon. Enter the term into the "Find" field and click Find. The results will appear below. Select all the occurrences you wish to replace and enter the new term in the "Replace with" field. Click Replace.
 - To sort columns chronologically or alphabetically, click the column header name. Click the name again to switch from ascending to descending order.
- To filter the grid, hover over the column header and click the Filter icon and set the filter parameters.
- At the bottom right of the grid, use the "Rows per page" dropdown menu to select the number of rows that you want to be displayed.
Note: Search terms are only added if the user has the "Add search terms when content is used as a result of library search" user or role application permission granted.
- To search for a learned term, enter text into the search box at the top right of the grid, and click the Search
- Click Permissions tab. It is not necessary to grant access to users or who already have permission to view all content, or all enabled content, in all folders.
- Click Roles tab or the Users tab and select the roles or users who should have permissions for the content. For each selected user or role, identify which of the following permissions they should have:
- View: View the content in the folder and use it, but not perform other functions on it.
- Edit: Modify and update any content record in the folder.
- Manage: View and edit any content record in the folder and its properties, move and copy any content record from this folder to another folder for which you have the New Content permission.
- Owner: This permission is only available in the Users tab. You can set multiple users as owners of the bundle.
- To work with the Roles / Users grid:
- To search for a role, enter text into the search box at the top right of the grid, and click the Search icon or Enter.
- To sort columns chronologically or alphabetically, click the column header name. Click the name again to switch from ascending to descending order.
- To filter the permissions by role, hover over the column header and click the Filter icon. The "Filter" dialog will appear. Set the filter parameters: Contains All, Contains Any, Matches Any, Matches Exactly, Matches any or is empty, Starts with, Ends with, Is Empty, Is Not Empty, or Does Not Contain from the Operator dropdown menu. The Contains All, Contains Any, Matches Any, Matches Exactly, Matches any or is empty, and Does Not Contain operators allows you to enter more than one value by pressing the Enter key after each value. The Starts with and Ends with operators allow you to enter a text value to find. The Is Empty and Is Not Empty operators do not require a value. Enter a value into the Text field and click Apply.
- At the bottom right of the Users grid, use the "Rows per page" dropdown menu to select the number of rows that you want to display on the grid.
- You can customize your grid columns.
 Customize columns
You can show, hide, and order columns to display on the grid.
- Click the Customize Columns
 icon in the top right corner of the grid to display the Columns dialog. The "Manage Columns" dialog will appear.
 - To filter the column list, enter text into the Available Columns search box.
- Select your desired column(s) using the checkboxes or by clicking the rows and using CTRL+CLICK or SHIFT+CLICK to select multiple records. Select the Select All option from the More Options
 menu to enable all the columns and use the Left
  and Right
  icons to move the columns between the Available and Selected columns to determine which columns will be displayed on the grid.
 - To determine grid order: drag and drop any Selected Columns, select specific column checkboxes and use the Move to Top or Move to Bottom options from the More Options menu, or select specific column checkboxes and use the Up
 and Down
  icons to order the columns.
 - Click Restore Default to return to the default settings.
- Click Save to save the changes and close the dialog box or Cancel to close without saving changes.
- To search for a role, enter text into the search box at the top right of the grid, and click the Search
- Click Roles tab or the Users tab and select the roles or users who should have permissions for the content. For each selected user or role, identify which of the following permissions they should have:
- Click Bulk Load and Save to bulk upload and save the content or Cancel to exit without uploading the content.