A Distribution is a defined group of one or more recipients and associated routing rules. By using Distributions, you avoid the need to manually enter recipients each time you want to send a document to a group.
Distribution Types
-
Personal Distributions – also called My Distributions, you can create custom distributions for your unique needs. For example, you may have a distribution defined for sending information to people within your company and another distribution for sending information outside the company.
-
Public Distributions – which are created by a System Administrator for group use. For example, all members of the marketing group may have a distribution predefined specifically for their use. Or, you can also make your own Personal Distributions available as Public Distributions to which other users can subscribe.
Distribution
Collections may also be available. These are collections of
Public distributions that a System Administrator creates for the use of
specific user or device groups.
Distributions are available on the Embedded Device Client display panel. Personal Distributions require authentication. By default, Public Distributions do not. With either, you can use a single MFP button to instruct the server to send your document to the recipients in your selected distribution.
The My Distributions
tile lists your Personal and Public distributions created in
The Subscribed Distributions tile lists all the Public distributions of other users that you are subscribed to.
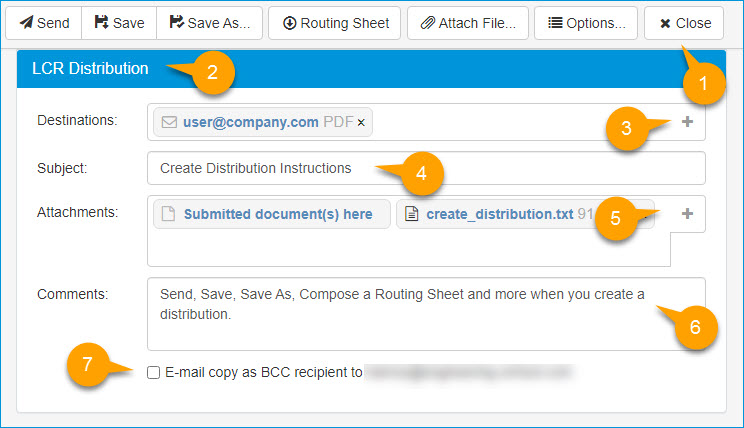
| Create Distribution Legend | Description |
|---|---|
|
1. Toolbar |
Use the toolbar to:
|
| 2. Distribution Name header | Shows the distribution name after it is saved. |
|
3. Destinations box and Add icon (+) |
Use to create and specify a destination; for example, email address. It is also used to specify a document's delivery format; for example, PDF. Note: The destination can also be a DMS folder that you can use for DMS Profiling. |
| 4. Subject box | Specify a subject for the message. |
|
5. Attachments box and Add icon (+) |
Browse and select files. Note: You can also drag and drop files into the Attachments box or use the Attach File button in the toolbar. |
| 6. Comments box | Specify additional comments; if any. |
| 7. Email copy as BCC recipient to check box | Use to send a copy to your email address. |
You can create personal distributions for one-time use or save for reuse. In addition, you can compose a Routing Sheet and set other options by using the Create Distribution tile.
To create a distribution
-
Open WebApps from your browser.
-
Select Create Distribution on the Home page. The Create Distribution page appears.
-
Click the Plus (+) on the Destinations box. The Destinations Type drop-down list appears.
-
Select a destination; for example, Email. The Recipient Properties dialog box appears
Note: The Email destination will be used for illustrative purposes in the next series of steps.
-
Specify the following Destination and Recipient parameters.
-
Email
-
Name
-
Company
-
Business Phone
-
-
Specify the following options.
-
Filename
-
Deliver as (document format)
-
-
Click OK.
-
Specify the following Message options.
-
Subject
-
Attachments - You can select the Plus (+) icon, drag and drop documents in the Submitted document(s) here area or use the Attach File button in the toolbar.
-
Comments
-
Email copy as BCC recipient to your email address.
Note: You can drag and drop emails with attachments or just attachments onto a new, personal and favorite distribution. Contact your Administrator for assistance if you are not able to drag and drop emails and/or attachments.
-
You can perform the following additional steps based on your personal distribution requirements.
-
Send the message for one time use only without saving the distribution.
-
Save the distribution for reuse and send the message.
See also
Creating a Personal Distribution
Creating a Favorite Distribution
