You can create a personal distribution by using the
To create a Personal Distribution
-
Open
-
Select Distributions > My Distributions.
-
Select + New on the toolbar.
-
At the end of the Destinations box, select the Plus + icon.
-
Select a destination on the Destination drop-down list. The Recipient Properties dialog box appears.
Note: Destination
options will vary based on how
-
Determine the type of recipient to add. In the Destinations section, select a Type and Format:
-
Folder – Select the format of the file you are sending to a folder.
See Sending Messages to DMS folders for more information.
-
Printer – The format automatically defaults to PDF (preferred format for printing).
-
Fax – The format automatically defaults to TIFF (preferred format for faxing).
-
Email – Select the format of the file you are sending by email.
Note: If you select a DOC, RTF, or TXT format, the server converts any image files so they are editable and searchable. PDF Image+Text and PDF Text are also searchable. PDF Image formats are not searchable. Options that display the letters OCR indicate the system will perform optical character recognition. This means the server will read the scan and determine how letters and characters translate to text. Handwritten text is not recognized but will remain a part of your document as an image.
-
Add type-specific information:
-
Folder – Select a destination folder and specify the Action, Filename, and Deliver as (format) options. Add Confirmation and Advanced properties as needed.
-
Printer – Select a printer or type the device's IP address. Specify additional options and add Confirmation and Advanced properties as needed.
-
Fax – Specify the Destination properties; for example, the fax number in the Fax box. Select the appropriate options and add the Confirmation and Advanced properties as needed.
-
Email – Specify the Destination properties; for example, email address in the Email box. Select the appropriate options and add the Confirmation and Advance properties as needed.
Note: To modify recipient information, select the recipient destination on the list and enter your changes. To remove a recipient from the list, select x to the right of the recipient destination.
-
Repeat Steps 4 through 5 to add recipients to your distribution.
-
Select the Email copy to... check box to send a copy of your message to yourself (optional).
-
In addition to scanning paper hard copy documents, you can instruct the server to append electronic files to your transmission.
Note: The following options may not apply to all destinations.
-
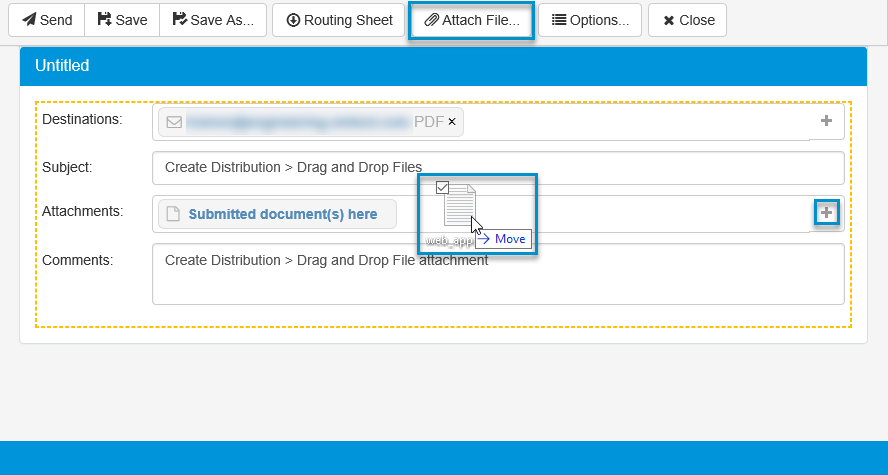
Select Attach File or the Plus icon (+) at the end of the Attachments box.
Note: You can drag and drop emails with attachments or just attachments onto a new, personal and favorite distribution. Contact your Administrator for assistance if you are not able to drag and drop emails and/or attachments.
-
Select Browse, select a file, and select Open.
-
Select Open to add the file to the list, if necessary.
-
Repeat for all files you want to send.
-
After the desired files are added, select OK, if necessary.
Tip: You can also drag and drop files instead of using the Attach File button or Plus icon (+). A yellow dash border appears as you drag and drop files on to the Attachments box. Simply, locate the file from any location, drag the file to your personal distribution, and drop on to Attachments. The Attachments box expands, if necessary, to show all files attached.
See a Personal Distribution example with the Attach File button, Plus (+) icon, and drag and drop in progress.
Note: To remove a file from the list, select the x button next to the file or press the Backspace button on the keyboard.
-
In the Subject box, enter a subject for your distribution.
Fax recipients will see this text on the cover page they receive from the server. Email recipients will see this text in the subject line of the email they receive.
-
In the Comments box, enter any text to accompany your document.
Fax recipients will see this text on the cover page they receive from the server. Email recipients will see this text in the body area of the email they receive.
-
Select Save on the toolbar to save your distribution.
-
Type a name for the distribution so you can reuse or change it later. This distribution title will appear on the MFP device display panel. Use a suitable name to help you remember the contacts and formats of the distribution. Select OK.
Sending a message using a Personal Distribution
You can send a message using a Personal Distribution from:
-
-
An MFP device, using the authenticated Personal Distributions button.
Sending messages to a DMS folder
For NetDocuments and iManage Work DMS users only
You can send messages from a personal distribution that has a NetDocuments or iManage Work DMS folder set up as a destination. When creating a personal distribution, select the appropriate DMS folder destination. The Recipient Properties dialog box appears and shows a list of the DMS folders available in your file cabinet.
More about the DMS folder
-
The DMS folder is pre-authorized by your System Administrator and does not require authorization at the user level The following message appears if you attempt to authorize a DMS folder in Preferences > Authorizations.
"The folder does not require user authorization."
Note: Some folder types require authorization at the user level. See Managing your authorizations for more information.
-
You cannot create sub-folders so the New Folder button is dim and inactive.
-
The Overwrite and Append options are not available for use in the workflow. Only use Create New.
-
You may not have access to all folders in your DMS file cabinet. The following message appears if you attempt to access a restricted folder.
"This folder is not selectable in the current workflow."
Note: The DMS folders are configured by a System Administrator. If you do not see the DMS folder on the Destination list, contact your System Administrator.
See also
Sharing a Personal Distribution
Creating a Public Distribution
About Subscribed Distributions
About Distribution Collections
Creating a Favorite Distribution