How to Extract Biomedical Text with ScispaCy
About ScispaCy
-
ScispaCy is a Python package containing spaCy models for processing biomedical, scientific or clinical text.
Installation of Stand-Alone REST API Wrapper for SciSpacy Python-based NER
Prerequisites
Software
- Anaconda Console (Miniconda)
- This automatically installs Python and PIP
- Administrator rights on the local machine (to install the program as an Administrator)
Hardware
Server Requirements
- Your server must have sufficient physical memory.
- The Python application for the NER model consumes approximately 9 GB of RAM (with the NER model loaded in memory for efficiency)
- Optional:
- For best performance install the SpacyWrapper on a separate server in your intranet.
- To install the SciSpacy wrapper on a separate server, copy the PythonRestAPIWrapper (see below) folder on that server and continue there with the installation steps
How to Install Miniconda
Miniconda is a free minimal installer for Conda.
It is later used to install and activate ScispaCy.
- Install Miniconda for separate virtual python environments:
- Available for download from https://docs.conda.io/en/latest/Miniconda.html
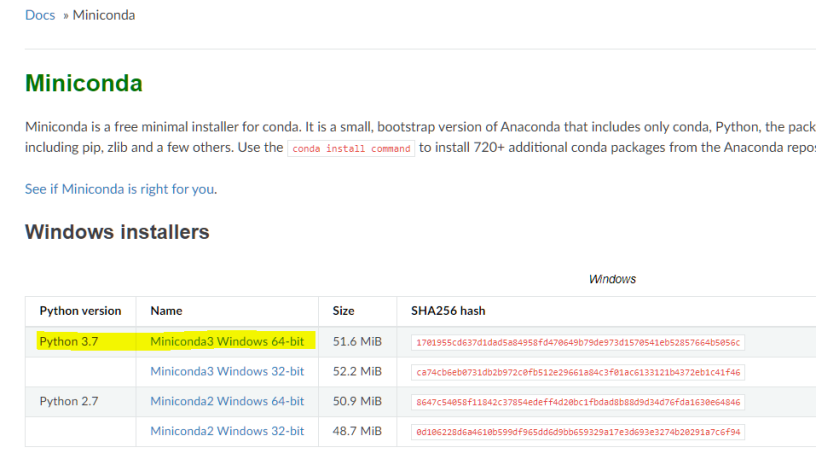
- Available for download from https://docs.conda.io/en/latest/Miniconda.html
- Run the downloaded .exe file as an Administrator.
- Install the application using the wizard.
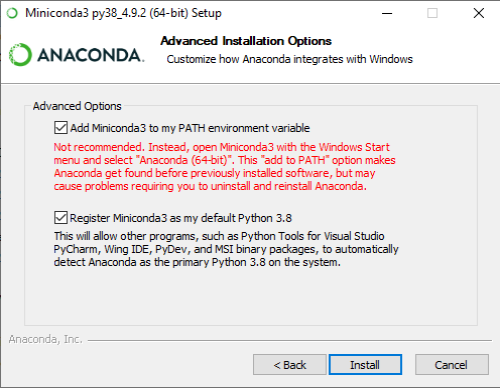
Check the settings:- "Add Miniconda to my PATH environment variable"
- "Register Miniconda as my default Python"
- Info: You can choose not to add the PATH environment variables or register default Python, but scripted installation may fail and will require manual changes to your environment.
How Install and Activate SciSpacy
Locate the PythonRestAPIWrapper folder in the BA Insight <AutoClassifier_engine_install_root>\Admin Site directory.
The files inside this folder are used during the following installation process.
- Open Windows PowerShell as an Administrator
- Navigate to the PythonRestAPIWrapper folder (run command: cd " your path to PythonRestAPIWrapper")
-
Next, run the following command:
- When prompted, specify the user and password for a local administrator and press Enter.
- This user is used to run Spacy NLP install commands and must have permissions to create scheduled tasks and run PowerShell scripts on your system.
- This user is used to run Spacy NLP install commands and must have permissions to create scheduled tasks and run PowerShell scripts on your system.
- When prompted to proceed, enter 'y'for Yes.
powershell -ExecutionPolicy ByPass -File RegisterScheduledTaskForSciSpacyNLP.ps1
Installation Verification and Continuous Operation
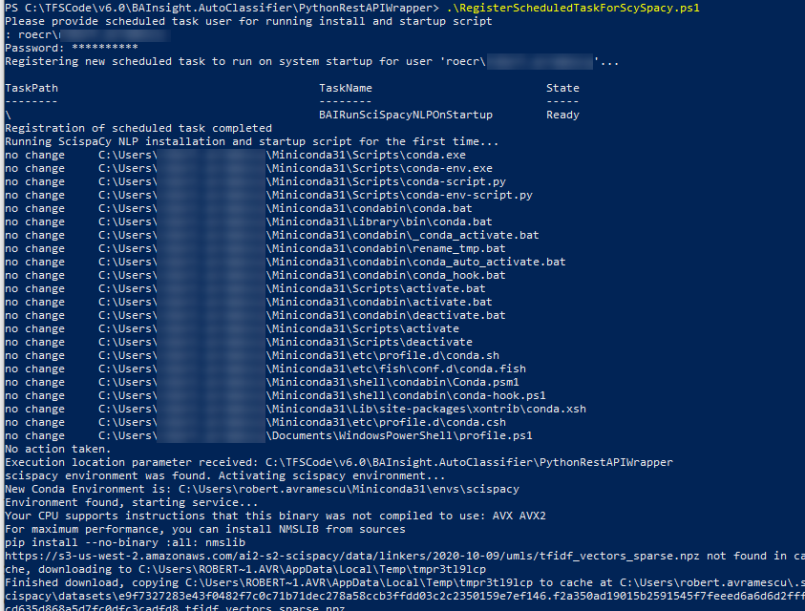
The installation process is complete when you see a message displayed such as:
"Serving on http://yourcomputername.domain:8080http://yourcomputername.domain:8080"
See the screenshot below.
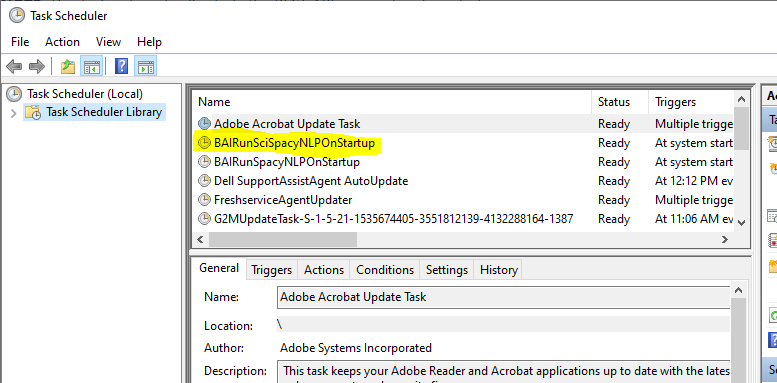
Check that Scheduled Task to automatically start the REST API wrapper was successfully created:
- Open Windows Task Scheduler
- Check for the task:
BAIRunSciSpacyNLPOnStartup
Note: This task automatically starts the REST API server at system startup.
Running and Maintaining Your SciSpacy Instance
Your SciSpacy instance runs from the Anaconda (Miniconda3) command shell.
If you close your Anaconda (Miniconda3) shell, or if it is closed automatically for reasons such as:
- Server maintenance
- Power outage
- User error
- Application error
Your SciSpacy instance is then closed and non-operational.
Restart Your SciSpacy Instance
In the event you must restart your SciSpacy instance, perform the steps below.
Note: If you close this shell or shutdown the machine running the shell you must:
- Restart your system to automatically trigger the scheduled task that starts the service
OR - Manually run the created scheduled task
OR - Take the steps below:
- Run Windows PowerShell as an Administrator.
- Navigate to the PythonRestAPIWrapper folder:
cd " your path to PythonRestAPIWrapper" -
Activate your spaCy environment:
powershell -ExecutionPolicy ByPass -File InstallSciSpacy.ps1
Configure the SciSpacy NER Models
To configure (add/remove) the SciSpacy NER models used by your SciSpacy Instance:
- Navigate to SciSpacy models page and review the models available.
- Decide on the new models you want to add.
- Download all new models.
- Create a new SciSpacyRequirements.txt.
- Example: SciSpacyRequirements0.txt
- Add the download links of the models you want to use on separate lines as in the example below:
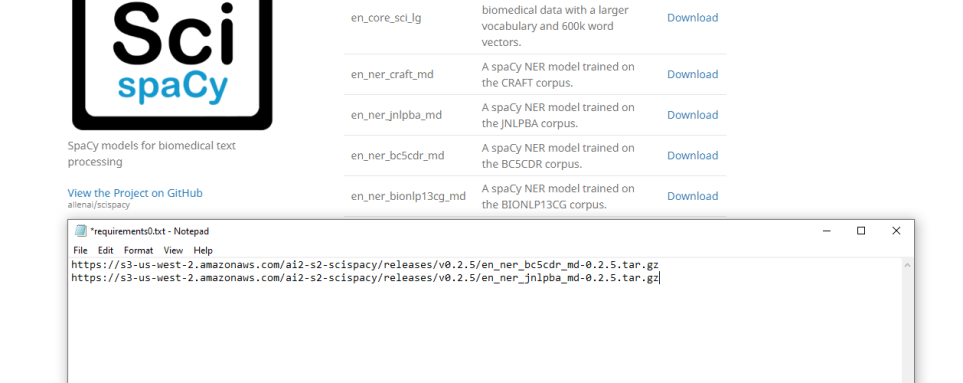
- If the SciSpacy Python wrapper is running, close the Anaconda Console to stop the service.
-
Open the Anaconda Console as an Administrator and run the following commands:
Copyconda activate scispacy
pip install -r requirements0.txt --no-cache-dir --user - After the requirements are downloaded successfully:
- Navigate to the PythonRestAPIWrapper folder
- Edit the file "SciSpacyWrapper.py" as in the example below, depending on which models you want to use:
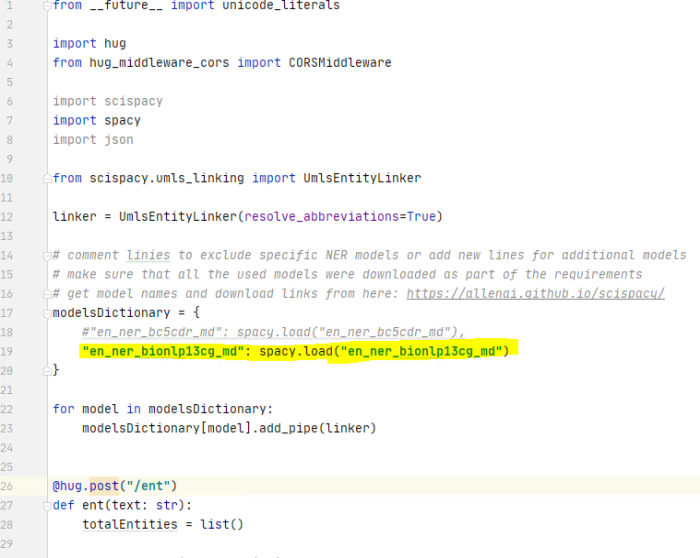
- Add or remove lines similar with line 19 in the example above containing the name of the model you want to use (and downloaded via the SciSpacyRequirements.txt file).
- To start the SciSpacy Python instance using the new model configuration run command in the Anaconda console you have opened:
python.exe SciSpacyWrapper.py - The process is complete when you see a message displayed such as:
"Serving on http://yourcomputername.domain:8080"
How to Add the SciSpacy Component to a Pipeline
To add the SciSpacy component to a pipeline in AutoClassifier:
- See the generic component installation instructions here: How to Add Components to Pipelines.
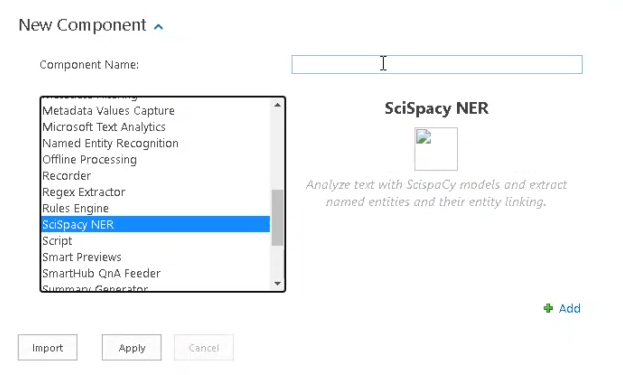
- Select "SciSpacy NER" (see the graphic below) as your component when you add your component in the "How to Add a Component" section.
- Configure the SciSpacy NER component as specified in the topics below.
SciSpacy Pipeline Configuration
- Within BA Insight AutoClassifier, navigate to the Pipelines section.
- Open the SciSpacy pipeline component you added to your pipeline earlier.
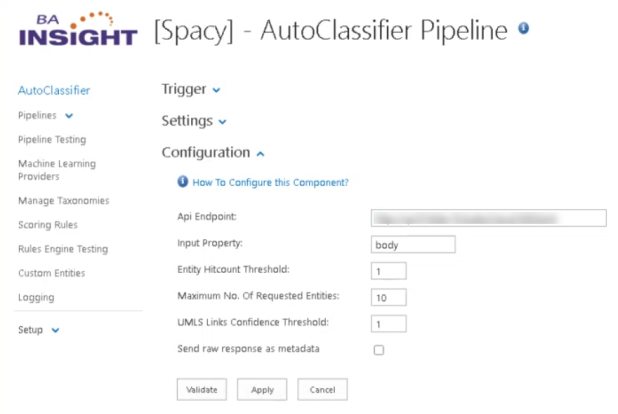
- Configure your component with the following information:
- Api Endpoint:
- Specify the API endpoint: http://<servername>:<port>/ent.
- See the API Endpoint field in the graphic below as an example.
- Input Property:
- Specify the input metadata to be used for processing.
- Entity Hitcount Threshold:
- Number of times an entity must be found (or "hit") in a document in order for the document to be returned.
- Accepted range of values: 0-1.
- Maximum No. of Requested Entities:
- The number of top entities to be returned.
- For example, a value of "10" indicates the top 10 entities should be returned.
- UMLS Links Confidence Threshold:
- A scoring threshold.
- Accepted range of values: 0-1.
- Example: 0.85.
- Send raw response as metadata:
- Output from Python API in JSON format.
Pipeline Order
The order of your AutoClassifier pipeline stages impacts the operation of the pipeline.
Note the following general guidelines:
| Pipeline Stage | Order | Description |
|---|---|---|
| 1st stage |
|
|
| GSK JSON | 2nd stage |
|
|
SciSpacy NER |
Any | These stages cannot be 1st or 2nd, but can be any stage after that |
| after MS Text Analytics | Must be after MS Text Analytics as it uses the output from the MS Text Analytics stage. |
Example of Pipeline Stage Order
The following is an example of one possible valid order of pipeline stages:
- Tika
- SciSpacy NER
- Document Summary Generator
Extracted Metadata
The following metadata is extracted by SciSpacy when your pipeline is run:
- Detected entity classes in documents and their values:
- Gene-protein; diseases; drug-chemical
- Examples: rWGS, NiFeO, oxalate, and so on
- Predominant entity type for documents:
- Does the document contain more protein entities or does the document contain more drugs as detected entities:
- This will do possible tagging the document with a document type based on what the document is more likely to be about
- List of UMLS CUI IDs of the concepts detected in the input property.
- List of detailed information about the UMLS concepts including the concept name and concept definition.
Input Properties
- The metadata property specified in the stage configuration in the Input Property field.
Input Property Example

Output Properties
- For the NER result, the component returns a separate output property for each detected entity type, depending on the NER trained model.
- Output Property Name Format: "SciSpacy_ENTITY_TYPE" as in the examples below.
| Property | Type | Description |
|---|---|---|
| SciSpacy_ORGAN |
Text – Multi |
Example: 'cardiovascular', 'abdominal' |
| SciSpacy_TISSUE | Example: 'subcutaneous', 'adipose tissue' | |
| SciSpacy_SIMPLE_CHEMICAL | Example: 'cardiovascular', 'abdominal' | |
| SciSpacy_GENE_OR_GENE_PRODUCT |
|
|
| SciSpacy_CANCER |
|
|
| SciSpacy_MULTI-TISSUE_STRUCTURE | Example: 'oral glucose', 'visceral' | |
| SciSpacy_ORGAN_ORGANISM_SUBSTANCE |
|
|
| SciSpacy_ORGANISM | Example: 'patients' | |
| SciSpacy_CUIDDetails |
|
|
| SciSpacyCUIs |
|
|
| SciSpacyUMLSAliases | Example: 'babies', 'Infant (person)', 'Infant [Disease/Finding]' | |
| SciSpacy_DominantEntityType | Text – Single |
|
| SciSpacySerializedEntitiesJson | Text-Single |
|