Apply Project Template Configuration to the Project
Eclipse PPM users can apply a different Project Template to a Project after creation by applying a Project Template Configuration. When this occurs, certain characteristics of the Project Template will be applied to the Project.
Project Template Configuration application is totally customizable; this means that users can decide which characteristics to apply and how they are applied.
Example: Ana is a Project Manager who recently realized that a different Project Template is a better fit for her Project, so she decides to apply it to the Project using Project Template Configuration application. However, she is not interested in totally replacing the existing Health Indicators on the Project; she would like the Health Indicators from the new Project Template, but she knows that the current indicators are important as well. This is why she selects Merge project list with template list and retain existing values where duplicates exist from the "Health Indicators" drop-down menu:
This will give the Project the additional Health Indicators from the template without erasing the ones the Project already has. Also, the existing Health Indicators will keep their current values.
Applying a Project Template Configuration to a Project allows users to update/replace the following entities:
-
Health Indicators
-
Project Number
-
Classification Fields
-
Project Properties
-
Task Properties
-
Portfolio Evaluation
-
Portfolio Prioritization
-
Risk Scoring
-
Financial Indicators
-
Work Plan Settings
-
Time Entry Settings
-
Document Settings
-
Workflow Settings
-
Visible Area Settings
To apply a Project Template Configuration:
Before You Start: Eclipse PPM users will require permissions to modify the Project based on the entities that they are editing. For example, user will require "Full Control" Profile Details permissions on the Project Policy in order to apply the Project Template's Health Indicators. Also, they will require "Full Control" Project Financials permissions to apply the Project Template's Financial Indicators. It is recommended that a user with full Project permissions (i.e. the Project Manager) apply the Project Template Configuration to ensure that nothing is left out.
-
Navigate to a Project.
-
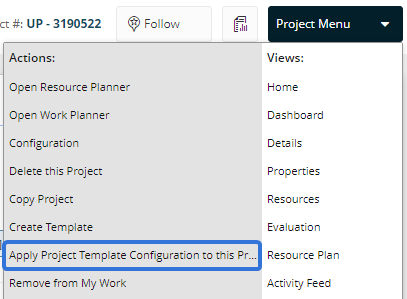
Select Apply Project Template Configuration to this Project from the "Project Menu":

-
Select a Project Template to apply to your Project using the "This Project Template" drop-down menu:

Tip: Type the name of the Project Template you would like to use into the "Filter" field to find it faster:

-
Use the "Apply Options" to determine which characteristics of the Project Template will be applied to your Project:
-
Health Indicators: Determine how the Project Template's Health Indicators will be applied to the Project.

-
Do Not Change: None of the Project's Health Indicators will be changed.
-
Merge Project list with Template list and retain existing values where duplicates exist: None of the Project's existing Health Indicators will be removed, and the Health Indicators from the Project Template will be added. If there are any duplicates (if the Project Template contains Health Indicators that are already on the Project), the current values of the Project's Health Indicators will be retained.
-
Replace Project list with Template list and retain existing values if set: The Project's Health Indicators will be replaced by the Project Template's Health Indicators. If there are any duplicates (if the Project Template contains Health Indicators that are already on the Project), the current values of the Project's Health Indicators will be retained.
-
Replace Project list with Template list and reset all values to "Not Set": The Project's Health Indicators will be replaced by the Project Template's Health Indicators. None of the Health Indicators on the Project will contain any values.
-
-
Project Number: Determine how the template's auto-numbering settings will be applied to the Project. Templates with a defined "Auto-Number Prefix" will apply a number with the prefix to the Project. Templates without an "Auto-Number Prefix" will just assign a number.
Note: If auto-numbering is not enabled on the template that is being applied, this field will be inactive.
Note: To enable auto-numbering or an "Auto-Number Prefix", edit the settings of the Project Template.

-
Do Not Change: The Project Numbers will not be changed.
-
Update: The auto-number settings of the template will be applied to the Project. A new number will be applied to the Project even if it currently has one.
-
Update, if empty: The auto-number settings of the template will be applied to the Project if it does not currently have one. If it currently has a Project Number, it will not be affected.
-
-
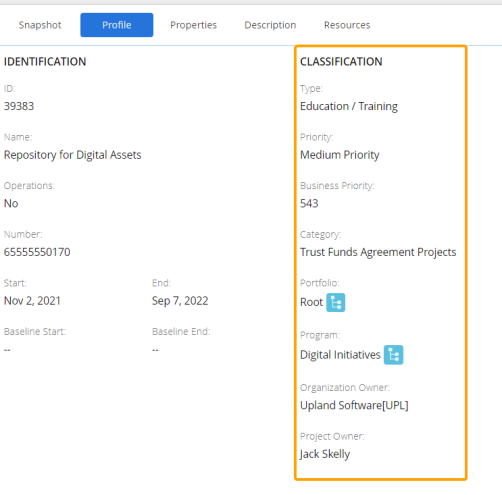
Classification Fields: Determine how the template's "Classification" fields will be applied to the Project.
Note: "Classification" fields can bee seen on a Project's Home page when the "Profile" tab is selected.


-
Do Not Change: The "Classification" settings of the Project will not be changed.
-
Replace project data with template data: All of the template's "Classification" values will be applied to the Project.
-
-
Project Properties: Determine how the Project Template's Project Properties will be applied to the Project.

-
Do Not Change: None of the Project's Properties will be changed.
-
Merge project list with template list and retain project values where duplicates exist: None of the Project's existing properties will be removed, and the Project Properties from the Project Template will be added. If there are any duplicates (if the Project Template contains properties that are already on the Project), the current values of the Project's properties will be retained.
-
Merge project list with template list and retain template values where duplicates exist: None of the Project's existing properties will be removed, and the Project Properties from the Project Template will be added. If there are any duplicates (if the Project Template contains properties that are already on the Project), the current values of the Project Template's properties will be retained.
-
Replace project list with template list : The Project's properties will be replaced by the Project Template's properties and values.
-
-
Task Properties: Determine how the Project Template's Task Properties will be applied to the Project.

- Do Not Change: None of the Project's Task Properties will be changed.
-
Merge project list with template list and retain project values where duplicates exist: None of the Project's existing Task Properties will be removed, and the Task Properties from the Project Template will be added. If there are any duplicates (if the Project Template contains Task Properties that are already on the Project), the current values of the Project's Task Properties will be retained.
-
Merge project list with template list and retain template values where duplicates exist: The Project's existing Task Properties will be replaced by the Project Template's Task Properties. If there are any duplicates (if the Project Template contains Task Properties that are already on the Project), the current values of the Project Template's Task Properties will be retained.
-
Replace project list with template list : The Project's Task Properties will be replaced by the Project Template's Task Properties and values.
-
Portfolio Evaluation: Determine how the Project Template's Portfolio Evaluation details will be applied to the Project.

-
Do Not Change: The Project's Portfolio Evaluation data will not be changed.
-
Replace Project list with Template list: The Project will inherit the Portfolio Evaluation details of the Project Template. This includes both the Evaluation Criteria Template used on the Project Template as well as any scores that have been entered into the Project Template's Portfolio Evaluation table.
-
-
Portfolio Prioritization: Determine how the Project Template's Portfolio Prioritization details will be applied to the Project.

-
Do Not Change: The Project's Portfolio Prioritization data will not be changed.
-
Replace Project list with Template list: The Project will inherit the Portfolio Prioritization details of the Project Template. This includes both the Prioritization Criteria Template used on the Project Template as well as any scores that have been entered into the Project Template's Portfolio Prioritization table.
-
-
Risk Scoring: Determine how the Project Template's Risk Scoring details will be applied to the Project.

-
Do Not Change: The Project's Risk Scoring data will not be changed.
-
Replace Project list with Template list: The Project will inherit the Portfolio Prioritization details of the Project Template. This includes both the Risk Criteria Template used on the Project Template as well as any scores that have been entered into the Project Template's Risk Scoring table.
-
-
Financial Indicators: Determine how the Project Template's Financial Indicators will be applied to the Project.

-
Do Not Change: The Project's Financial Indicators will not be affected.
-
Merge project list with template list: None of the Project's existing Financial Indicators will be removed, and the Financial Indicators from the Project Template will be added.
-
Replace project list with template list: The Project's Financial Indicators will be replaced by the Project Template's Financial Indicators.
-
-
Work Plan Settings: Decide if the Project Template's Work Plan Settings will be applied to the Project.

-
Do Not Change: None of the Project Template's Work Plan Settings will be applied to the Project.
-
Replace project settings with template settings: The Project Template's Work Plan Settings will totally replace the Project's Work Plan Settings.
-
-
Time Entry Settings: Decide if the Project Template's Time Entry Settings will be applied to the Project:

-
Do Not Change: None of the Project Template's Time Entry Settings will be applied to the Project.
-
Replace project settings with template settings: The Project Template's Time Entry Settings will totally replace the Project's Time Entry Settings.
-
-
Document Settings: Decide if the Project Template's Document Settings will be applied to the Project.

-
Do Not Change: None of the Project Template's Document Settings will be applied to the Project.
-
Replace project settings with template settings: The Project Template's Document Settings will totally replace the Project's Document Settings.
-
-
Workflow Settings: Decide if the Project Template's Workflow Settings will be applied to the Project.

-
Do Not Change: None of the Project Template's Workflow Settings will be applied to the Project.
-
Replace project settings with template settings: The Project Template's Workflow Settings will totally replace the Project's Workflow Settings.
-
-
Visible Area Settings: Determine how the Project Template's Visible Area Settings will be applied to the Project.

- Do Not Change: The Project's Visible Area Settings will not be affected.
-
Merge project list with template list: None of the Project's selected Visible Areas will be turned off, and the Visible Areas selected on the Project Template will be added.
-
Replace project list with template list: The Project's selected Visible Areas will be replaced by the Project Template's selected Visible Areas.
-
-
Select the Save button:

After selecting Save, the Project Template Configuration will be applied to the Project. A "Results" window will appear to indicate whether the application was successful, partially successful, or unsuccessful:
