Project Activity Report
The Project Activity report provides statistics on Project-related activities (number of Status Updates, Health Indicator modifications, etc.) for a custom selection of Projects within a specific time period. It will be exported in a Microsoft Excel spreadsheet.
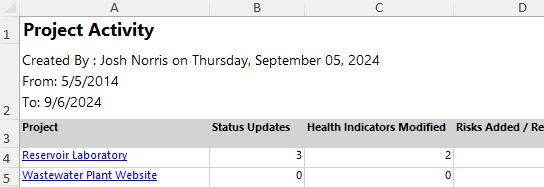
The following columns will be displayed for each Project on the report:
-
Project: The name of the Project.
-
Status Updates: The number of Status Updates that have occurred on the Project within the date range.
Note: Both changing a Project's Status and editing a Project's "Status Update" message (or both at the same time) count as a Status Update.
-
Health Indicators Modified: The number of times Health Indicators were modified on the Project within the date range.
Note: This includes existing Health Indicators being modified as well as new Health Indicators being added to the Project.
-
Risks Added / Re-opened: The number of Project Risks that were added or re-opened within the date range.
Note: Project Risks that were added, closed, and then re-opened all within the date range will not count as two separate events.
-
Risks Closed: The number of Project Risks that were closed within the date range.
Note: Reopening a Risk that was closed within the date range will not result in this count decreasing. Additionally, closing the Risk again within the date range will not result in an extra closed Risk being counted.
-
Issues Added / Re-opened: The number of Project Issues that were added or re-opened within the date range.
Note: Project Issues that were added, closed, and then re-opened all within the date range will not count as two separate events.
-
Issues Closed: The number of Project Issues that were closed within the date range.
Note: Reopening a Issues that was closed within the date range will not result in this count decreasing. Additionally, closing the Issue again within the date range will not result in an extra closed Issue being counted.
-
Baseline Modified: The date a Baseline was first captured for the Project within the date range.
-
Tasks Added: The number of Tasks that were added to the Project within the date range.
Note: Tasks that have been deleted will not count toward this tally.
-
Actual Time (hr): The number of hours that users have entered against the Project on their Timesheets within the date range.
Note: This refers to the days the time was submitted for, not the day the time was submitted on. For example, imagine the current date is September 5th and the date range is September 1st to September 8th. If the user enters time against the Project for August, it will not be included in the report. If the user submits the time for September 2nd, it will be included in the report.
-
Allocated Time (hr): The number of hours that have been allocated toward Project Tasks within the date range.
Note: Allocated time refers to time allocated to a Resource. Task hours that are not assigned to a Resource will not count.
Note: This refers to the days the time was allocated for, not the day the time was allocated on. For example, imagine the current date is September 5th and the date range is September 1st to September 8th. If a Project Manager allocates time toward a Task for August 30th, it will not be included in the report. If she allocates time towards a Task for September 2nd, it will be included in the report.
-
Financial Plan Modified: The date (month/day/year) that the Project's current Financial Plan was approved.
Note: Projects without an approved plan will not display a date in this field, even if a plan was previously approved.
-
Notes Added: The number of Notes that have been added to the Project.
Note: Although Timesheet Notes appear on a Project's "Notes" page, they do not count toward the "Notes Added" tally. For example, take these two notes from a Project's "Notes" page:
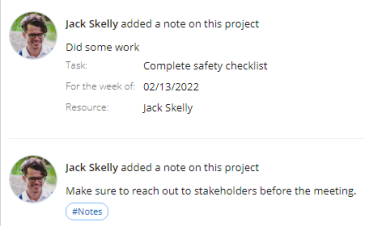
The top Notes contains metadata ("Task", "For the week of", and "Resource") which indicates that it is a Timesheet Note. It will not count toward the "Notes Added" tally. On the other hand, the bottom Note does not contain any metadata because it was added directly to the Project. This Note will count toward the tally. -
Portfolio Evaluation Modified: The date (month/day/year) that the Project's Portfolio Evaluation was modified. This includes changes to the Portfolio Evaluation score and application/changes to the Evaluation Criteria Template.
-
Risk Scoring Modified: The date (month/day/year) that the Project's Risk Score was modified. This includes changes to the Risk Score and application/changes to the Risk Criteria Template.
-
Prioritization Score Modified: The date (month/day/year) that the Project's Prioritization Score was modified. This includes changes to the Prioritization Score and application/changes to the Prioritization Criteria Template.
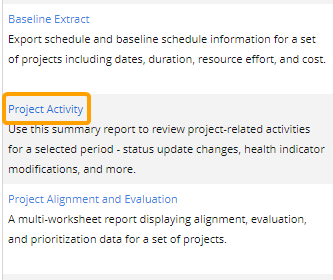
Eclipse PPM users can run the Project Activity report from the Reports page.
To run the Project Activity report:
Before You Start: A Project will only be included in the report if the user running it has the "Project Schedule - View" permission on at least one of the Project's Policies.
-
Select the Reports icon
 from the Navigation Menu.
-
Select Project Activity from the list of Eclipse Reports.
-
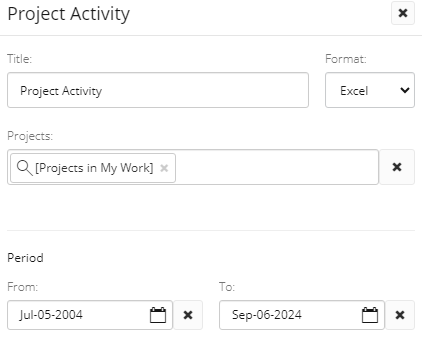
Use the "Project Activity" window to customize your Project Activity report.
-
Title: Enter a custom name for your Project Activity report. This name will be displayed at the top of the report.
-
Format: Ignore this field for this report; the only available export option is a Microsoft Excel file.
-
Projects: Select which Projects will be included in the report by typing in the name of a Project or Project filter and selecting it from the drop-down menu. Repeat this until all of your desired Projects and filters have been added.
Note: These are the same Project filters that can be found on the Project Search page. From here, users can create their own custom Project filters that can be used in the report.
Note: A message will appear if the selected filter(s) will result in no Projects being included in the report.
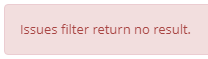
This could be the result of selecting a filter (or multiple) that does not include any Projects. It could also occur if the user running the report that does not have permission to view any of them. -
Period: Use the "From" and "To" fields to determine a date range for the report. Only activity that takes place between these dates will be included in the report.
-
-
Select the Run button.
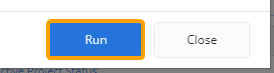
After selecting Run, the report will automatically download onto your device in a Microsoft Excel spreadsheet.