Working with broadcast messages
To manage broadcast messages in Mobile Commons, select ![]() Text Messaging → Broadcasts from the left pane:
Text Messaging → Broadcasts from the left pane:
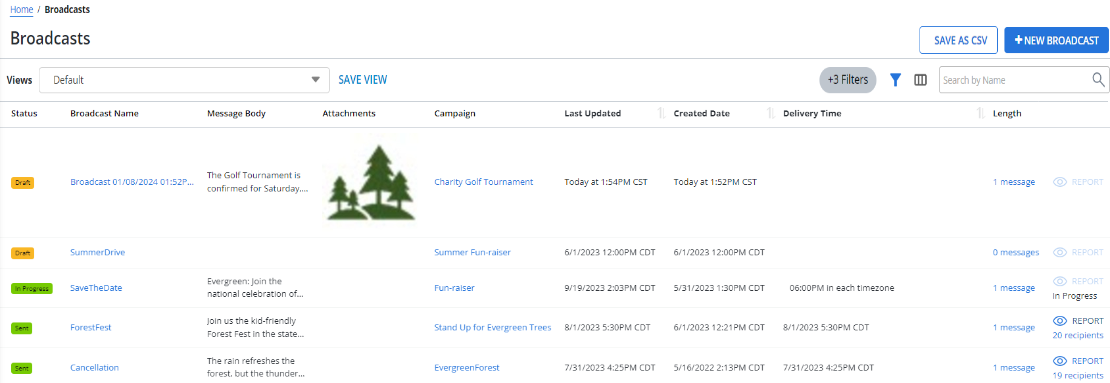
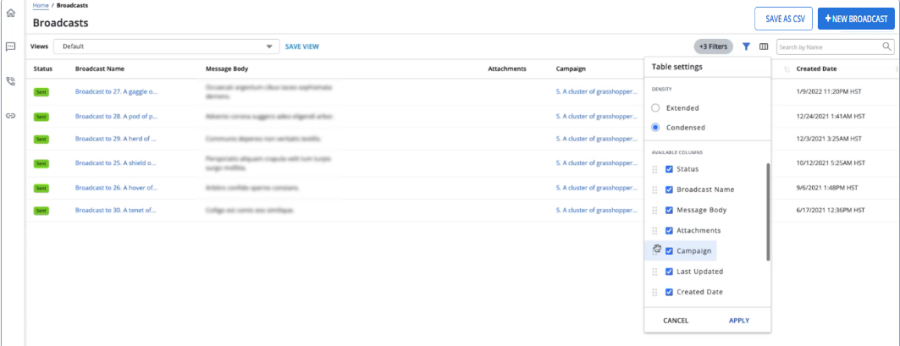
This will open up the Broadcasts table:
Note: The Broadcasts table is sorted by the Delivery Time column. Also, draft broadcasts that are less than a year old are added at the top of the table.
Tip: To sort the Broadcasts table by Last Updated, Created Date, or Delivery Time, select ![]() Ascending or
Ascending or ![]() Descending to the right of the column header.
Descending to the right of the column header.
The Broadcasts table is made up of the following columns:
| Column | Description |
|---|---|
| Status | The current status of the broadcast message. For more information, see Filtering broadcast data. |
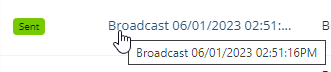
| Broadcast Name | The name of the broadcast message. Note: A maximum of 30 characters can be displayed in the column. If a Broadcast name is cut off, scroll over it with your cursor to view the entire name: |
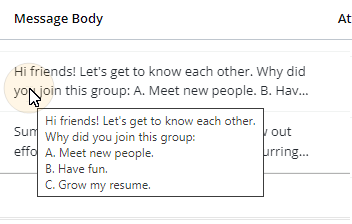
| Message Body | The content of the Broadcast message. Note: A maximum of 160 characters can be displayed in the column. If a message body is cut off, scroll over it with your cursor to view the entire body: |
| Attachments | The Broadcast's attached media file (if one has been added). Tip: See Adding an attachment for more information. |
| Associated Campaign | The name of the Campaign that the Broadcast message belongs to. |
| Last Updated | The date and time the broadcast was last edited. |
| Created Date | The date and time the broadcast was added to Mobile Commons. |
| Delivery time | The date and time the message is (or was) scheduled for delivery. |
| Length | Indicates how many messages are included in the broadcast. Selecting the value will navigate the user to the broadcast's "Edit Conversation" page. |
If the table is longer than one page, use the page-navigation options on the lower-right to select the number of rows per page and to navigate to the ![]() next or
next or ![]() previous page.To navigate directly to a specific page, select the page field, enter the page number, and then press ENTER.
previous page.To navigate directly to a specific page, select the page field, enter the page number, and then press ENTER.
Tip: Selecting ![]() Report in any of the table's rows will open up the Broadcast Report for the listed broadcast.
Report in any of the table's rows will open up the Broadcast Report for the listed broadcast.
The following actions can be taken from the Broadcasts table:
Tip: For information on creating a new broadcast, see Adding a new broadcast message.
Searching the Broadcasts table
To search the records in the Broadcasts table by broadcast name:
-
Select
 Text Messaging in the left pane, and then select Broadcasts.
 -
Above the Broadcasts table, on the right, enter a search term in the Search box, and then select
 Search.
The Broadcasts table displays the matching records.
Customize the Broadcasts table
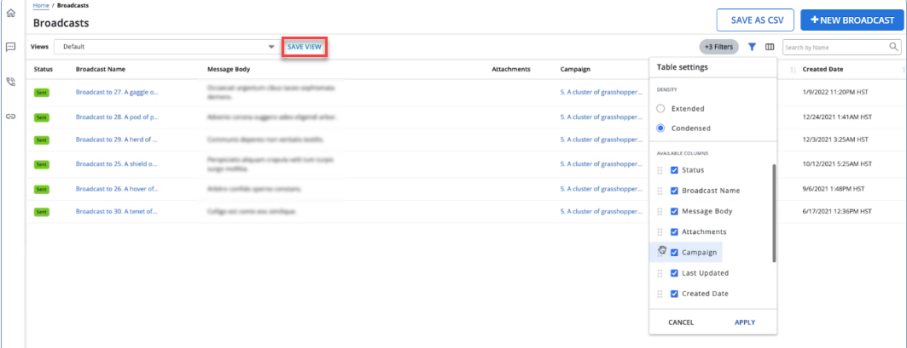
Mobile Commons users have the ability to fully customize the Broadcasts table using  Table settings:

Selecting the icon will open up the "Table settings" window:

The Broadcasts table can be customized in the following ways:
-
Message density
-
Column display
-
Column placement
Message density
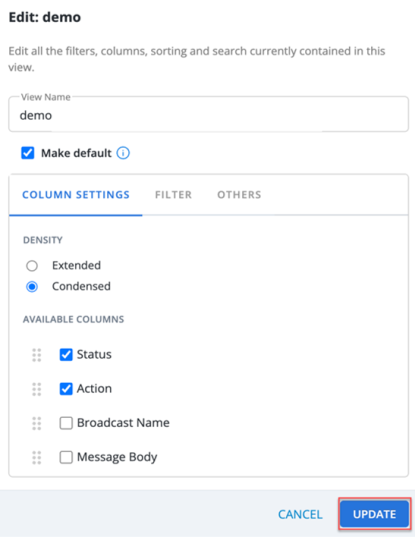
The "Table settings" window contains a "Density" section with following two options for determining how much "Message Body" text is displayed:
-
Extended: Displays five to six lines of information in a message.
-
Condensed: Displays one line of information in a message.
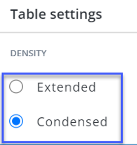
Once a "Density" option has been selected, select the APPLY button to save the changes:

Column display
Users can choose which columns they would like to display on the Broadcasts table.
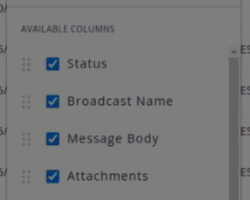
The "Table settings" window contains a list of available columns that can be added / removed from the table:

Tip: Use the scrollbar on the right to view all of the available columns.
The checkboxes next to the column names can be used to add and remove columns from the table. Columns with checked boxes will be displayed in the table and columns with unchecked boxes will not.
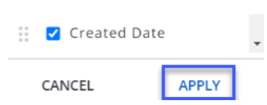
Once all of the desired columns have been added or removed from the table, select the APPLY button to apply the changes:

Column placement
Users can decide where each column will appear on the Broadcasts table.
The "Table settings" window contains a list of available columns that can be added / removed from the table:

Dragging and dropping the  dotted icons next to each column name will reorder how the columns will appear on the table. For example, a user can use the dotted icon next to the "Status" column name to drag it under the "Broadcast Name" column name:
Once the columns have been rearranged appropriately, the user must select the Apply button:
The top-to-bottom order of the columns in the "Available Columns" list will be reflected from left-to-right on the Broadcasts table.
Creating a customized view on the Broadcasts table
With a customized view, you can save specific view settings for the broadcast table. These settings include search options, filter combinations, table density adjustments (expanding or condensing), hiding columns, rearranging columns, sorting, and setting the number of rows per page. You can create up to 10 customized views for the Broadcasts table, allowing quick access to saved view settings without the need to reapply settings repeatedly.
To create a view:
-
Select a combination of various features, including filters, search, table density (extended or condensed), rows per page, column hiding, column re-ordering, sorting, and others on the Broadcasts page.
-
Click SAVE VIEW to save the selected customization on the Broadcast table.
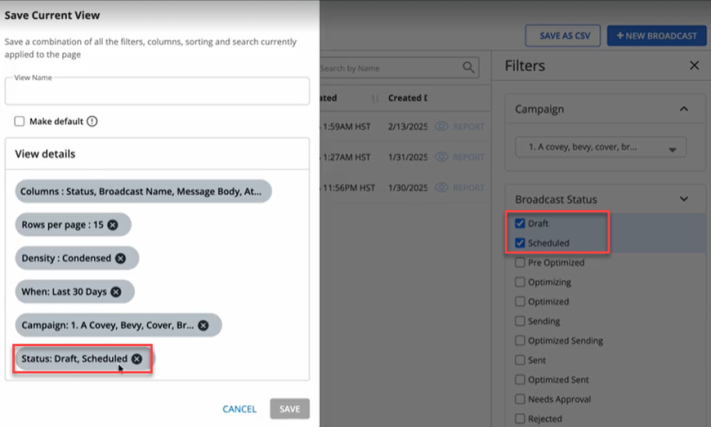
Clicking SAVE VIEW opens the Save Current View screen.
You can save your selected multi-select filter options within “Save View” and retrieve your customized Broadcast page view with the newly applied filter settings.
-
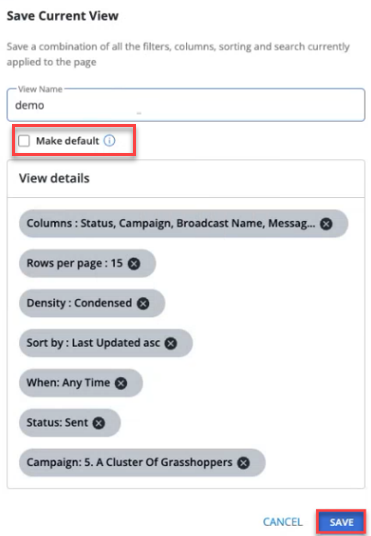
Enter the name of the view in the View Name field.
-
To set the view customization as default, check the box available next to "Make default." This will make the customized view the default one on the Broadcasts page. By doing so, every time you visit the Broadcasts page, it will display the default view.
To remove any applied configuration, select
 Delete.
 -
Click SAVE to save the current view. The SAVE button is only enabled upon entering the View Name. If you do not want to save a view, click CANCEL.
Note: The SAVE VIEW button is only enabled for creating up to 10 views. Only 10 saved customizations are available in the drop-down menu. To create a view exceeding 10, you must remove any previously saved views.
These saved views are available in the Views dropdown menu. You can quickly switch between different saved views from the view dropdown without having to apply the settings each time.
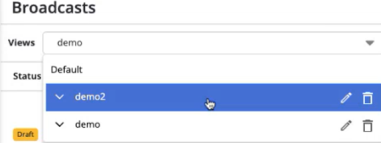
You can edit the saved view by clicking
 Edit available next to the saved view.
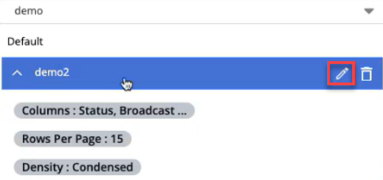
This opens the Edit view screen where you can view all the saved options. Make the updates as required. Click UPDATE to update the changes. If you do not want to make any updates to a view, click CANCEL.
You can hover over a lengthy detail with
 Ellipsis to see all the selected options.
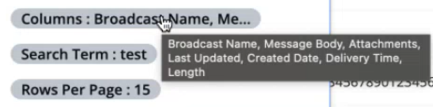
Select
 Arrow available next to a view name to collapse and expand the view window, which allows you to view the entire selected options for a saved view.
To delete the saved view, click
 Delete available next to the saved view.
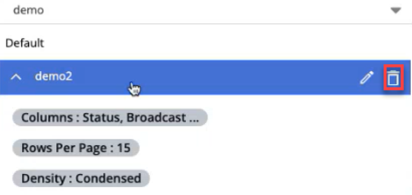
Clicking Delete opens the confirmation message below.
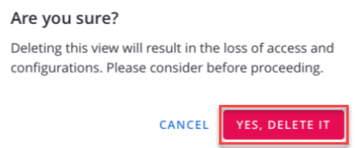
Click YES, DELETE IT to delete the saved view. If you do not want to delete the saved view, click CANCEL.
Filtering broadcast data
To filter the Broadcasts table:
-
Select
Text Messaging in the left pane, and then select Broadcasts. -
Above the Broadcasts table, on the right, select
 Filter.
 -
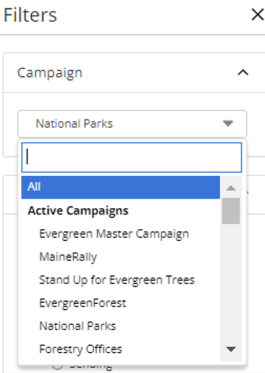
Select a campaign from the campaign drop-down list that displays All, Active Campaigns, and Ended Campaigns. You can search for a particular campaign by entering the search term in the search field.
-
Select a broadcast status from the Broadcast Status dropdown list. You can select multiple options simultaneously.
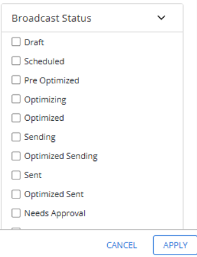
Filter Description All All of your broadcast messages. Draft Messages that have been started but not yet ready to be sent. Scheduled Messages that are ready to be sent at a scheduled date and time. Sending Messages that are currently in the process of being sent. Sent Messages that have been sent. Needs approval Messages added by users whose permissions require approval before their messages can be sent. Rejected Messages that were sent for approval but were rejected. Stopped Messages that were stopped while in the process of being sent. -
Select a date range from the Date Range dropdown list that displays various date range options. The default date range is last 30 days.
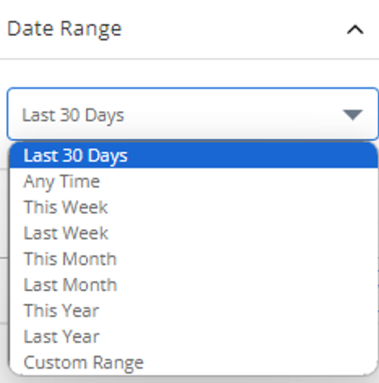
For selecting a specific date range, select the "Custom Range" option, and input your desired dates from the calendar selector.
When you are done, select APPLY.
The Broadcasts table displays only those records that match the selected filter(s). The filter indicator above the table
 displays the number of filters that have been applied. Hover your cursor over the filter indicator to display a list of applied filters.
Exporting broadcast data
You can export the broadcast data in the Broadcasts table to a CSV (comma-separated values) file.
To export broadcast data:
-
Select
Text Messaging in the left pane, and then select Broadcasts. -
(Optional) Above the Broadcasts table, on the right, select
Filter and then select a filter from the Broadcast Status list. For more information, see Filtering broadcast data. -
Above the Broadcasts table, on the right, select Save as CSV.
The broadcast records in the Broadcasts table are saved in a CSV file containing the following columns:
Column Description id The broadcast ID. name The name of the broadcast message. status The current status of the broadcast message. start_time The time when the messages began to be sent. delivery_time The time when the messages were delivered to subscribers. recipients_count The number of subscribers who received the message. sent The number of messages sent. failed_permanently The number of messages that failed to reach their recipient. undeliverable The number of messages that were sent to undeliverable phones. opt_out rate The percent of opt outs per overall message count. links_click The number of links clicked. links_click_rate The percent of clicks per overall message count. response_rate The percent of responses per overall message count. replies_number The number of replies, excluding opt-outs. opt-outs The number of subscribers opted out as a response to this message. body The content of the message. message_type SMS or MMS
Note: For draft broadcasts, this field will be blank.
include_subscribers Yes/No, indicating whether this message was sent to all campaign subscribers. included_groups The name of any groups included in the recipient list. excluded_groups The name of any groups excluded from the recipient list. campaign The name of the campaign. created_by The name of the user who created the broadcast message. target_name The name of the mConnect or mData promoted by this broadcast. target_id The ID of the mConnect or mData promoted by this broadcast. tags One or more organizing labels applied to the broadcast.
Note: All tag label sets contain the email address of the user who created the tag.
-
To download the CSV file, select
 Home in the left pane, and then select Reports.
 -
Locate the CSV file in the Exports table, select the link in the Name column, and then open the downloaded file.
Reviewing a broadcast message
To review a broadcast message:
-
Select
Text Messaging in the left pane, and then select Broadcasts. -
Locate the broadcast in the Broadcasts table, and then select the link in the Name column to open it.
The Broadcast message page displays the message(s) in the broadcast conversation.
Approving a broadcast message
Campaign editors have a limited role and can access only selected campaigns. If their broadcasts require approval, then an editor must review and approve a broadcast message before it can be sent. For more information, see Assigning the Campaign Editor role.
To review a broadcast message:
-
Select
Text Messaging in the left pane, and then select Broadcasts. -
Locate the broadcast in the Broadcasts table, and then select the link in the Name column to open it.
The Broadcast message page displays the message(s) in the broadcast conversation.
-
In the Broadcast Actions panel on the right, select one of the following:
-
Unschedule Broadcast to edit the broadcast before approving.
-
Approve Broadcast to approve the broadcast to be sent according to its schedule.
-
Reject Broadcast to change the broadcast status to Draft.
If the Broadcast was rejected alert is enabled, the campaign editor will receive a notification that the broadcast message was rejected.
-
Opening the Broadcast report
To open the Broadcast report for a sent message:
-
Select
Text Messaging in the left pane, and then select Broadcasts. -
Locate the message (with
 status) in the Broadcasts table, and then do one of the following:
-
Select
 Report at the end of the row.
 -
Select the link in the Name column to open the broadcast conversation page, and then select
 Report in the Broadcast Actions panel on the right.
The Broadcast report opens. The broadcast status is
 .
.
For more information, see Working with the Broadcast report.
-