Adding a new broadcast message
Tip: Be sure to review the content of your messages to ensure they meet regulatory guidelines. For more information, see Reviewing content carefully.
You can send a broadcast message to users who have subscribed to your campaign.
For example, a nonprofit sends a general message to all of its subscribers about new research:

Alternatively, the nonprofit targets a message to subscribers who live in Maine:

For broadcast messages:
For more information, see Working with broadcast messages.
Creating a broadcast message
Creating a broadcast message from the Campaigns page
-
Select
 Text Messaging in the left pane, and then select Campaigns.
Tip: The default short code is listed in the title bar.

If you have questions about the short code to use, contact your customer success manager.
-
Locate an existing campaign in the Campaigns table, and then select the campaign name link.
The Campaign Details page opens.
-
To review existing broadcast messages, select the Recently updated broadcasts tab at the bottom of the page.

The Recently updated broadcasts table lists the broadcast messages for the selected campaign.
-
Select Actions at the top of the page, and then select New broadcast.
The broadcast builder steps opens to the first step, Details. The full list of steps (1. Details, 2. Conversation, 3. Recipients, 4. Schedule and 5. Review) appears at the top of the page.
Creating a broadcast message from the Broadcasts page
-
Select
 Text Messaging in the left pane, and then select Broadcasts.
 -
On the Broadcasts page, click + NEW BROADCAST.

The broadcast builder steps open to the first step, Details. The full list of steps (1. Details, 2. Conversation, 3. Recipients, 4. Schedule and 5. Review) appears at the top of the page.
Details
1. Enter a descriptive name for the broadcast message or leave the date and time as the broadcast name (default).
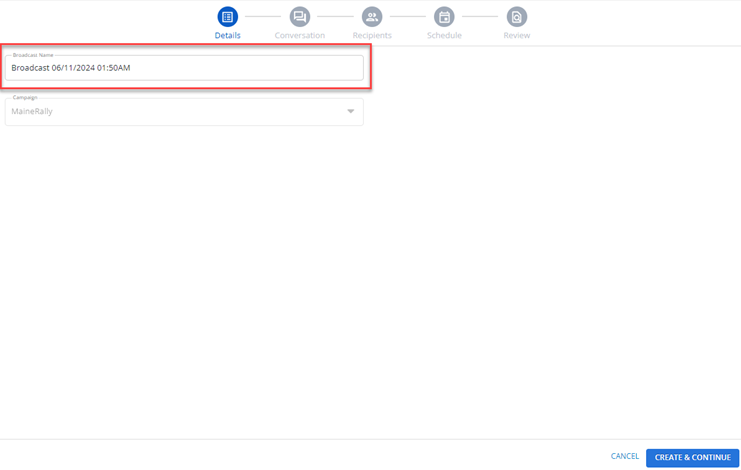
When you create a new broadcast from the “Broadcasts” page by clicking +NEW BROADCAST, select a campaign from the Campaign drop-down list.
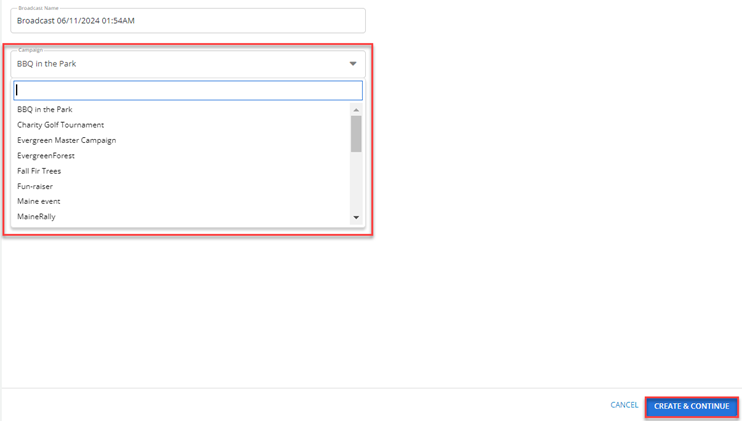
2. Select CREATE & CONTINUE. The Conversation page opens. The broadcast status is  .
.
Conversation
1. Select the message option from the message drop-down list that best describes the message. For the available message options, see the “Message Options” section below.

Hover over the  tool tip icon available next to any message function name to know more about each message function.
2. In the Conversation text box, enter the message to send to users who have opted in (subscribed) to the campaign.
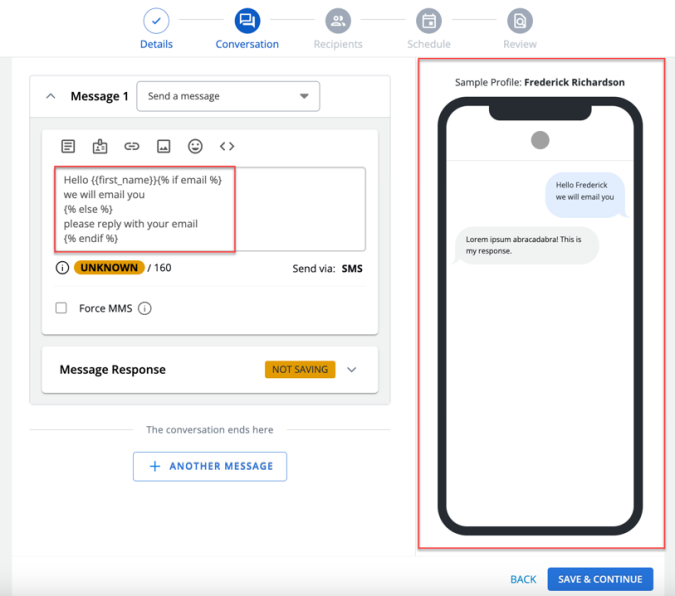
You can preview messages in real time with the message preview and it updates dynamically based on any selected options such as message templates, dynamic fields, links, media, emojis, and liquid logic in the message body.
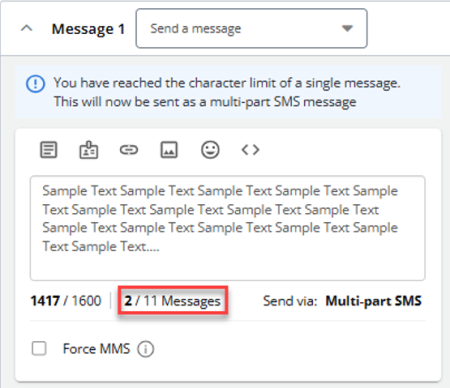
Note: If the character count exceeds 160 characters, the message is sent as a multi-part SMS message. Once you reach the character limit for a single message, a notification will appear informing that the character limit has been exceeded, and the message will be sent as a multi-part SMS.
The number of parts with the threshold (for example, 2/11 messages) is displayed next to "Send via: Multi-part SMS."
Be sure to identify your company or organization and include the opt-out disclosure (for example, “Reply STOP 2 quit, HELP 4 info”) regularly; for example, include the opt-out disclosure in every fourth message sent or once a month.
You can add emoji, media, links, dynamic fields, liquid, and select template for your message. The “Conversation” section populates itself in real-time with text and any added links, images, emojis, dynamic fields, and others. Special characters, including emojis, add extra characters to the character count for your SMS message.
-
UPLOAD Tab: Use the UPLOAD tab to upload new media attachments.
-
Click the UPLOAD tab in the modal.
-
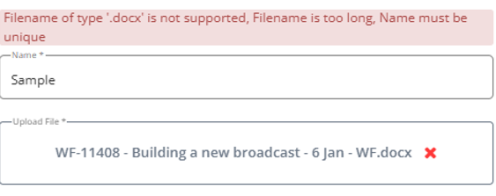
Enter a unique name for the media in the Name text field. This field is mandatory and ensures your attachment is easily identifiable.
Use the drag-and-drop area to upload media files by dragging them directly from your device. Alternatively, click BROWSE FILES, located to the right of the drag-and-drop area, to manually select files from your device.
-
Click UPLOAD to upload the media. To cancel the upload process and close the Insert Media modal, click CANCEL.
-
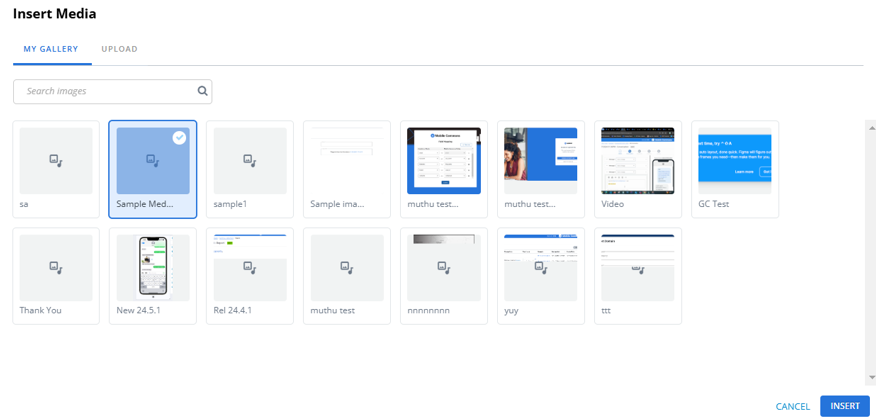
MY GALLERY Tab: This tab displays all previously uploaded media attachments saved in the system.
-
Click the MY GALLERY tab in the modal.
-
Select media from the list of existing media files.
-
Click INSERT to insert the desired media. To cancel the inserting media process and close the Insert Media modal, click CANCEL.
-
-
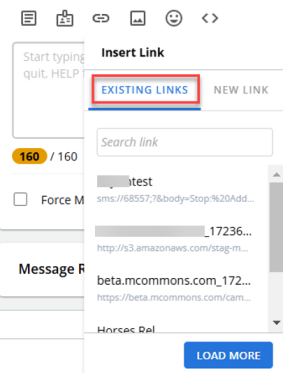
Existing Links: You can search for a link from the Search field. Only five links display when clicked on the Insert Link icon, to load more links, click LOAD MORE. The inserted link appears in the message area.
-
New Link: Select the New Link tab to access a form with required fields for Link Name, Destination URL, and Short URL dropdown, along with an optional Description field. The link name must be unique. Once the required fields are filled, the CREATE & INSERT button becomes active.
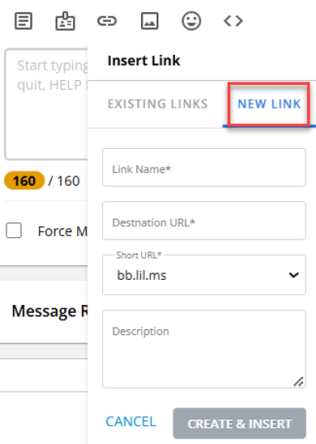
Clicking CREATE & INSERT will insert a short URL in the message body. The new link will also appear on the Links page in Mobile Commons and in the message preview.
If you wish to cancel, click CANCEL to clear all entered data without applying any changes.
-
Name: A mandatory field where you must enter a unique name (max 255 characters) for the template to identify it. Entering a name that has already been taken will result in an error.
-
Description: An optional field where you can add context or details (max 255 characters) about the liquid template.
-
Go to the “Message Response” section in the “Conversation” stepper.
-
Click the Save response as dropdown.
-
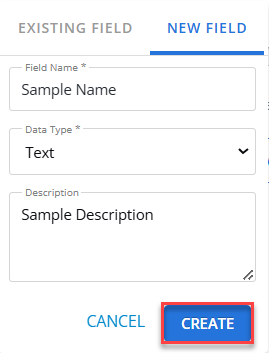
Select the NEW FIELD tab to begin creating a custom field.
-
In the Field Name field, enter a unique name for your custom field. (Mandatory)
-
Use the Data Type dropdown to select the type of data your field will hold (for example, text, number, date). (Mandatory)
-
Add a description in the Description field to provide additional context for your custom field. (Optional)
-
Click CREATE.
Initially, this button will be grayed out. It becomes active (blue) only after you complete all mandatory fields. Click CANCEL to discard any entered data and return you to the previous state with no changes applied.
-
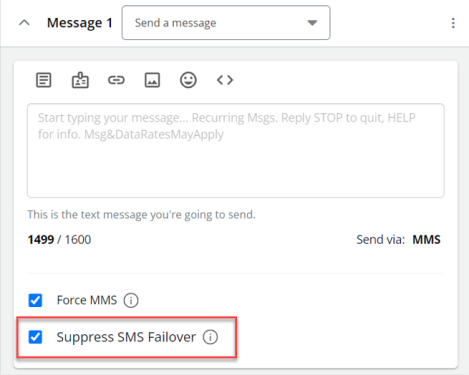
Clear the Suppress SMS Failover checkbox to send an MMS message over 160 characters or with an attachment as multi-part SMS messages. (If an attachment is added to the message, the SMS message will include a link to the attachment file.)
-
Select the Suppress SMS Failover checkbox to send the MMS message to MMS-capable devices only. Other subscribers will not receive the message at all.
-
Select the Send Broadcast to (count) Active Campaign Subscribers checkbox. All subscribers will receive the message, unless you specify groups to exclude. For more information, see Working with user profiles.
-
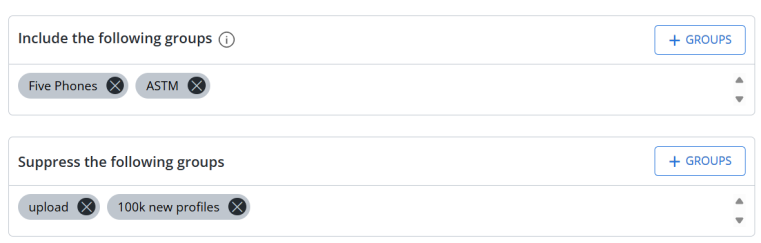
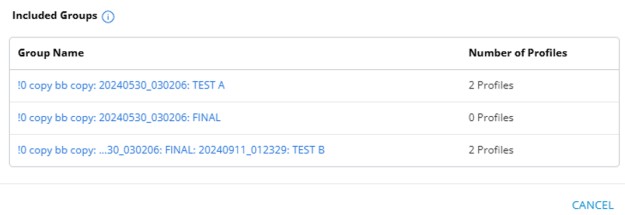
To include recipients, for the Include the following groups, click +GROUPS.
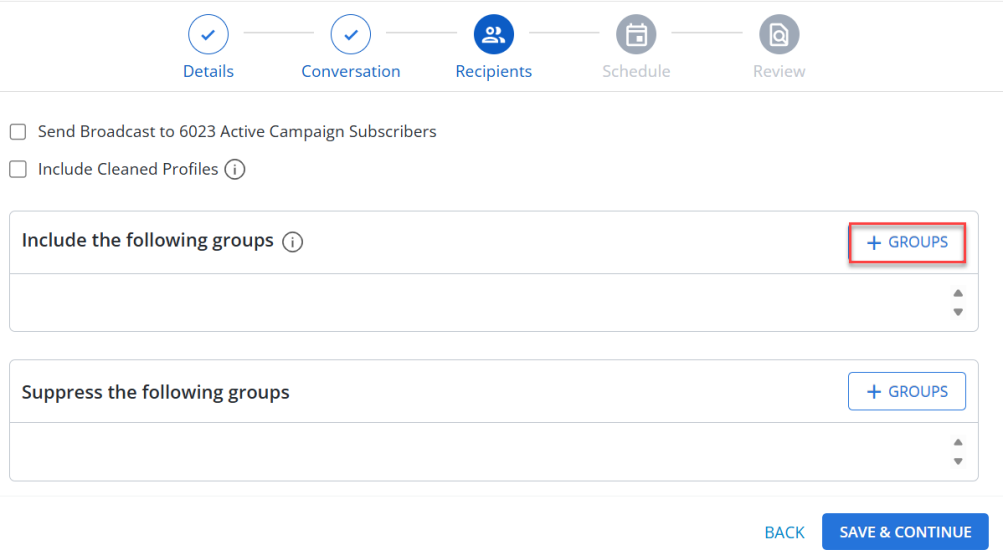
This opens the “Include groups” modal, which displays the following three columns:
-
Group: Displays group name.
-
Recipients: Displays the number of recipients in the selected group.
-
Creation Date: Displays the creation date of the group in the format MM/DD/YYYY HH:MM (Time Zone).
Select the groups and click INCLUDE to include the groups in the broadcast creation process. Click CANCEL to close the “Include groups” modal without saving any changes. These subscribers will receive the message. For more information, see Working with profile groups. When you add a group to a broadcast, only active subscribers will receive the broadcast message.
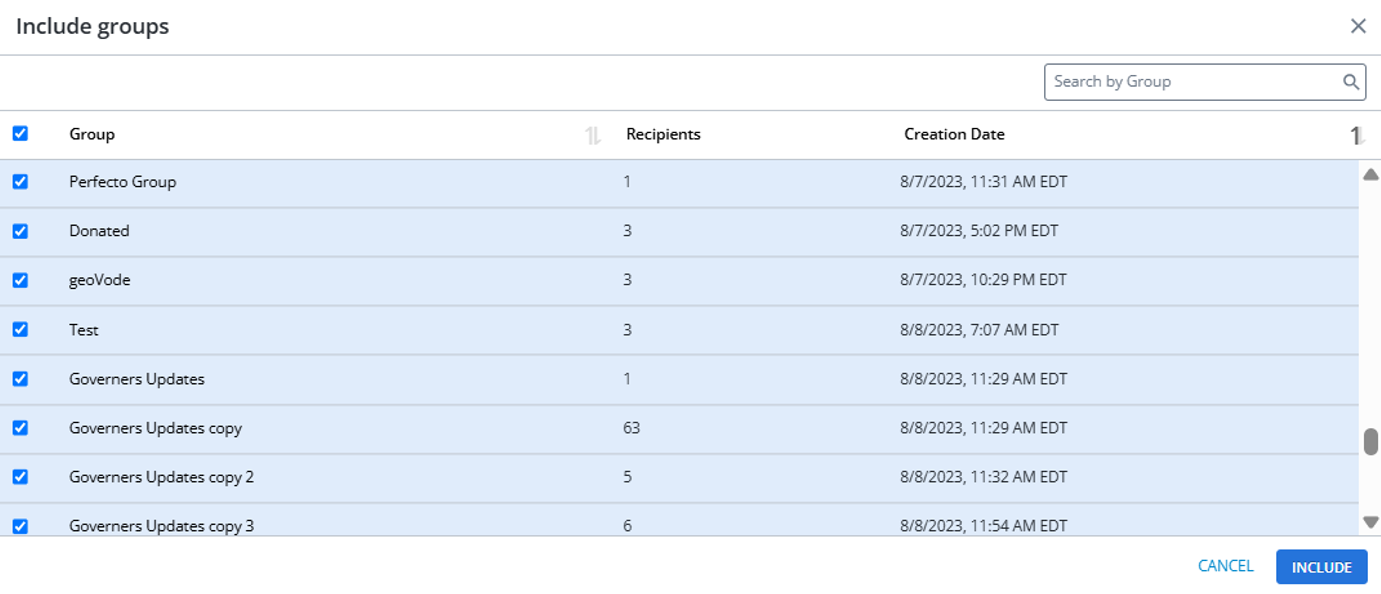
Note: You cannot select the already selected groups.
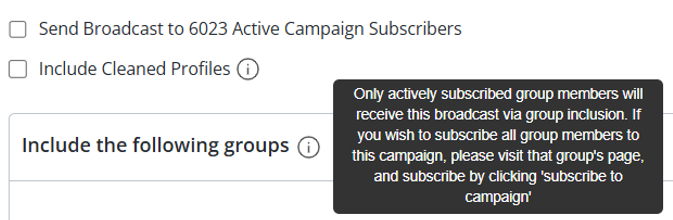
Clicking the tooltip for Include the following groups displays: “Only actively subscribed group members will receive this broadcast via group inclusion. If you wish to subscribe all group members to this campaign, please visit that group’s page, and subscribe by clicking ‘subscribe to campaign’.
-
-
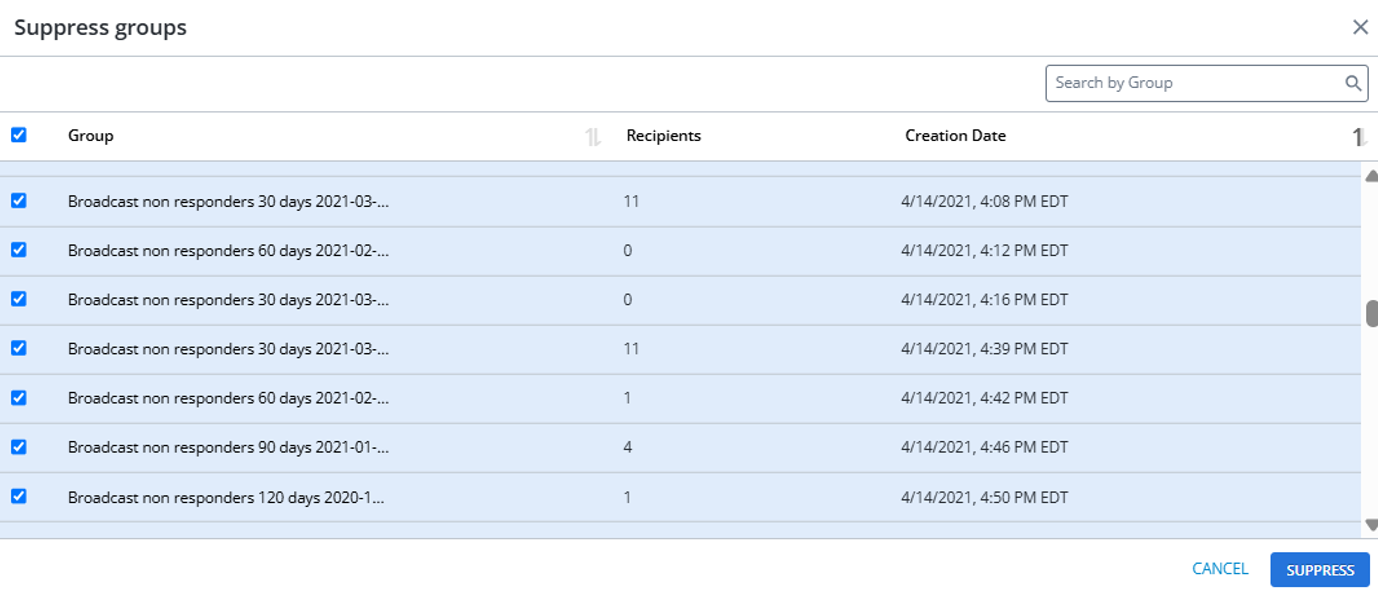
To remove recipients, for the Suppress the following groups link, click +GROUPS to select a subscriber group.
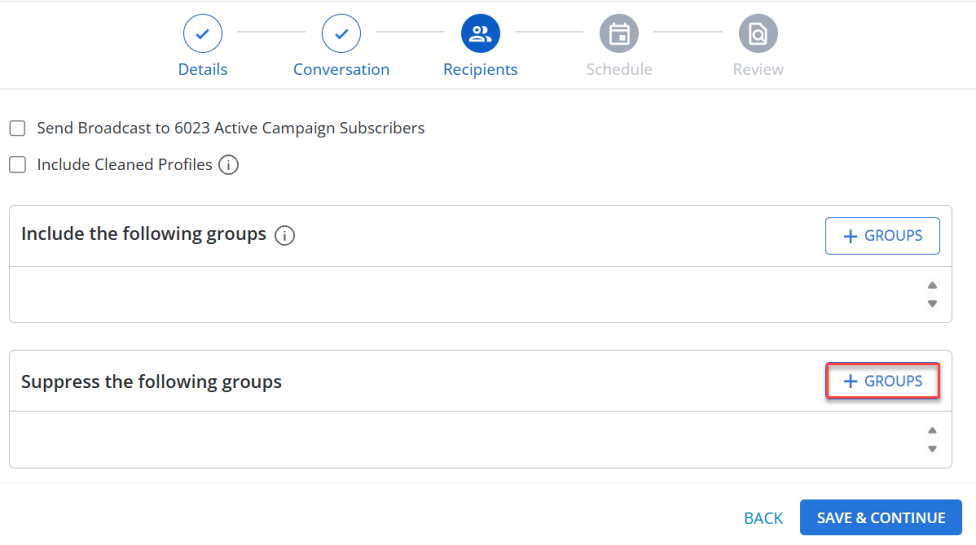
This opens the “Suppress groups” modal, which displays the following three columns:
-
Group: Displays group name.
-
Recipients: Displays the number of recipients in the selected group.
-
Creation Date: Displays the creation date of the group in the format MM/DD/YYYY HH:MM (Time Zone).
Select the groups and click SUPPRESS to suppress the groups in the broadcast creation process. Click CANCEL to close the “Suppress groups” modal without saving any changes. These subscribers will not receive the message.
-
-
Select Automatically adjust for each recipient's time zone to send the message based on the address and zip code in user's profile, if available. If this information is not available, then the recipient's time zone is based on the area code of their mobile phone number.
-
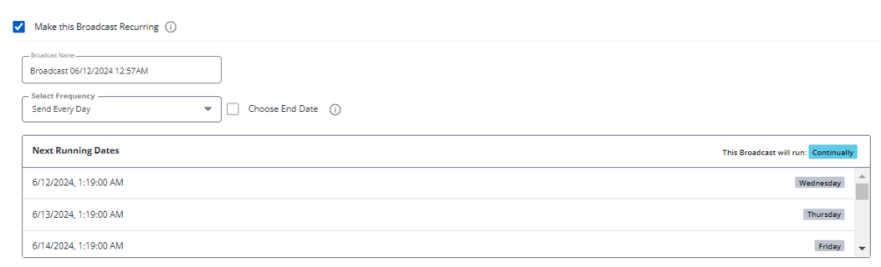
To send the message on a recurring basis, select Make this Broadcast Recurring:
-
(Optional) Edit the broadcast name, which will override the previous name.
-
Select the frequency from the drop-down list.
-
Select Choose End Date and then select the date and enter time (in 24-hour format) from the calendar selector.
-
-
Next Running Dates display the dates and time when the broadcast will run next, based on the selected frequency and end date (if applicable).
-
This broadcast will run provide information on the recurrence day of the broadcast. Weekdays (Monday-Friday) displays in gray color and Weekends (Saturday and Sunday) displays in orange color.

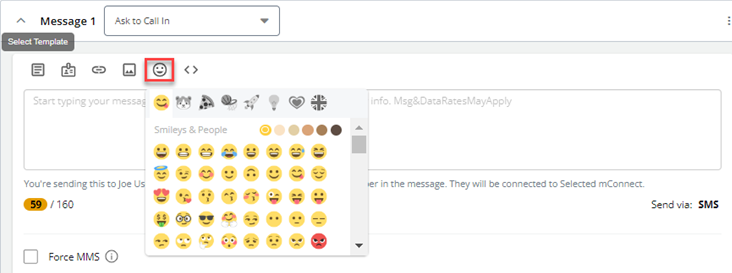
• Adding Emoji: To add an emoji, select  Insert Emoji. Scroll through the emoji library and select an emoji image to use. Click Insert to attach an emoji to the message.
Tip: If you know the name of the emoji, you can enter it directly into the message, with beginning and ending colons, for example, :emoji:
Note: If the character count exceeds 160 characters, the message is sent as a multi-part SMS message.
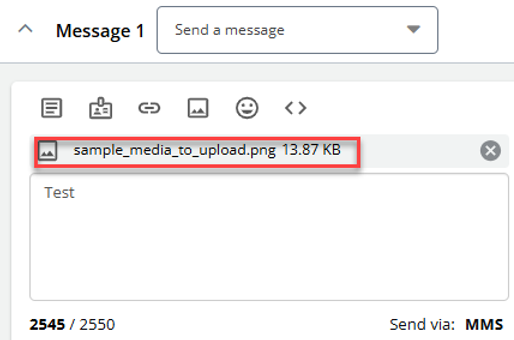
• Attaching Media: To attach a media, select  Attach Media.
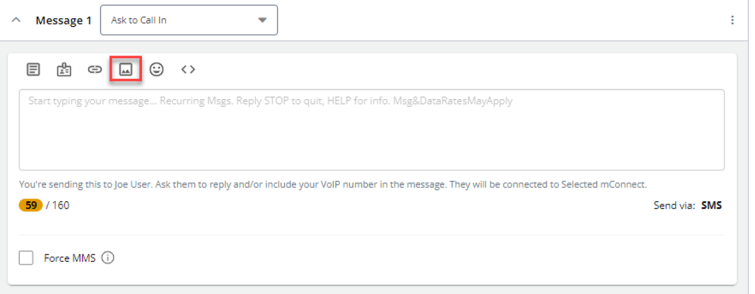
The Insert Media modal opens. The modal window consists of two tabs:

For any errors while uploading the file, an error message is displayed.
The attached media name appears above the message area.
• Inserting a Link: To insert a link, select  Insert Link. This will display two tabs: EXISTING LINKS and NEW LINK.
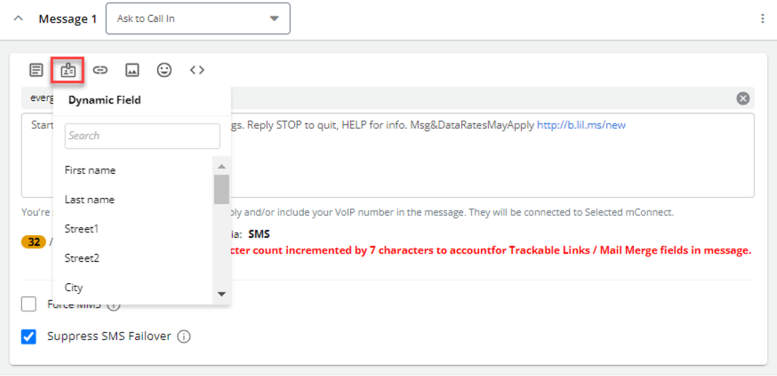
• Attaching Dynamic Fields: To add dynamic fields to the message, select  Dynamic Field. The Dynamic Field drop-down opens with various options to select. You can also search a dynamic field from the Search field. Upon selecting any option, the message preview displays the final message content in real time with populated dynamic fields.
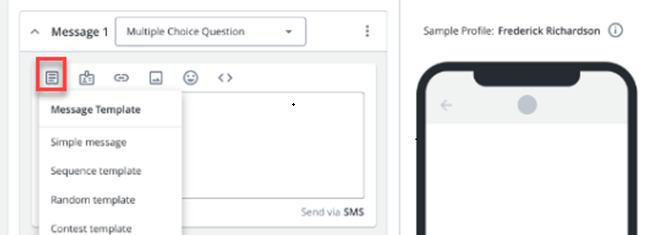
• Selecting a Message Template:If you have Message Templates, select a message from the Message Template drop-down list after clicking  Message Template. For more information, see Setting up message templates.
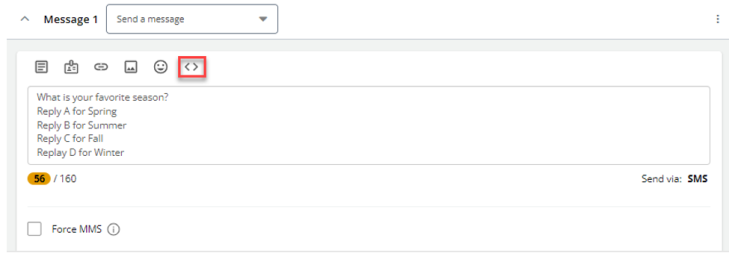
• Inserting Liquid: Use Liquid markup to personalize your message with values stored in the recipient's profile. Liquid Language adds extra characters to the character count as you compose your message. When the message is sent, the profile field values can also greatly increase the character count for each individual message. For more information, see Personalizing your message. Click  Insert Liquid to verify liquid templates and refine your message markup.
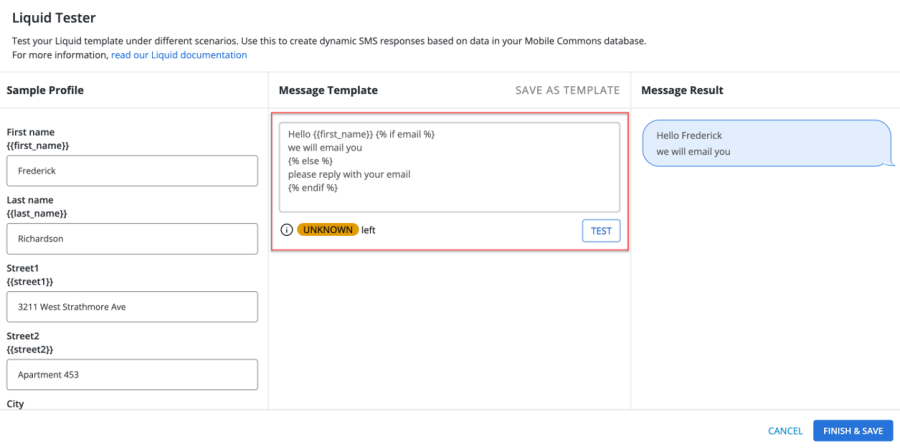
A "Message Template" section is available for real-time template updates. When you click TEST, the "Message Result" section will display the updates instantly. The character count is available at the bottom left of the "Message Template" section which updates in real-time as you add or remove characters.
You can save liquid templates directly within the broadcast interface with SAVE AS TEMPLATE, enabling you to effortlessly reuse pre-configured template. It reduces the need for repetitive manual entry and ensures consistency across broadcasts.

The  tooltip “Please click ‘TEST’ to validate the template before saving” is displayed next to the SAVE AS TEMPLATE button.

Clicking SAVE AS TEMPLATE opens the Save as liquid template modal. Enter the following information:
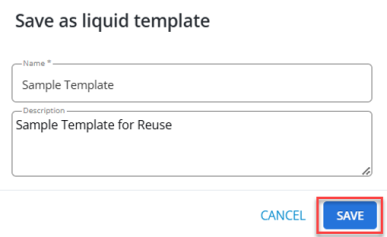
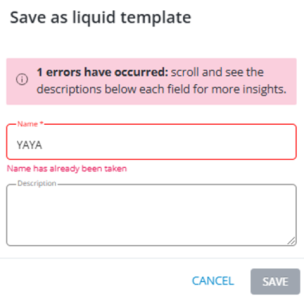
Note: You cannot create multiple liquid templates with the same name differing only by letter case (for example, "Template1" and "template1"). To avoid confusion, it is recommended to use unique names for all liquid templates. The SAVE button will initially appear inactive and grayed out. Once a unique name has been entered in the Name field, the SAVE button will become active (turn blue) and ready to be clicked to save the liquid template. If the Name field is left empty or the name is not unique, the SAVE button will remain inactive.
Click SAVE to save the liquid template. The saved template is stored on the "Liquid Templates" page, where it remains accessible for future use in broadcasts.
Note: If you enter Name and Description above 255 characters, it will result in an error, and you will not be able to save a liquid template.

Click CANCEL to close the Save as liquid template modal without saving any information.
Note: The SAVE button becomes active (blue) only when you enter a unique name in the Name field.
If there are any errors in your liquid template, a  tooltip appears indicating the actual number of errors. To see more details about these errors, look for the error descriptions displayed below each field (the red highlighted area), which indicates the area where the error has occurred.
When liquid logic text, including conditional statements or variables, is added to a message within the “Conversation” stepper, the message preview displays the final message content with the applied liquid logic as it appears upon sending, ensuring accurate preview of the final message.
When you are done, you can select FINISH & SAVE to update your message. For more information, see Testing your Liquid markup.
Message Options
Select a message option from the message drop down list that best describes the message. The message response will be based on the selected message type.
The following message options are available:
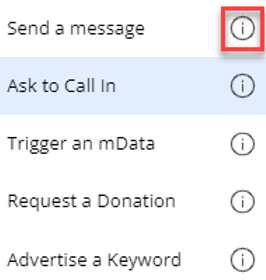
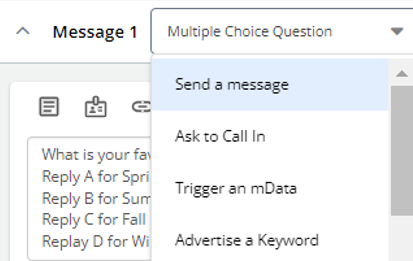
• Send a message: Send a text message. When a mobile user texts back in response, the next message in the conversation, if any, will be sent.
• Send as RCS: Send an RCS message. Leverage advance messaging features including high-quality media sharing, read receipts, and typing indicators. For more information, see Using Rich Communication Services (RCS) Messaging Function.
• Ask to call in: Invite the user to join a phone call campaign, usually by texting CALL to the short code or by dialling the VoIP number for an mConnect. Select the mConnect campaign, and then select an option for handling the response. For more information, see Phone Calls.
• Trigger an mData: Invite the user to enter a text search. Select the mData campaign, and then select an option for handling the response. For more information, see mData.
• Trigger an email: This is the text message the user will get. Their reply will trigger your email.
• Request a donation: This message will request a donation. Make sure to list donation options.
• Advertise a keyword: Invite subscribers to join a related campaign by texting in the keyword for the campaign. When a subscriber opts in, Mobile Commons sends the opt-in path message for the related campaign.
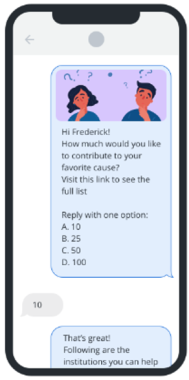
• Multiple choice question: You can create multiple choice question with this option. You can add choices and input both a standard value and a variation value (variations related to the standard value) for each choice. Three editable choices are available to edit when clicked on  Edit. To add more choices, click + NEW CHOICE.
Note: It has limit of up to 10 MCQ values after clicking + NEW CHOICE. The + NEW CHOICE button will be disabled after you add 10 MCQ values.
Click SAVE to save the choice. The standard value is displayed for each choice upon saving. Click RESET to clear all fields of a choice.
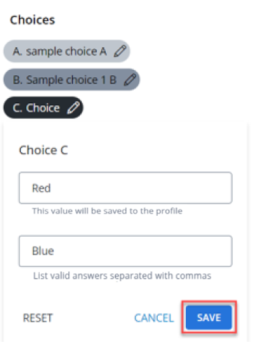
Send a message asking the user to select options that you enter, labelled A, B, C, D, etc., in the multiple-choice question panel. The recipient can respond with the corresponding letter or the value you enter next to the letter. If you select Yes to require a valid response, Mobile Commons will re-send the message if the user does not respond with a valid option.
Within the message preview section, you can review multiple-choice questions to ensure a smooth and accurate message creation process. If any changes are made to the multiple-choice questions, the message preview section updates instantly.
Tip: Add a thank you message to send after the user has responded to the multiple-choice question.
If you ask the subscriber for profile information, in the Save Response As section, select the field where the response will be stored:
• Nothing
• Address: If the response is a valid address, add it the Address field in the user's profile.
• Name: Add the response to the Name field in the user's profile.
• Name & Address: Split the response to add text to the name field. If a valid address is identified, add it to the Address field in the user's profile.
• E-mail: If the response is a valid email address, add it to the email field in the user's profile.
• Zip code: If the response is a valid ZIP code, add it to the email field in the user's profile.
If you have added custom fields to the user profiles, the custom fields are added to the list.
Note: You can request data for more than one field, if the fields are different data types, for example, name, email, and zip code.
Save Response As – In Message Response
Apart from the existing fields where you can search and use already existing fields, you can also insert new custom fields in the “Message Response” section.
Follow these steps to create and insert new custom fields:
Note: If there are any errors while creating a new field, an error message will display. If all fields are complete, the system will create the new custom field.
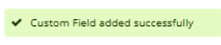
The success message will appear once custom field is added successfully.
Navigate to the “Existing Field” tab to select specific standard or custom field to include in your broadcast. The newly created custom field will now appear on the “Custom Field” page in Mobile Commons.
Force MMS: For a message longer than the standard 160-character count for SMS, up to 1600 characters, select Force MMS.
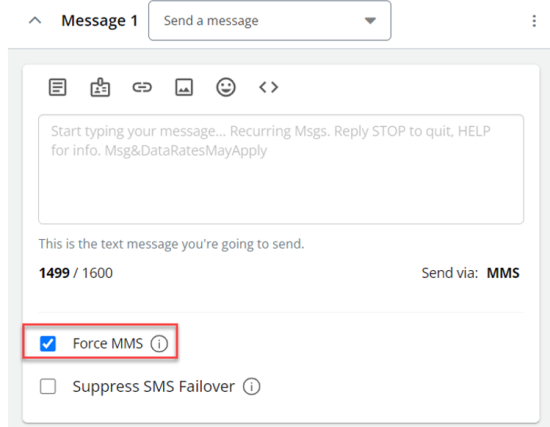
Note: Messages longer than 1600 characters will not be sent.
Select the action for subscribers that cannot receive MMS messages:
Note: Force MMS is an add-on feature. To add Force MMS to your company account, contact your customer success manager or Technical Support.
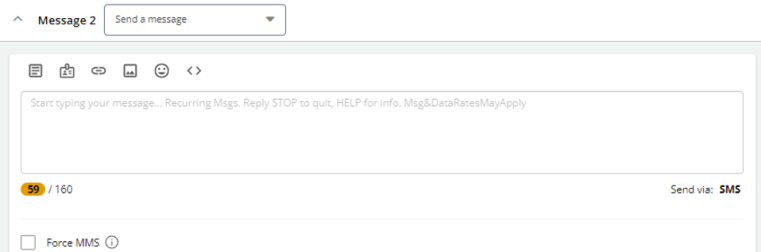
If you want to add another message round, select + ANOTHER MESSAGE.
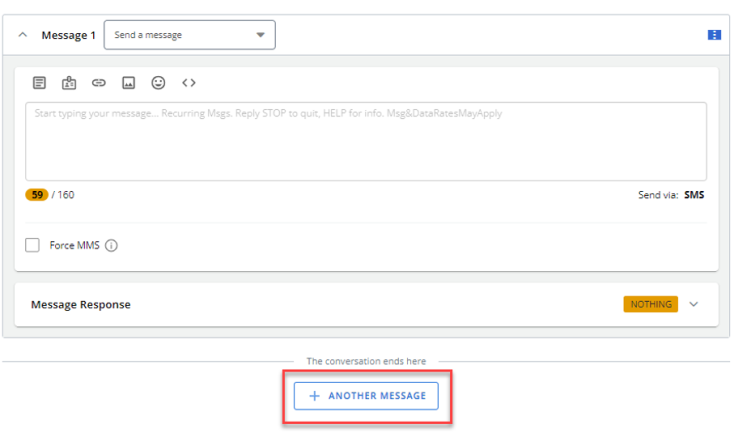
This will add a new message container.
You can expand or collapse the message containers by using the expand icon or the collapse icon available in the message container.
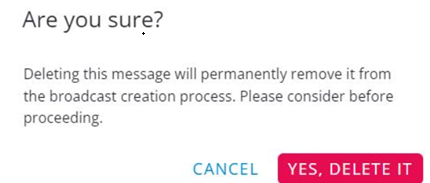
To delete a message container or move it up or down one step to its current position (when two or more message containers are added), open the message  Actions menu in the message container and select the appropriate option – Delete, Move Up, or Move Down.
You will receive a confirmation message when deleting a message container, select YES, DELETE IT to delete.
Note: When the selected message container is already at the top position, Move Up is inactive. When the selected message container is already at the bottom position, Move Down is inactive.

The  Actions menu will not appear in the first message container when you enter the conversation stepper for the first time.
If a message container is collapsed and has an unresolved error, a  red tooltip will appear on it. This icon will disappear once the error is corrected.

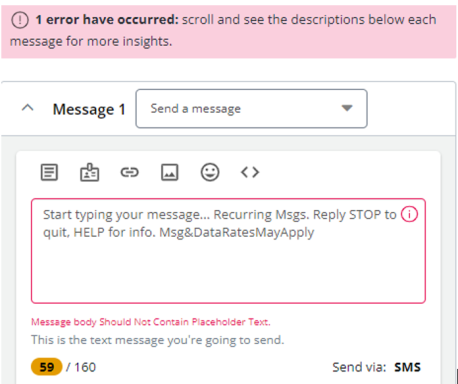
If there are any errors when creating a message, and you try to save and continue, a  tooltip will appear above the message container indicating the actual number of errors. To see more details about these errors, look for the error descriptions displayed below the red highlighted area, which indicates the area where the error has occurred.
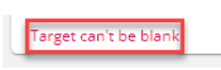
For the message options: Ask to Call In, Trigger an mData, Request a Donation, or Trigger an Email Reply, you must select a value from the corresponding dropdown. If you try to save and continue without selecting a value, you will see the error message "Target can't be blank."
3. When you are done, select SAVE & CONTINUE. The Recipients page opens.
Recipients
1. To add recipients:
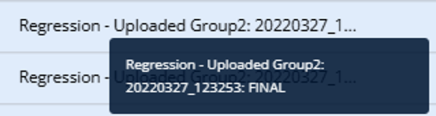
A checkbox is included next to each group in the "Group" column for selection where users can check or uncheck individual groups. A select all checkbox  is available next to “Group” column to select or deselect all visible groups. If the group name is long, hover over the truncated portion to see the full group name in a tooltip.
If you want to remove any selected group, select  Cross available next to a selected group. You can click on a group pill to go directly to that specific group's page.
The search bar is placed at the top right of the “Include groups” and “Suppress groups” modals and labeled “Search by Group”. It supports both partial and full matches, with results updating dynamically as you type.
To sort the “Group” and “Creation Date” data in ascending or descending order, use the  Ascending or
  Descending order located to the right of the “Group” and “Creation Date” columns in the “Include groups” and “Suppress Groups” modals.
Note: The same subscriber group cannot be selected in both the Include the following groups and Suppress the following groups. If a group is selected in the Include the following groups, the same group will be disabled for selection in the Suppress the following groups. Whereas if a group is selected in the Suppress the following groups, the same group will be disabled for selection in the Include the following groups.
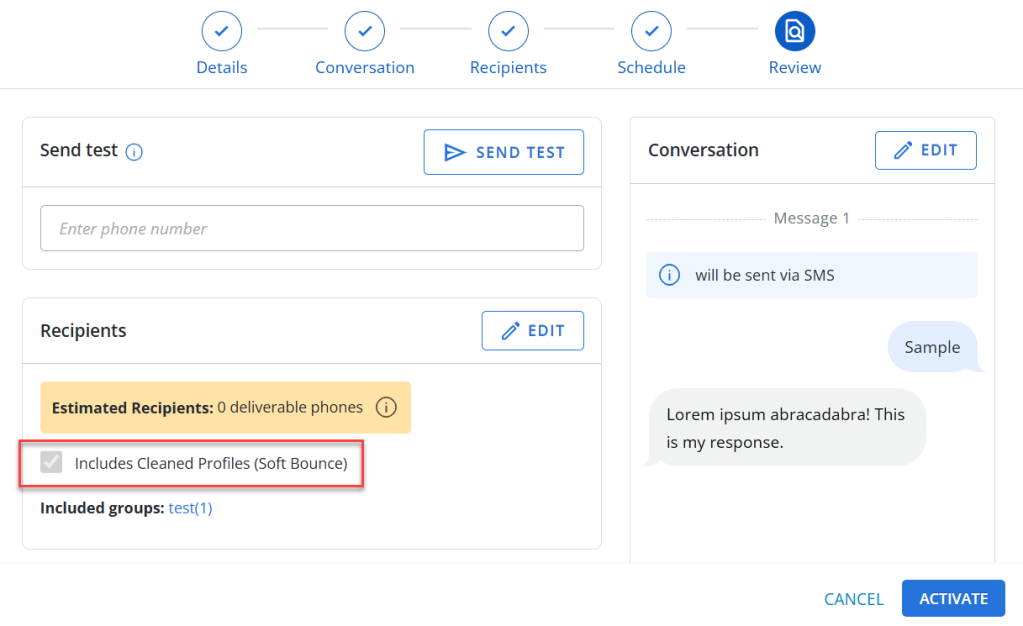
You can also include cleaned profiles when creating a broadcast, enabling you to re-engage profiles that may have been mistakenly marked as cleaned or have become active again. Select Include Cleaned Profiles checkbox to include cleaned profiles.
Note: All profiles (active subscribers) that are cleaned only due to soft bounces are included. Once a cleaned profile receives a message, it is automatically uncleaned.
The Include Cleaned Profiles option is disabled by default. The tooltip displays “Enable this option to include cleaned profiles in the broadcast. Only profiles that have been cleaned due to a certain number of soft bounces will be targeted. If the profile shows active, then we will automatically unclean the profile.”
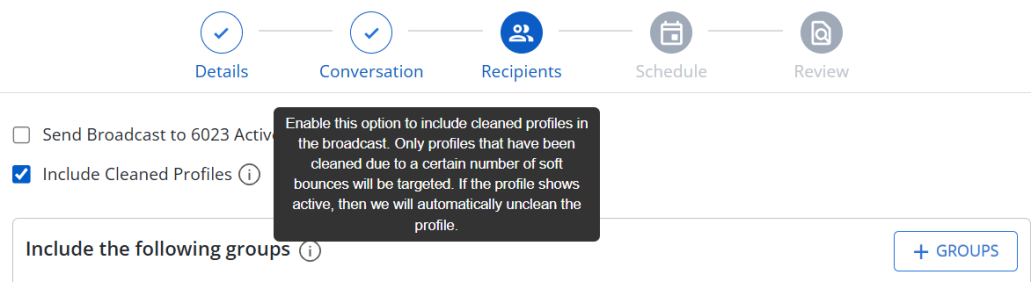
If this option is selected, it also appears as checked on the Review page, indicating that cleaned profiles are included.
2. When you are done, select SAVE & CONTINUE. The Schedule page opens.
Schedule
1. To schedule the delivery time, select one of the following options:
• Send Now: To send the message immediately, select Send Now.

Select the Fast track this broadcast checkbox to expedite delivery. If checked, this broadcast will send out directly via sub-generators at a faster rate.

• Schedule: To schedule at a specific date and time, select Schedule and select the date and time for the year, month, day, hour, and minute from the calendar selector.
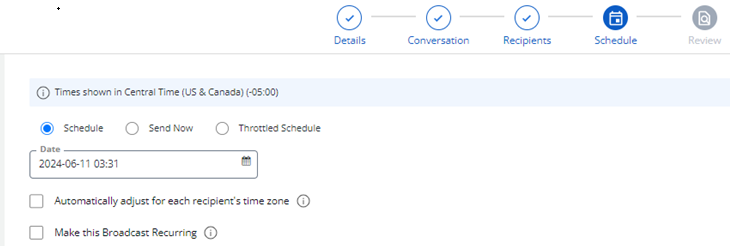
In the Enter Time section, you can manually enter hours and minute values.
Note: The time is displayed in a 24-hour format, ranging from 00:00 (midnight) to 23:59. The inclusion of a.m. or p.m. is not required, as numerals exceeding 12 signify the afternoon.
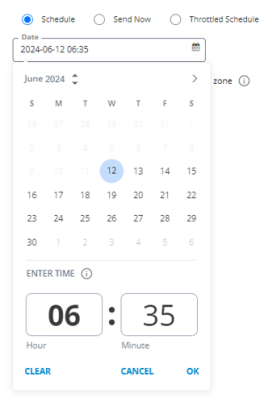
Select CLEAR to reset the selected date and time to default values. Select CANCEL to close the calendar without saving any changes. Select OK to confirm the selected date and time, close the calendar and proceed with the broadcast creation process.
To refine the setting:
Note: End Date provides a way to make your broadcast iterate a predefined number of times, otherwise, it will run continually.
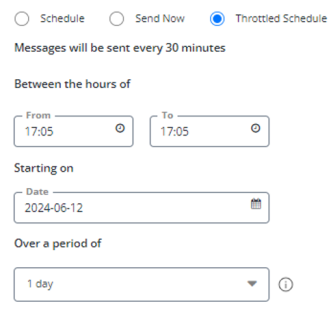
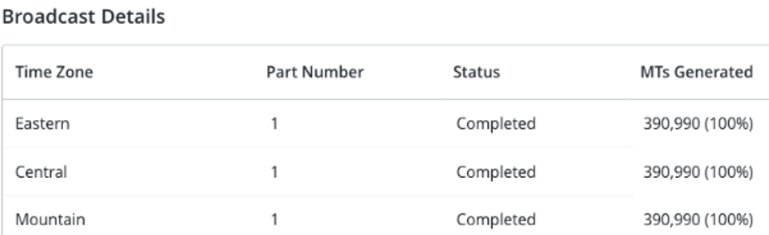
• Throttled schedule: You can schedule throttled messages to be sent every 30 minutes within a specified time frame. Select the hours during which to send messages, the start day to begin sending messages, and the number of days (1 to 5) during which all the messages will be sent. Recipients will be divided up so that they are spread evenly across the specified time period. The user's time zone is not used. Users who become eligible to receive the broadcast while it is sending will also receive it.
2. When you are done, select SAVE & CONTINUE. The Review page opens.
Review
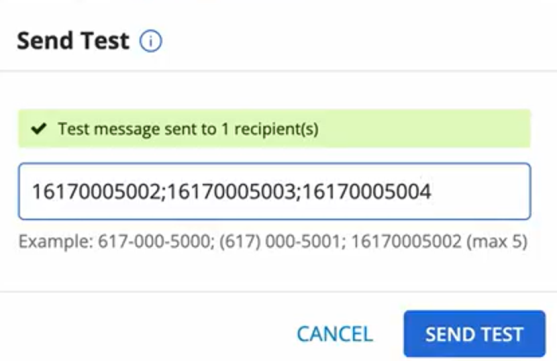
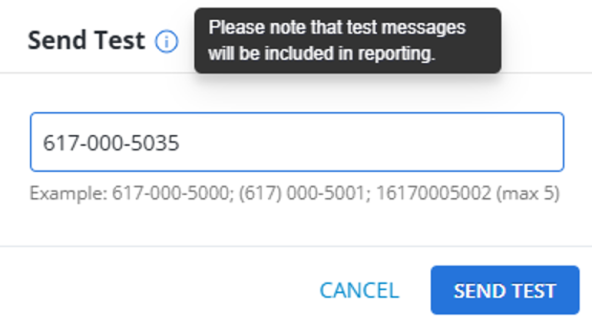
You can send a test message before the broadcast is scheduled:
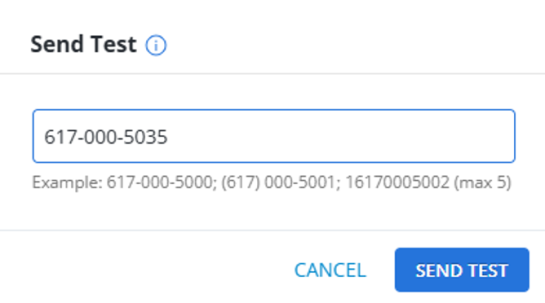
1. In the Send Test, enter a test mobile number to which you want to send a test message.
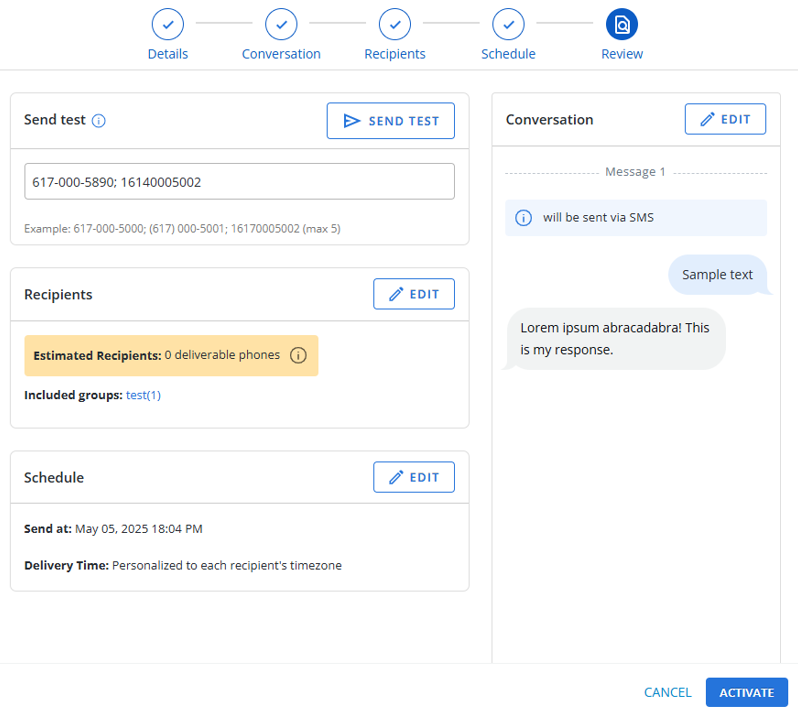
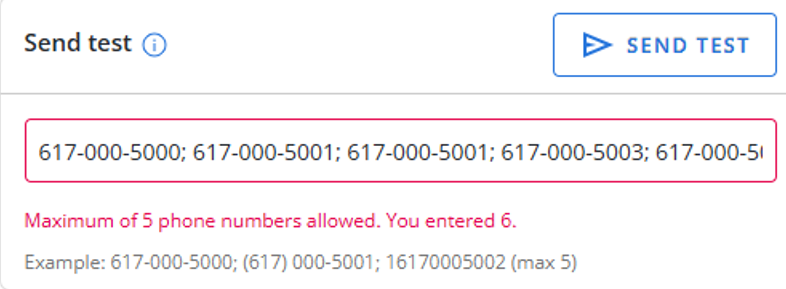
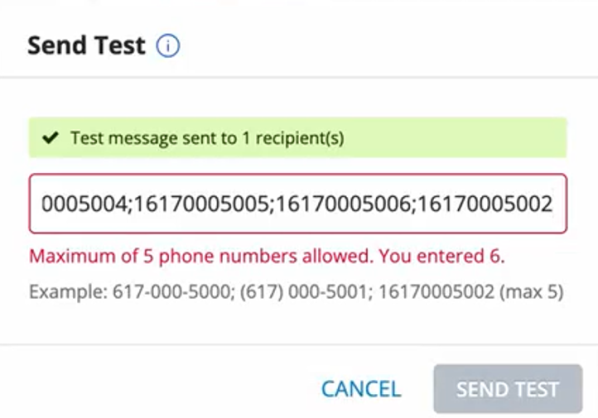
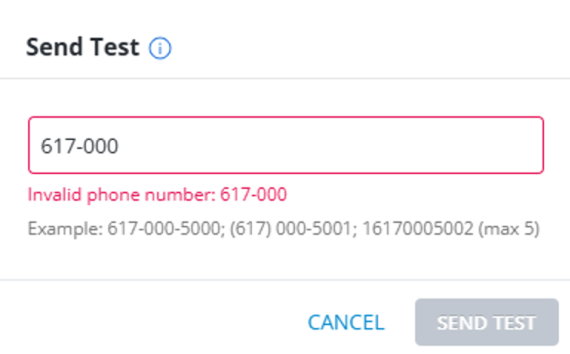
You can send test messages to a maximum of five phone numbers, separated by semicolons. If more than five numbers are entered, an error message will be displayed.
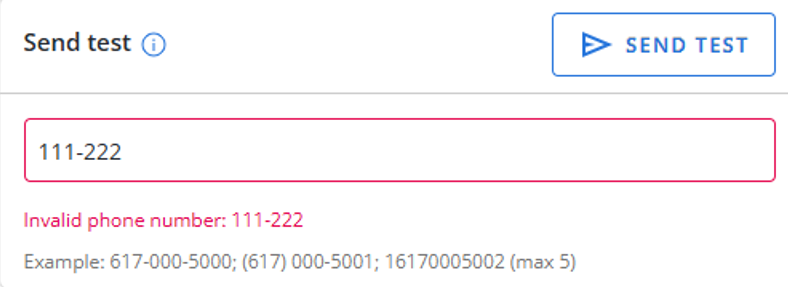
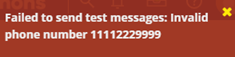
If you enter an invalid phone number, an error message will appear specifying the exact number that is invalid.
After the test message is successfully sent, a flash message will appear stating: “Test message sent to [number] recipient(s).”

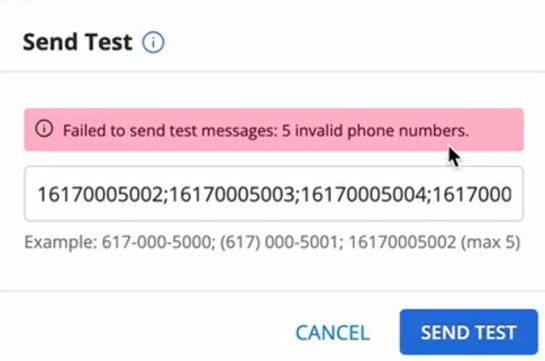
If the test message fails to send due to an invalid phone number, a flash message will appear stating: “Failed to send test messages: Invalid phone number” followed by the specific invalid number.
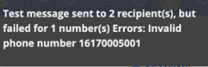
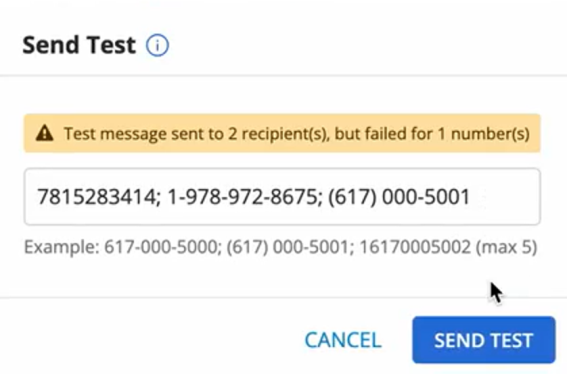
If the test message is successfully sent to some recipients but failed for any phone number(s), a flash message will appear stating:
“Test message sent to [number] recipient(s), but failed for [count] number(s). Errors: Invalid phone number” followed by the specific invalid number.
The test mobile number does not need to be subscribed to the campaign, though it must be available in a profile from the Mobile Commons database.
Tip: To send test messages to your mobile phone, create a static profile group containing your mobile phone number. For more information, see Creating a static (uploaded) group and create the group by adding your mobile phone number in the Upload Profiles text box.
2. Click Send Test. All the messages within a broadcast are immediately sent to the test mobile number. A confirmation message will appear once the test message has been successfully sent. The message will appear in the Outbox and the Campaign report but not in the Broadcast report.
Note: The test messages will be included in the Broadcast and Campaign report if they have been sent.
Review the conversation, recipients, and schedule information. If any edits are necessary, click Edit available next to the respective section.
The "Recipients" section shows the counts for:
• Estimated recipients
• Send Broadcast to (count) Active Campaign Subscribers checkbox. (if selected on recipients page)
• Included groups
• Excluded groups
Individual group profile counts for both included and excluded groups are displayed on the "Review" page.
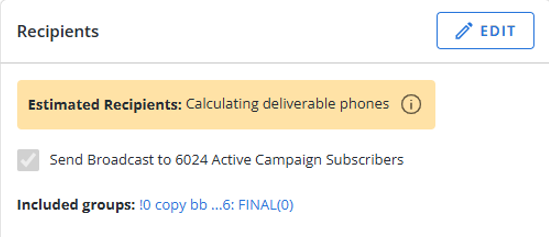
To view the tool tip, select  tooltip adjacent to the “Estimated Recipients” count.
3. When you are done, select ACTIVATE.
Note: If you are a campaign editor with restricted permissions, an editor must review and approve your broadcast before it is sent. Select Submit for Approval. Read the broadcast summary, and then select OK. For more information, see Approving a broadcast message.
If your broadcast message is not approved, you can edit it and re-resubmit it for approval.
A confirmation message appears to confirm the submission of the broadcast.
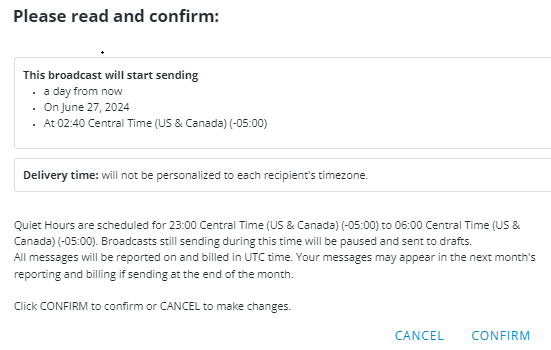
4. Read the confirmation message carefully:
• If you agree, select CONFIRM. You see a message that your broadcast has been scheduled.
• If you are not ready to schedule the broadcast currently, select CANCEL.
Note: If you need to stop the message at a later date, you can select Edit Conversation and then select Unschedule Broadcast. If Mobile Commons is in the process of sending a message when it is stopped, you can reschedule the message for a later time, when Mobile Commons will resume sending the message to the remaining recipients.
The Conversation page opens. The broadcast status is  .
.
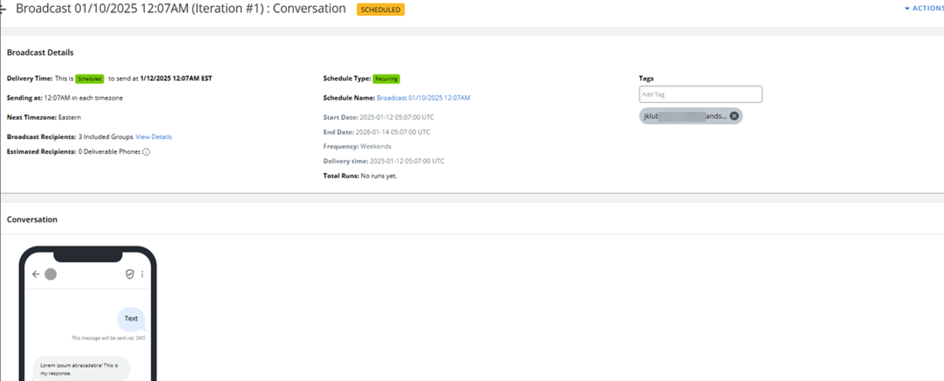
Click View Details located next to Broadcast Recipients to access the recipients’ details.
Click View Details located next to Broadcast Details to access broadcast details.

For adding tags, see “Add tags to a broadcast message” section below.
You can also delete and clone this broadcast. To do so, in the Actions panel on the right, select an appropriate action Delete Broadcast or Clone Broadcast, as needed.
Cloning a broadcast message
You can also create a broadcast message by making a copy of an existing broadcast message.
To clone a broadcast message:
-
Select
Text Messaging in the left pane, and then select Broadcasts. -
Locate the broadcast message to copy in the Broadcasts table, and then select the broadcast name link.
The Conversation page opens.
-
In the Broadcast Actions panel on the right, select Clone Broadcast.
Mobile Commons creates a copy of the broadcast and opens to the Conversation step.
-
Enter a new name for the broadcast, and then select SAVE & CONTINUE.
-
To revise the broadcast message, proceed through the Conversation, Recipients, Schedule, and Review steps.
Add tags to a broadcast message
Tags are keywords or terms that can be attached to broadcasts in Mobile Commons to inform users on what the broadcast is about. They help users easily organize and search through broadcasts. Multiple tags can be added to broadcasts.
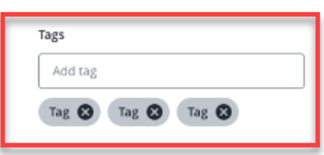
Note: When a new broadcast is created, the email address of the user who created the broadcast will automatically be added as a tag.
To add tags to a broadcast:
-
Select
Text Messaging in the left pane, and then select Broadcasts. -
Select a broadcast from the Broadcasts list.
-
Type the name of a tag into the "Tags" textbox.
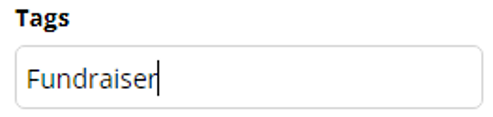
-
Select the Enter key on your keyboard.
-
Select the OK button from the confirmation window.
-
(Optional) Repeat Steps 3-5 until all of your tags have been added.
-
(Optional) Select
 for any displayed tags to remove them.
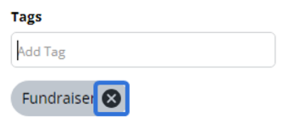
Each added tag will be displayed under the "Tags" textbox.
Editing a draft broadcast message
To make changes to a draft broadcast message:
-
Select
Text Messaging in the left pane, and then select Campaigns. -
Locate the name of the campaign in the Campaigns table, and then the campaign name link.
The Campaign Details page opens.
-
Locate the broadcast in the Broadcasts table, and then select the broadcast name link in the Recently Updated Broadcasts table.
The Broadcast page opens, with the five steps to building a broadcast message at the top of the page.
-
To revise the broadcast message, proceed through the Details, Conversation, Recipients, Schedule, and Review steps.
Editing a scheduled broadcast message
If a broadcast is scheduled to be sent, you can edit the conversation only.
Note: If a broadcast has already been sent, you cannot edit it or send a test message from it, though you can clone it to create a new message. For more information, see Cloning a broadcast message.
-
Select
Text Messaging in the left pane, and then select Campaigns. -
Locate the campaign in the Campaigns table, and then select the campaign name link.
The Campaign Details page opens.
-
Locate the broadcast message in the Recently Updated Broadcasts table, and then select the broadcast name link.
The Broadcast page opens to the Conversation page.
-
In the Broadcast Actions panel on the right, select Edit Conversation.
-
Make your changes to the message(s) in the conversation. For more information, see Conversation.
-
When you are done, select SAVE.
Tip: If you want to make changes to the name, recipient list, or schedule pages, you must first unschedule the broadcast. From the Broadcast Actions panel in the right, select Unschedule Broadcast.
Deleting a broadcast message
Caution: Use caution when deleting a broadcast message. You cannot restore a deleted broadcast message.
To delete a broadcast message:
-
Select
Text Messaging in the left pane, and then select Campaigns. -
Locate the campaign in the Campaigns table, and then select the campaign name link.
-
Locate the broadcast message in the Recently Updated Broadcasts table, and then select the broadcast name link.
-
If the broadcast has been scheduled, in the Broadcast Actions panel on the right, select Unschedule Broadcast and then select OK to confirm.
Note: You cannot delete a broadcast message that has already been sent.
-
In the Broadcast Actions panel on the right, select Delete Broadcast.
-
Select YES, DELETE IT to confirm.
Sending a test message
You can send a test message after scheduling a broadcast.
-
Select
Text Messaging in the left pane, and then select Campaigns.
-
Locate the campaign in the Campaigns table, and then select the campaign name link.
The Campaign Details page opens.
-
Locate the broadcast message in the Recently Updated Broadcasts table, and then select the broadcast name link.
The Broadcast page opens to the Conversation page.
-
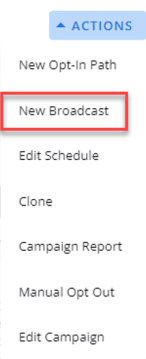
In the Broadcast Actions panel on the right, select Send Test.
-
Enter the mobile number to end the test message. Click SEND TEST.You can send test messages to a maximum of five phone numbers, separated by semicolons. If more than five numbers are entered, an error message will be displayed.
The test messages will be included in reporting.
Note: The SEND TEST button will be initially disabled and activated only when the user has entered a valid phone number in the “phone number” field. If you enter an invalid phone number, an error message will appear specifying the exact number that is invalid.
If the test message is successfully sent to some recipients but fails for one or more numbers, an error message will appear stating:
“Test message sent to [number] recipient(s), but failed for [count] number(s).”
If the test message fails to send due to invalid phone number(s), an error message will appear stating:
“Failed to send test messages: [count] invalid phone number(s).”
The test message will be immediately sent to the mobile number. Once successfully sent, the Send Test modal displays a confirmation message: “Test message sent to [number] recipient(s).”