Scheduling a Mailing
After selecting a target audience, adding content, rendering, and seeding your mailing, you can schedule your mailing.
When setting a schedule, you have the option to send the mailing immediately (default option), delay your send until a specified time, or use personalized delivery time settings. You can also set your queue priority from the schedule tab.
Note: personalized delivery time is an on-demand feature and may not appear in your scheduling options. For more information, contact postup-support@uplandsoftware.com.
Sending at a specified time
If you are preparing campaigns in advance, you may wish to delay the send until a given date and time.
-
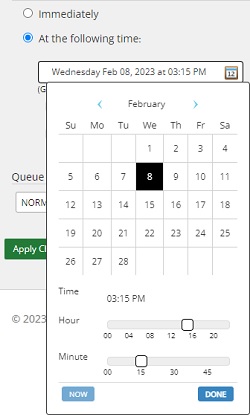
Select the at the following time option from the schedule tab.
-
Use the calendar to define a date, e.g. Feb 08, 2023.

-
Use the hour and minute sliders to select a time, e.g. 03:15 pm.
-
Press the done button to confirm your settings.
-
Select the optional checkboxes if you wish to:
-
Delay content assembly - PostUp will delay content assembly until the send time. This is useful when Web Fetch or content management files will not be ready until after the mailing has been scheduled.
-
send in recipient's time zone - the send time adjusts for timezone for each recipient, e.g.
When unchecked, the mailing will go out to all recipients at your set time, e.g. 3:15 pm in your timezone.
When checked, the mailing will go out to each recipient when the send time is reached, e.g. 3:15 pm in their timezone.
-
-
Press the apply changes button to save your changes.
When you finish setting up your mailing and press send on the preview and send tab, PostUp will wait until the set date and time to send your mailing.
-
Press the next button to move to the responses and results tab.
Schedule with personalized delivery time
Note: this is an on-demand feature. For more information, contact postup-support@uplandsoftware.com.
Personalized delivery time (PDT) uses machine learning to identify the most likely time a recipient engages with an email and sends the email at that time. If you have personalized delivery time activated:
-
Select the personalized delivery time option from the schedule tab.
-
Use the start time calendar to define a date and time for the earliest mailing delivery.
-
Use the stop time calendar to define a date and time for the latest mailing delivery.
PDT will calculate the best time for each recipient to be sent a mailing between your selected dates and times.
Note: there may be instances where a personalized delivery time cannot be calculated, e.g. not enough engagement data exists for that recipient. To ensure these recipients do not get excluded from the mailing, set a fallback time.
-
Use the fallback time calendar to define a date and time for any recipients not captured by PDT to be sent the mailing.
-
Select the optional checkbox if you wish to:
-
Delay content assembly - PostUp will delay content assembly until the send time. This is useful when Web Fetch or content management files will not be ready until after the mailing has been scheduled.
-
-
Press the apply changes button to save your changes.
When you finish setting up your mailing and press send on the preview and send tab, PostUp will wait until the set dates and times to send your mailing.
-
Press the next button to move to the responses and results tab.
Queue priority
If you have multiple mailings being sent at the same time, you may wish to prioritize them.
By default, mailings are set to a normal priority. If you wish to change the priority:
-
Use the dropdown menu to select a high or low priority for that mailing.
-
Press the apply changes button to save your changes.