This article covers the available options when creating or Editing an Expense Item.
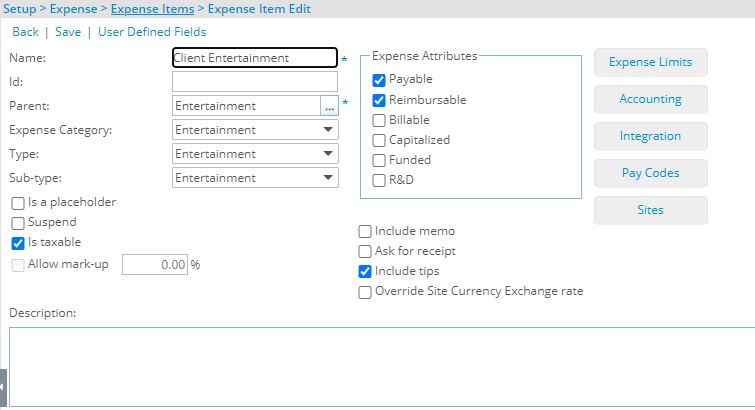
- Name: In the Name box, type the name of the Expense Item.
- Id: Enter an ID for the Expense Item in the ID field. The ID, when used, is usually used for search purposes.
- Parent: From the Expense Items list page select and designate, from the Expense Items list page, under which the Expense Item is to be displayed.
- Expense Category: From the Expense Category list, select a category to which the Expense Item belongs. Depending on the category selected, different options appear on the Expense Edit page:
- Other:
- Airfare:
- Cash Advanced:
- Entertainment:
- Mileage: Selecting Mileage as the Expense Category will require setting a Currency.
- Per Diem: Selecting Per Diem as the Expense Category will require setting a Per Diem Amount and a CurrencyThe currency of a Mileage or Per Diem type Expense Item cannot be changed at the expense entry level
- Type: Select the Type and Sub-type of the Expense Item. The Sub-Type list filters based on the selections made in the Type list.
- For the Transportation Type you can choose from Airfare, Mileage, Train, Car Rental, Cab Fares and Parking, Tolls Sub-type.
- For the Lodging Type you can choose from Hotel or Meal Sub-type.
- For the Entertainment Type you can choose from Entertainment Sub-type.
- For the Telecommunication Type you can choose from Fax, Telephone and Internet Access Sub-type.
- For the Office Type you can choose from Computer Hardware, Computer Software, Copies/Printing, Customs & Broker Fees, Equipment, Material, Postage, Shipping & Handling and Supplies Sub-type.
- For the Service Fees Type you can choose from Certification, Consulting, Insurance, Subscription, Support and Training Sub-type.
- For the Other Type you can choose from Insurance, Other, Shipping and Media Sub-type.
- Is a placeholder: Select this option if the Expense Item Is a Placeholder. A placeholder is a virtual component. It allows the user to design a hierarchical Expense Item tree. If an Expense Item is set to be a placeholder, it cannot be used as a regular Expense Item. It is used solely for organizational purposes.
- Suspend: If the Suspend box is selected, then the Expense Item is suspended. Therefore, users are not able to use it. To reactivate an Expense Item after it has been suspended, clear this selections box click Save.
- Is taxable: Select the Is Taxable box if the Expense Item is taxable when billing to a Client.
- Allow mark-up: Select the Allow Mark-up box if the Expense Item is allowed to be marked up when billing to a Client.
- Expense Attributes section: In the Expense Attributes section, if the Expense Item is Funded, R&D, Payable, Reimbursable, Billable or Capitalized, select the appropriate box as required.
- Payable: Payable expenses are a cost to the company. The expenses incurred are accounted for a specific project and not reimbursed to a user.
- Reimbursable: Reimbursable expenses are also a cost to the company. The company pays costs incurred by Expense Items to the user reporting these expenses.
- Billable: When an Expense Item is marked as billable, a client pays all costs incurred by the Expense Item. Billable Expense Items generally generate profit for the company.
- Capitalized: Marking the Expense Items as capitalized implies that the expenses incurred through these Expense Items are capital for the organization.
- Funded: Marking an Expense Item as funded implies that the company is receiving some outside funding for the Expense Item.
- R&D: Marking an Expense Item as R&D makes it part of research and development. Often it is possible to receive government grants for R&D expenses. In this case, accurate information of all actuals that relate to R&D expenses must be kept.
- Select the boxes if a user is to: Include memo, Ask for receipts or Include tips
- Override Site Currency Exchange rate: The Override Site Currency Exchange Rate box can be selected when expenses are incurred in a different currency. If this Expense Item is included in an Expense Report, the user can manually change the currency exchange rate. If the Override Site Currency Exchange Rate box is not selected, the system applies the default Exchange Rate to the expenses.
- Description: You can include notes on the Expense Item within the Description box. It is particularly useful if there is extra information you would like to include.
- User Defined Fields: Allows you to access the Associate User Defined Fields page where you can associate UDFs to the Expense Item.
- Expense Limits: Allows you to access the Expense Limits page where you can set new Expense Limits or edit existing one.
- Accounting: Allows you to access the Accounting page where you can set Receivable or Payable Transactions Segment Code and Account.
- Integration:
- Pay Codes: Allows you to access the Pay Codes page where you can set Pay Code for Expenses.