This article details how to edit an Announcement Notification.
- From the Icon Bar click Setup
 .
. - From the Navigation Menu click Notifications to access the Notification List page.
Note: By default System Notifications is selected.
- From the Notification Type options, select Announcement Notifications.
- From the Announcement Notifications List page click the name of the Notification you wish to modify.
Note: By default, the page lists all Announcement Notifications in alphabetical order.
- Click the Edit
 button against the Name to enable inline editing. Enter a new name or modify it as required.
 - From the Message tab:
- If required modify the subject line of the notification in the Title box.
Note: HTML tags are not supported in the Title box.
- Select the Language (English or French).
- Choose a different Valid Until date.
Note: The Announcement Notification will not be sent after this specified date.
- Choose a Delivery Method from the available options:
- Email (default selection): Targeted recipients receive the announcement by email.
- In-App: Targeted recipients receive the announcement in the application. See In-App Delivery Method.
- Or both: Targeted recipients receive the announcement by email and in the application.
- Select a Scheduled Send Date: This is the date on which the Announcement Notification is scheduled to be sent.
Note: By default, this field is empty, allowing you to choose the desired date for sending the notification.
- Select the required Time: The specific time, represented in military format, at which the Announcement Notification is scheduled to be sent.
Note: By default, this field is set to 00:00.
- Select the required Time Zone: The geographic region or area where the scheduled time for sending the announcement notification is based.
Note: By default, this field is set to (GMT -05:00) Eastern Time (US and Canada).
- Enter the required Message. You can customize the message body using the Rich Text Editor. For formatting options and features, see Rich Text Editor.
Note: Pasting text into the rich-text editor should preserve most formatting, but some types of unsupported formatting, such as colored text, may need to be added manually in the editor after pasting.
- If required modify the subject line of the notification in the Title box.
- From the Recipients tab you can add or remove Recipients:
- To remove exiting recipients from the To section, choose the selection box(es) against the Users, Functional Groups, Resource Groups, Approval Groups, Clients and/or Security Profiles and click the Delete
 button.
 - To add users to the list of Recipients click New.
- Choose the Recipient type from the following options: Users, Functional Groups, Resource Groups, Approval Groups, Clients and/or Security Profiles.
- The page will refresh to display the list of available options based on your selection in step (i).
Tip: To narrow the list down you can search the list based on Name or Id.
- Select the required option from the Available list on the left and Add them to the Selected list on the right .
- Click Close to return to the edit page.
- To remove exiting recipients from the To section, choose the selection box(es) against the Users, Functional Groups, Resource Groups, Approval Groups, Clients and/or Security Profiles and click the Delete
- If required Enter or modify the CC or BCC recipients email addresses separated by a semicolon within the Other Recipients section
- Click Save.
- If you have scheduled the Announcement Notification for future delivery then click the Back button. Your Notification will be sent according to the schedule of the Notifications Delivery Automation Service.
Caution: As a precautionary note, please be advised that delays might occur depending on the schedule settings of your Notifications Delivery Automation Service.
Example: If you have set an Announcement Notification to be sent at 13:30, and your Notifications Delivery Automation Service runs every 60 minutes, with the most recent operation at 13:00, your Announcement Notification will be dispatched at the next execution time of the Automation Service, which is 14:00.
- Otherwise, click Send to immediately deliver the notification to the selected Users.
Note: By clicking Send, the Announcement Notification will be immediately sent to the designated recipients regardless of the schedule.
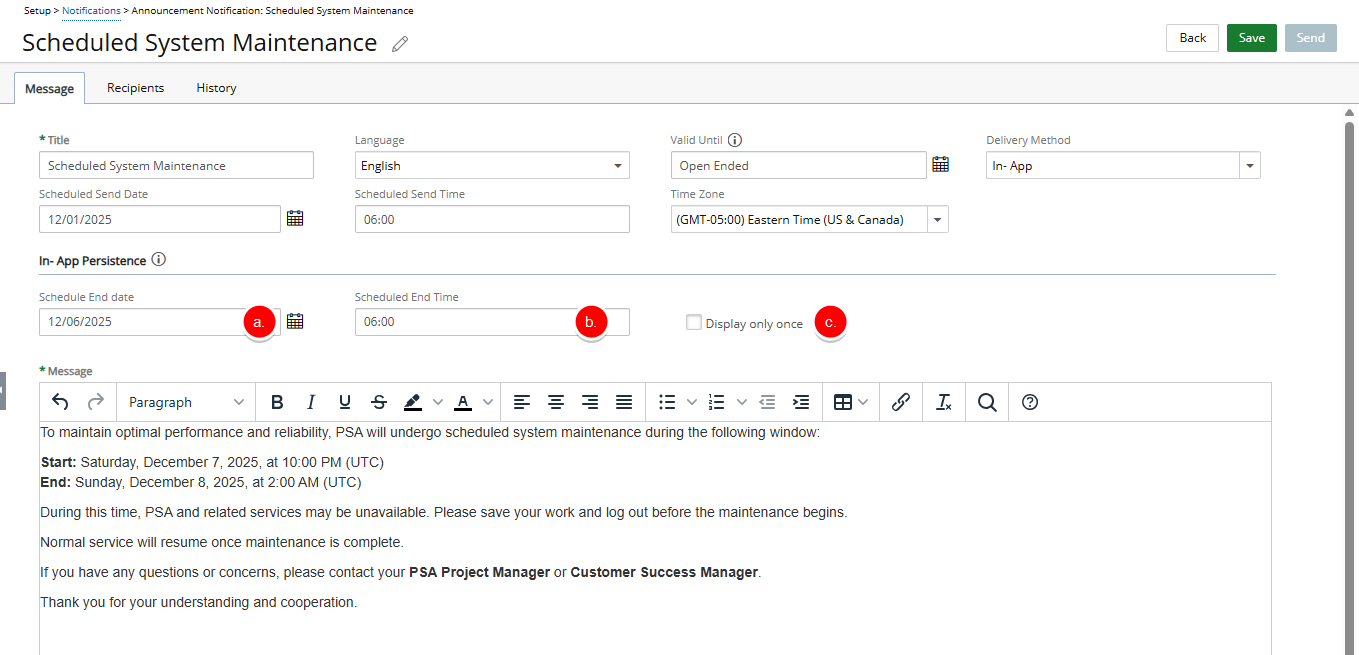
In-App Delivery Method
When you select In-App from the Delivery Method dropdown, a new section titled In-App Persistence appears. An information icon is displayed next to this title. Hovering over the icon shows the message: This announcement will be displayed upon login until the selected Date and Time. In this section, you can define the following settings:
- Scheduled End Date:The date when the announcement will stop appearing to users in the application.
- Scheduled End Time: The time on the Scheduled End Date when the announcement will no longer be shown.
- Display Only Once: When selected, the announcement appears only once to each user upon login.
Note: This option is unchecked by default.