The Notifications are sent based on their respective service schedule. These services are pre-configured with default values; however, the schedule can be modified.
By default, the services are configured as follows:
- Start Date: Database start date
- Start Time: 01:00
- Time Zone: (GMT-05:00) Eastern Time (USA and Canada)
- Process Every: 1 Day
You can modify the processing frequency and time based on your organization's needs.
This article details how to modify the Automation Processing Options.
Note:
- The Enable Automation Processing box defines whether or not the automation options are processed; the box is enabled by default to enable the services grid.
-
Note that any changes will not take effect until the next service is done executing.
- From the Icon Bar click Setup
 .
. - From the Navigation Menu click Organization.
- From the menu click System.
- Click the Automation button to open the Automation Processing Options page.
- Choose the selection box located against the required Service Name to enable it.
- Click Save to apply your changes.
-
Click a Service Name to open the Automation Service Setup page and then configure the following for the selected service within the Details tab:
- Start Date: start date of processing; set by default to the date when batch service was initialized through the Server Administration application.
- Start Time: time the service starts the processing; set by default to 01:00.
Note: The time is entered in military time (24-hour notation); for example, 21:30 is entered for 9:30 PM.
- Time Zone: time zone of the processing time; by default, set to the server time zone.
Note: A user can override the time zone; the automation service translates the specified processing time from the user-defined time zone to the system time zone.
- Process Every: frequency the service is processed; by default, 1 Day is displayed.
Note: Available units include Minute, Hour, Day, Week, Month and Year.
- Last Process: date and time of the last automated background process
- Status: status of the last automated background process
- Description: description of the service.
- Enable Service: select or clear the box to enable or disable the automation of a service.
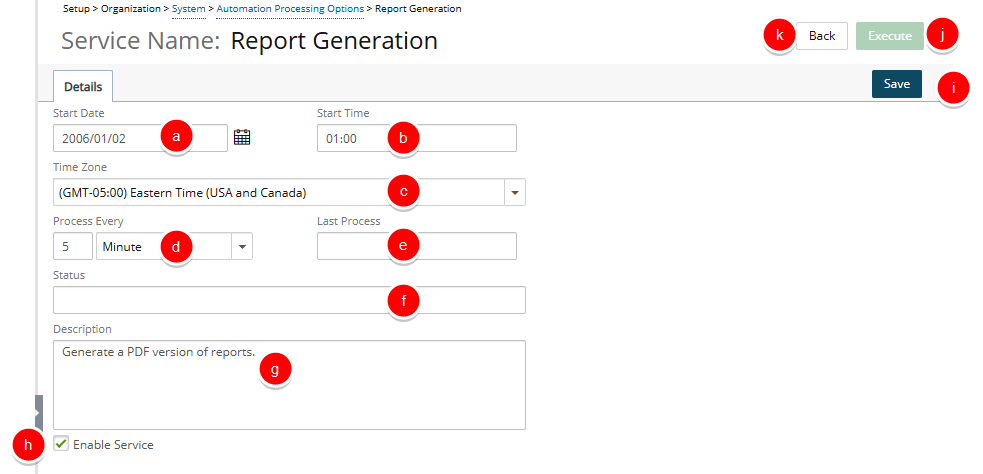
Note: The services can also be enabled or disabled directly from the Automation Processing Options page by selecting or clearing the Enabled box for a service.
- Click Save to apply your changes.
- Click Execute to run the service.
- Click Back to return to the previous page.
- From the Automation Processing Options page: Click Save and then Back to save your changes and return to the previous page.