The Advanced option is available when associating an Edit-type User Defined Field of data types Integer, Number, Date, Percentage, Currency, and Timespan to Projects or Project Status Templates.
This article details how to associate and configure Advanced User Defined Fields of various data types with Projects and Project Status Templates.
Note: Advanced User Defined Fields can only be associated to Projects and Project Status Templates.
This Type of User Defined Field relies on database stored procedures to perform complex calculations on any category of record in PSA. To create the formula in an Advanced User Defined Field, contact PSA Support to discuss your specific business requirements.
Advanced UDF Configuration
In our example we are going to associate an Edit Type User Defined Field of Data type Integer to Projects and configure it as an Advanced User Defined Field.
- From the Icon Bar click Setup
 .
. - From the Navigation Menu select User Defined Fields to access the Associate User Defined Fields page.
Tip: The Menu will automatically hide (collapse or minimize), allowing for more space on the Associate User Defined Fields page. While the menu is minimized, click the blue Collapse/Expand arrow to turn it back on.
- Click the Associate to box to access the list and select Projects from the list of available options.
- Select the Tab where the UDF resides.
- From the Available Fields section select the desired Field.
- Drop the selected Field in the Layout section.
Tip: To add more UDF layout areas, simply drag a Field into the gray doted rectangle. You will notice a new line with dotted rectangles will appear above the gray dotted rectangle. You can add more UDFs in the available slots.
- When associating a User Defined Field for the first time to an item, the User Defined Field properties dialog box displays automatically allowing you to configure the UDF:
- Display Name: Allows defining a display name for the field in the selected language. By default, the Field Name will be used and system terminology will be applied.
- Language: Allows selecting the language for which the display name will be set.
- Select the Advanced option for the User Defined Field Type
Caution: The Type of a saved User Defined Field cannot be modified.
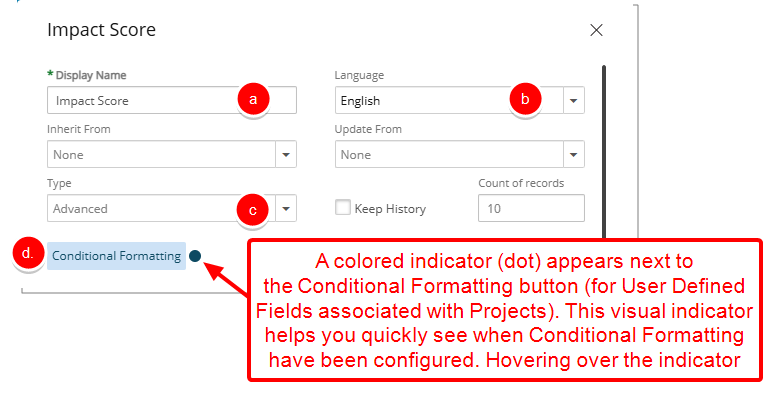
- If required click the Conditional Formatting button to define conditional expressions.
Note: Conditional Formatting is only available for User Defined Fields associated to Projects. For further details refer to Using Conditional Formatting for Project User-Defined Fields.
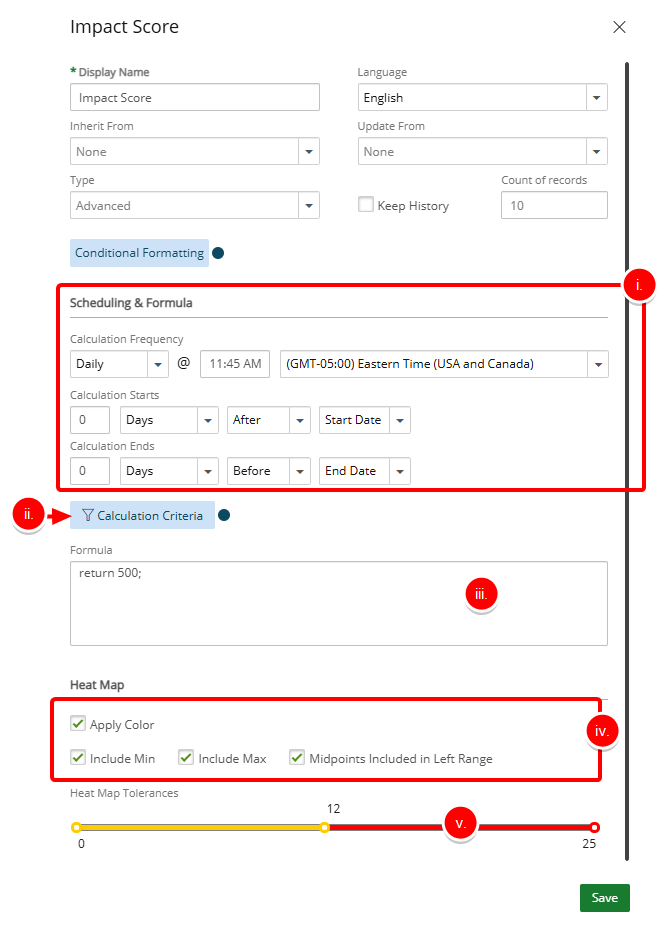
- Upon selecting Advanced Type, the following options are available to you where you can define your Advanced User Defined Field settings:
- Define a Calculation Frequency and then choose the options for when Calculation Starts and Ends. The values of Advanced User Defined Fields will be recalculated for all applicable Projects if recalculation is triggered from either the:
- Projects association page
- Or the Process Advanced UDFs Automation Processing Service.
Note: The default calculation frequency values will take effect if no frequency is defined.
- Calculation Criteria Filter: Click to filter the list of Projects where the Advanced User Defined Field will be associated to. The User Defined Field will be displayed on the Project Edit page of Projects meeting the defined criteria.
Note: A colored indicator (dot) appears next to the Calculation Criteria button (for Advanced User Defined Fields associated with Projects and PSRs). This visual indicator helps you quickly see when Calculation Criteria filter have been configured. Hovering over the indicator displays a tooltip confirming its presence.
- Formula: To create the formula in an Advanced User Defined Field, contact PSA Support to discuss your specific business requirements.
- Select Apply Color if you would like to use color indicators for this calculated field then choose the following options:
- Include Min: When selected, the min value(s) within the ranges will have a color indicator.
- Include Max: When selected, the max value(s) within the ranges will have a color indicator.
- Midpoints Included in Left Range: When selected, the midpoints will have the color of the lower range, otherwise, the higher range is used.
- Heat Map Tolerance: Drag the slider located at the far right to create as many ranges as necessary.
- Define a Calculation Frequency and then choose the options for when Calculation Starts and Ends. The values of Advanced User Defined Fields will be recalculated for all applicable Projects if recalculation is triggered from either the:
- Click Save to apply your changes.
- Upon saving and exiting the User Defined Field properties dialog box, note that a Recalculate button (
 ) is available on the associated Field. You can click the button to immediately recalculate the value, otherwise, the calculation will be triggered automatically based on the defined schedule in Calculation Frequency. The values of Advanced User Defined Fields will be recalculated for all applicable Projects if recalculation is triggered from either the:
- Projects association page.
- Newly available Process Advanced UDFs Automation Processing Service.
Note: Advanced User Defined Fields are not recalculated for Suspended and Placeholder Projects.