Manage submitted content review jobs
Project owners (POs) can submit new content added to a questionnaire to a Content Manager (CM) for review. When the content is submitted, the next available Content ID is automatically assigned to the record and it is added to the library, without being associated with a folder, as a disabled content record. The CM must select a folder for the record and approve it to enable it for use. Before approving a content record, the CM can edit it, assign it to a SME, or reassign it to another CM. The CM can also choose to reject the content and delete it from the library.
Note: While it is in the queue, the record is in the library as disabled. You can find it by running the Unassigned Content saved search. If a project participant edits the new submitted content, it can be submitted again with a new Content ID number.
Users can submit new and revised content for review on a slice-by-slice basis or in bulk. This is done by:
- editing empty slice(s) or cell(s).
- revising slice(s) or cell(s).
- dragging and dropping content from your computer into empty slice(s) or cell(s), or replacing existing content in the slice(s) or cell(s).
Manage Submitted To Review Jobs workspace
All new and revised submitted content is added to a single content review job titled "Submitted to [user name]". You can access this job from the Manage Content Reviews item on the Home page, which lists the most recent active jobs, or the Manage Content reviews page, which lists all jobs. Like the Content Reviews workspace, the Submitted to Review Jobs workspace is divided into an assignments panel on the left and a preview panel on the right. The content records are listed in the assignments panel along with the project from which they were submitted, the text of the question for which they were created, and any comments added by the PO who submitted it.
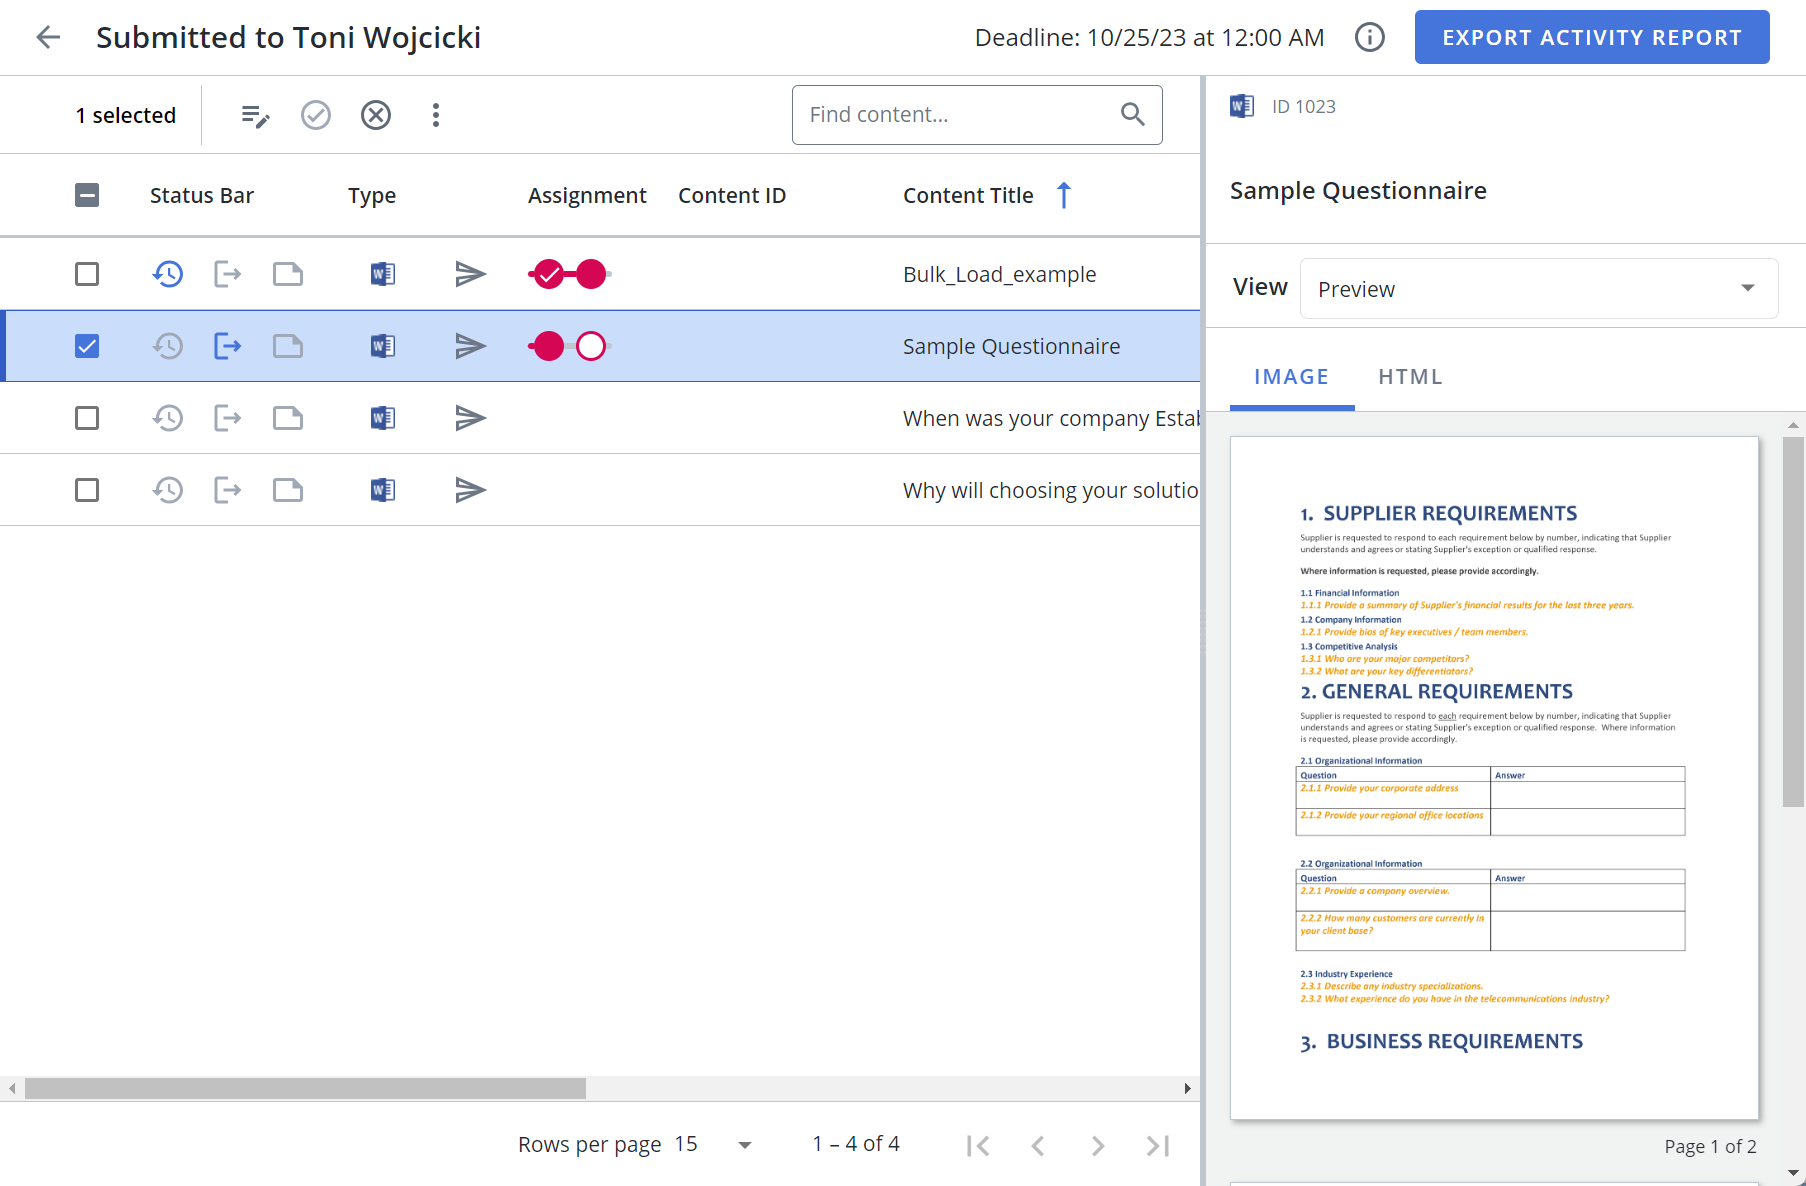
An example of the Submitted for Content Review page. Click to enlarge.
Click the Information  icon to view any instructions and the total number of overdue, in progress, and completed review jobs.
These icons will appear blue in the Status Bar to indicate the following:
- Updated
 icon: This icon appears if the record has been edited during the review job process.
 - Checked Out
 icon: This icon indicates that the file is being edited in a desktop application or being edited in Office for the Web. You can hover over the checked-out icons to see who has the file checked out.
 - Active Notes
 icon: This icon indicates that the review job currently contains active notes. Reviewers can add notes to the content records in lieu of using the comments features in Microsoft Word, which is not supported in the review job workflow. Notes are only visible to the reviewer who adds them and the content review job owner.
Note: Only one user can edit a Word, PowerPoint or Excel file in a desktop application at a time. The user must save their changes or cancel the checkout before another reviewer can edit it. Multiple users can edit the same file in Office for the Web at the same time. For image and PDF files, only the user who first downloaded the file can upload a revision. However, other users can download it to view. Once a revision has been uploaded, users must download the file again to upload a new version. Users can also upload a revision if the original reviewer cancels their checkout. Only the reviewer who checked out the content record or a Content Manager can cancel a checkout.
The assignment status bars display the progress of each record's review. Assignment bars are color coded and include circles indicating each task in the workflow. The color of the circles reflects the status of the current task in the workflow. As reviewers work on the assignment, the bars and circles change color. When a review is in progress, the bar and circle are yellow. Once a reviewer completes their task, it changes to green and a checkmark displays in the circle. You can hover over the checkmark for additional information. When a task becomes past due, the bar and circle are red.
All submitted content records, new and revised, found in the assignment panel will display a Content ID. A New Content  icon will appear next to new content. . Content Records can be sorted by both Content ID and New/Revised Icons.
Note: The content record question text is displayed as the Content Title for all new content submissions.
Enter text into the Find Content... field and click the Search ![]() icon or Enter.
icon or Enter.
At the bottom right of the display area, use the page scrolling controls (First page, Previous page, Next page, Last page) to move between pages in the grid.
At the bottom right of the display area, use the "Rows per page" dropdown menu to select the number of rows that you want to display on the grid.
Select your desired row(s) using the checkboxes or by clicking the rows and using CTRL+CLICK or SHIFT+CLICK to select multiple records.
You can show, hide, and order columns to display on the grid.
- Click the Customize Columns
 icon in the top right corner of the grid to display the Columns dialog. The "Manage Columns" dialog will appear.
 - To filter the column list, enter text into the Available Columns search box.
- Select your desired column(s) using the checkboxes or by clicking the rows and using CTRL+CLICK or SHIFT+CLICK to select multiple records. Select the Select All option from the More Options
 menu to enable all the columns and use the Left
  and Right
  icons to move the columns between the Available and Selected columns to determine which columns will be displayed on the grid.
 - To determine grid order: drag and drop any Selected Columns, select specific column checkboxes and use the Move to Top or Move to Bottom options from the More Options menu, or select specific column checkboxes and use the Up
 and Down
  icons to order the columns.
 - Click Restore Default to return to the default settings.
- Click Save to save the changes and close the dialog box or Cancel to close without saving changes.
Content Record details
Click the content record you want to view. Once selected, the content will appear in the View panel on the right. For more information, see Content Record Details Panel.
Submitted To Content Review actions
Click the Edit Content  icon and select one of the following options:
- Edit in an Office desktop application (.docx, .xlsx, and .pptx files only)
- Select Edit in Word, Edit in Excel, or Edit in PowerPoint. The file opens in the application.
Edit the content as necessary.
Note: We recommend that you do not change the Track Changes setting in Word. The Content Manager will enable or disable it prior to creating the review job and approving the record.
Click the Save button in the upper left of the application toolbar and close the application.
Caution: Do not save your file using Save As or the connection to the review job will be broken and you will not be able to upload the revision.
- Edit in Office for the Web (Word, Excel, PowerPoint)
- Select Edit in Office for the Web. The Microsoft 365 portal opens in a new browser window.
Sign into Microsoft 365. The file opens in Office for the Web and the record is now checked out. Once you sign in, your credentials are remembered until you sign out or clear your browser’s cache.
- Edit the content as necessary.
- Close the Office for the Web browser window. Changes to the file are saved automatically.
Note: You must have a Microsoft 365 account to edit files in Office for the Web. To obtain a Microsoft 365 license, visit https://products.office.com. For more information on editing a file in Microsoft 365, or Microsoft Office desktop applications, visit the Microsoft Support website at: https://support.microsoft.com.
- Download a file for editing and upload a revision (PDF and image files)
- Select Download for Edit. You will be prompted to open or save the file. The file is now checked out.
- Edit the content as necessary, and then save the file on your computer.
- Once finished, select Upload Revision, browse to the saved file, select it, and click Open.
Bulk edit content records in Microsoft Word for Office or the Web and include additional properties, such as custom metadata, for reference while editing.
Example: Save time by editing all Word content in a single document, instead of opening, editing, and saving each one separately.
- Select the content record(s) you want to edit:
- To edit a single content record: Click the Edit Content
 icon and select Advanced Edit. The "Edit Content - Single Document (1 record)" dialog displays.
 - To edit multiple content records: Select the checkboxes of the content records you want to edit, click the Edit Content icon at the top of the grid, and select Advanced Edit. The "Edit Content - Single Document (N records)" dialog displays, where N is the number of records you selected.
- To edit a single content record: Click the Edit Content
- Choose your preferred Edit Options:
- Edit in Word: This opens the selected records in a single Microsoft Word document. Incremental changes will be saved when you click the "Save" button in Word and will be finalized when you close the document.
- Edit in Office for the Web: This opens the selected records in a single document in Office for the Web. Incremental changes will automatically be saved and will be finalized when you close the document.
- Select your Sorting Options from the dropdown menu and choose whether to sort by Ascending or Descending order.
- (Optional) Select the Include a page break between content to preserve section formatting checkbox to have each record start on a new page of the created file.
- (Optional) Select the Include a page break between properties and content checkbox to have each record's properties start on a new page of the created file.
- Select the properties of the records to include in the single document. These properties are for informational purposes only and cannot be edited in Word.
- Click Edit. Depending on the editing option you selected, one of the following happens:
- Edit in Word: You are prompted by the Open Word? dialog. Click Open Word. The file opens in the Microsoft Office Word editor. Make your changes and click save your changes in the Word editor. You changes are pushed to the appropriate records in Qvidian.
Note: The document is opened in protected view. Click Enable Editing to edit the document.
- Edit in Office for the Web: The single file is opened in Office for the Web editor in a new window. Make your changes. The file is automatically saved. You changes are pushed to the appropriate records in Qvidian. Close the browser window to complete your changes.
- Edit in Word: You are prompted by the Open Word? dialog. Click Open Word. The file opens in the Microsoft Office Word editor. Make your changes and click save your changes in the Word editor. You changes are pushed to the appropriate records in Qvidian.
Caution: The ability to "Disable content while checked out" will not be available when performing an advanced edit in Review Jobs and Manage Review Jobs.
Caution: Do not change the name of the file. Qvidian tracks the names of files being uploaded and understands when a single file with multiple records is being uploaded and takes the necessary actions to update the records.
- Locate the content record(s) containing the assignment workflows and/or participants you want to edit:
- For a single content record: Click the More Options
 menu and select Assignments.
 - For multiple content records: Select the checkboxes of the desired content records. Click the More Options menu at the top of the grid and select Assignments.
- For a single content record: Click the More Options
- To edit an existing wokflow/task, click the Edit
 icon. You can change the name, due dates, task order, and add or remove assignees.
 - To add a workflow:
- Select the workflow you would like to use.
- Specify one of the following:
- Include Assignees: Include the assignees added to the workflow.
- Exclude Assignees: Exclude assignees added to the workflow.
- Click Add. The tasks of the selected workflow are visible on the page.
- You can now add a new task, add an existing workflow to this workflow, add tasks from another workflow, arrange the sequence of tasks in the workflow, and edit tasks details.
- To add a task:
- Click Add Task to add a task in the workflow.
- Enter a Task Name.
- Set the due Date and Time the task should be completed.
- Click the calendar icon to open the calendar.
- Browse to the required month and year and click on a date to set the date. Use the left and right arrows on the top right to move to the previous or next month. Use the drop-down to select the year.
- Set the time using one of the methods below:
- Click the clock icon to open the clock.
- Click in the hours and minutes fields and enter a new time.
- Click the up or down arrows on the hours, minutes.
- Use the drop-down to select AM or PM.
- Click the calendar icon to open the calendar.
- To add or edit assignees:
- For an existing task, click Edit Assignees. For a new task, click Add Assignees, the "Add/Edit Assignees" dialog displays. Enter the reviewer's name in the search box and press enter. Click the reviewer from the result list, a check mark appears. Repeat to add more assignees and close the dialog box.
Note: To remove assignees, click the Edit Assignees
 icon to open the "Edit Assignees" dialog. Click the search box, the added reviewers are listed at the top of the pop up list. Click a reviewer's name to remove the check mark. The reviewer is removed from the assignees list.
 - Specify the task completion rule. The task is considered complete, if all the assignees complete the task or if any of the assignees complete the task.
- Anyone: This option specifies that once any participant completes the task the workflow moves to the next task.
- Everyone: This option specifies that all participants have to complete the task for the workflow to move to the next task.
- Click the More Actions menu to delete this task or move this task and position it in the workflow task sequence.
- Click Done.
Note: If you would like additional changes made to a record, you can send it back to a previous reviewer. The reviewer will receive an email notification with a link to the project. If there tasks after the first task that was sent back, they will need to complete their task again as well.
- For an existing task, click Edit Assignees. For a new task, click Add Assignees, the "Add/Edit Assignees" dialog displays. Enter the reviewer's name in the search box and press enter. Click the reviewer from the result list, a check mark appears. Repeat to add more assignees and close the dialog box.
- Click Save.
Note: Click the More Options menu to delete any tasks or move their position within the workflow task sequence.
Click the More Options menu and select one of the following:
- Download Preview: Downloads content with the merge codes replaced.
- Download without Code Replacement: Downloads content without replacing the merge codes.
Content records without assignments can be reassigned to another content manager to manage.
- Locate the content record(s) containing the assignment workflows and/or participants you want to edit:
- For a single content record: Click the More Options menu and select Reassign.
- For multiple content records: Select the checkboxes of the desired content records. Click the More Options menu at the top of the grid and select Reassign.
- For a single content record: Click the More Options
- Enter the name of the content manager in the Send to field. You can only select one user; you must clear the check box before selecting another user.
Note: Only users with the "Allow user to see features related to content management" permission enabled will be listed in the "Reassign Content Manager" dialog for any new content submissions. Only users with the "Allow user to perform content review tasks" permission enabled and have edit, manage, or owner permissions will be available for any revised content submissions.
- (Optional) Enter any Comments.
- Click Assign.
If more than one reviewer is assigned to a task, all reviewers who have not submitted their revisions will receive a reminder email. To verify who has submitted their response, select the record(s), right click, select Assignments and then view the task card.
- Locate the content record(s) for which you want to send a reminder.
- For a single content record: Click the More Options menu and select Send Reminder.
- For multiple content records: Select the checkboxes of the desired content records. Click the More Options menu at the top of the grid and select Send Reminder.
- For a single content record: Click the More Options
- Enter any Comments for the participants that have not completed their assignment(s).
- Click Send.
You can view the content record properties, and then edit them in the same way as you would from the library. However, when opened from the Submitted to Review jobs page, the Content Properties dialog box includes a Project Metadata tab that has information on the project from which it was submitted and the submitter. Updates to the content record properties are applied immediately.
- Hover over the desired content record.
- Click the More Options menu and select Edit Properties. The "Edit Content Properties" page displays.
- Edit the properties as desired.
- Click Save.
Note: Project metadata is available for both new and revised submissions.
Users with permission to delete a content record in the library can also perform this action in Review Jobs.
Caution: This will also remove the content from the Review Job. Deleted content will remain in the Recycle Bin for a configurable amount of time before it is physically deleted.
- Hover over the desired content record.
- Click on the More Options
 menu, and select Delete. Confirmation dialog will display.
 - Click Yes, Delete.
If you or another reviewer has a content record checked out, the Checked Out  icon will be displayed. You can hover over the icon to see who has the record checked out. You must cancel the checkout before you can download the record. If the record is checked out, the latest version of the record currently in the library will be submitted with your review.
- Locate the checked out content record.
- Click the Edit Content icon and select Cancel Checkout.
Note: Only the reviewer who checked out the record and the content manager can cancel a check out.
Once the reviewers have submitted their reviews you can choose to approve or reject the content. If you approve a record, it immediately goes back into the library, replacing the existing record, and is enabled. If you reject a content record it is deleted from the library. If a record is checked-out, the latest version of the record in the library will be submitted. You must edit the folder path in order to submit the record.
- Hover over the desired content record.
- Review the changes in the preview panel. You can edit the content record if needed.
- To approve a content record:
- To approve a single content record: Hover over the desired record and click the Approve
 icon.
icon. - To approve multiple content records: Select the desired record checkboxes and click the Approve
 icon at the top of the page.
Note: Approving revisions replaces the existing record with the revised version.
Note: This option will not be available if any reviews are outstanding.
- To approve a single content record: Hover over the desired record and click the Approve
- To reject a content record:
- To reject a single content record: Hover over the desired record and click the Reject
 icon.
icon. - To reject multiple content records: Select the desired record checkboxes and click the Reject
 icon at the top of the page.
- To reject a single content record: Hover over the desired record and click the Reject
Note: If track changes are enabled on Microsoft Word content, approving a record will accept all changes and turn the Track Changes feature off.
You can convert revised changes into new documents inside the library.
- Select a revised piece of content.
- For a single content record: Click the More Options menu and select Convert to New.
- For multiple content records: Select the checkboxes of the desired content records. Click the More Options menu at the top of the grid and select Convert to New.
- For a single content record: Click the More Options
- Select which of the following information you want to copy when converting revised content to new content:
- Folder Path
- Owners
- Properties
- Custom Metadata
- Keywords
- Search Terms
- Click Convert to New. The New Content icon will appear next to your converted content.
You can create a report of the activity on all content records included in a job including the ID and title for the content record on which the activity was performed, the date the action was taken, the type of action and by whom it was performed.
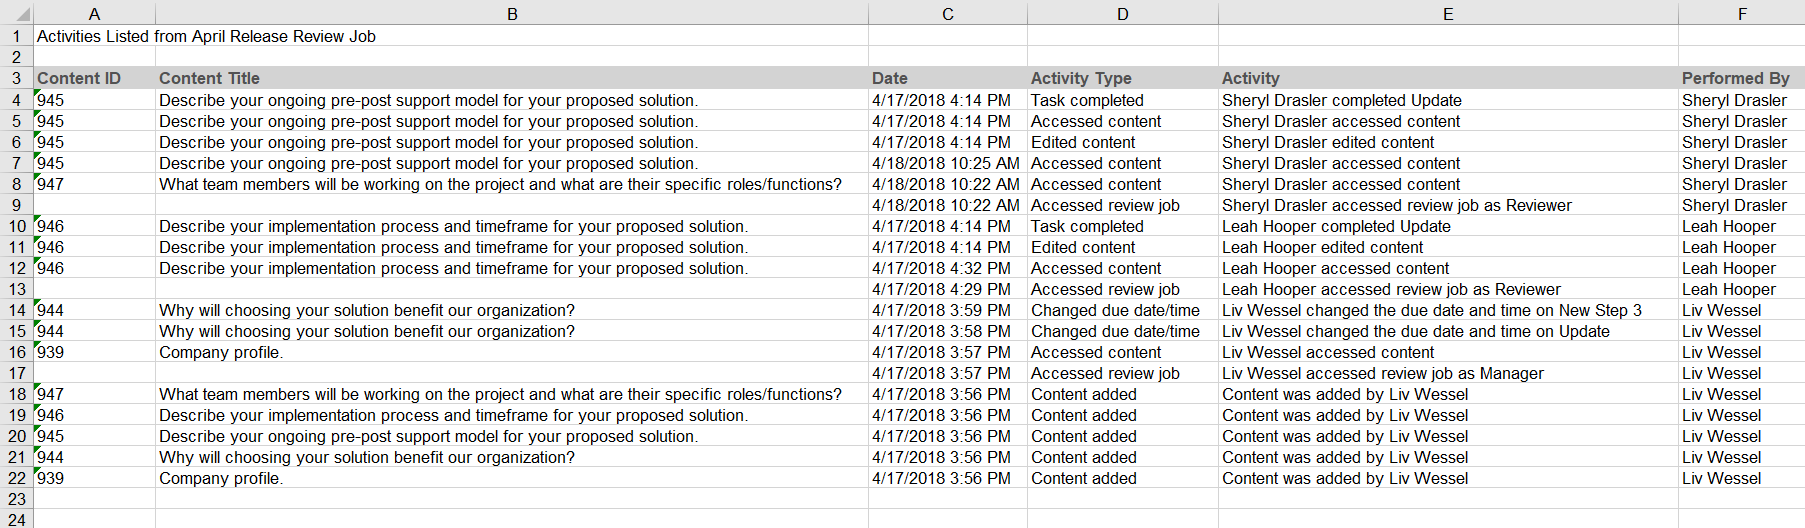
An example of a Review Jobs Activity report. Click to enlarge.
- Click the Export Activity Report button at the top right of the page. The "Export Activity Report" dialog will display.
- Enter a Name for the report.
- Click Export.