In the File List section, you can upload files from your computer or retrieve content records from the library to include in your package. Project owners can assign File List subsection owners, who can create assignments for each file.
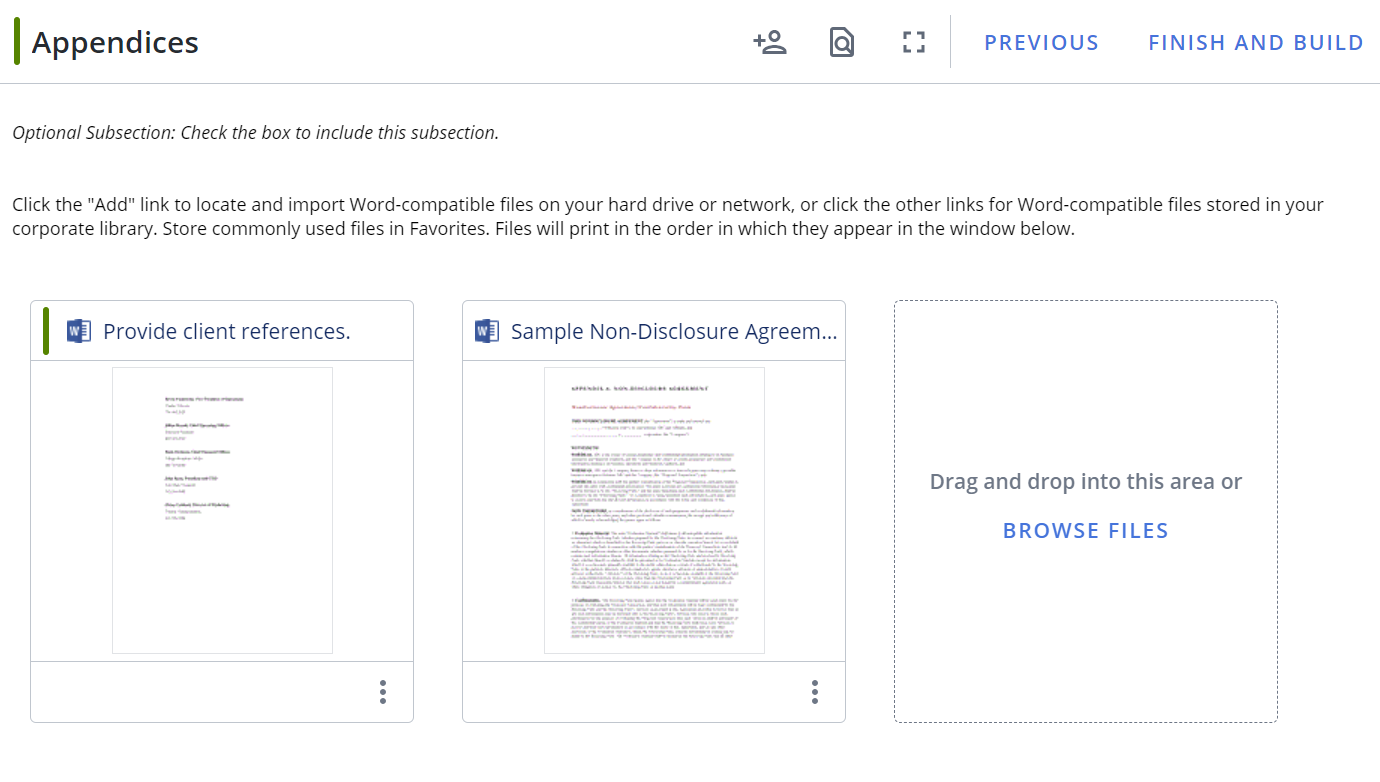
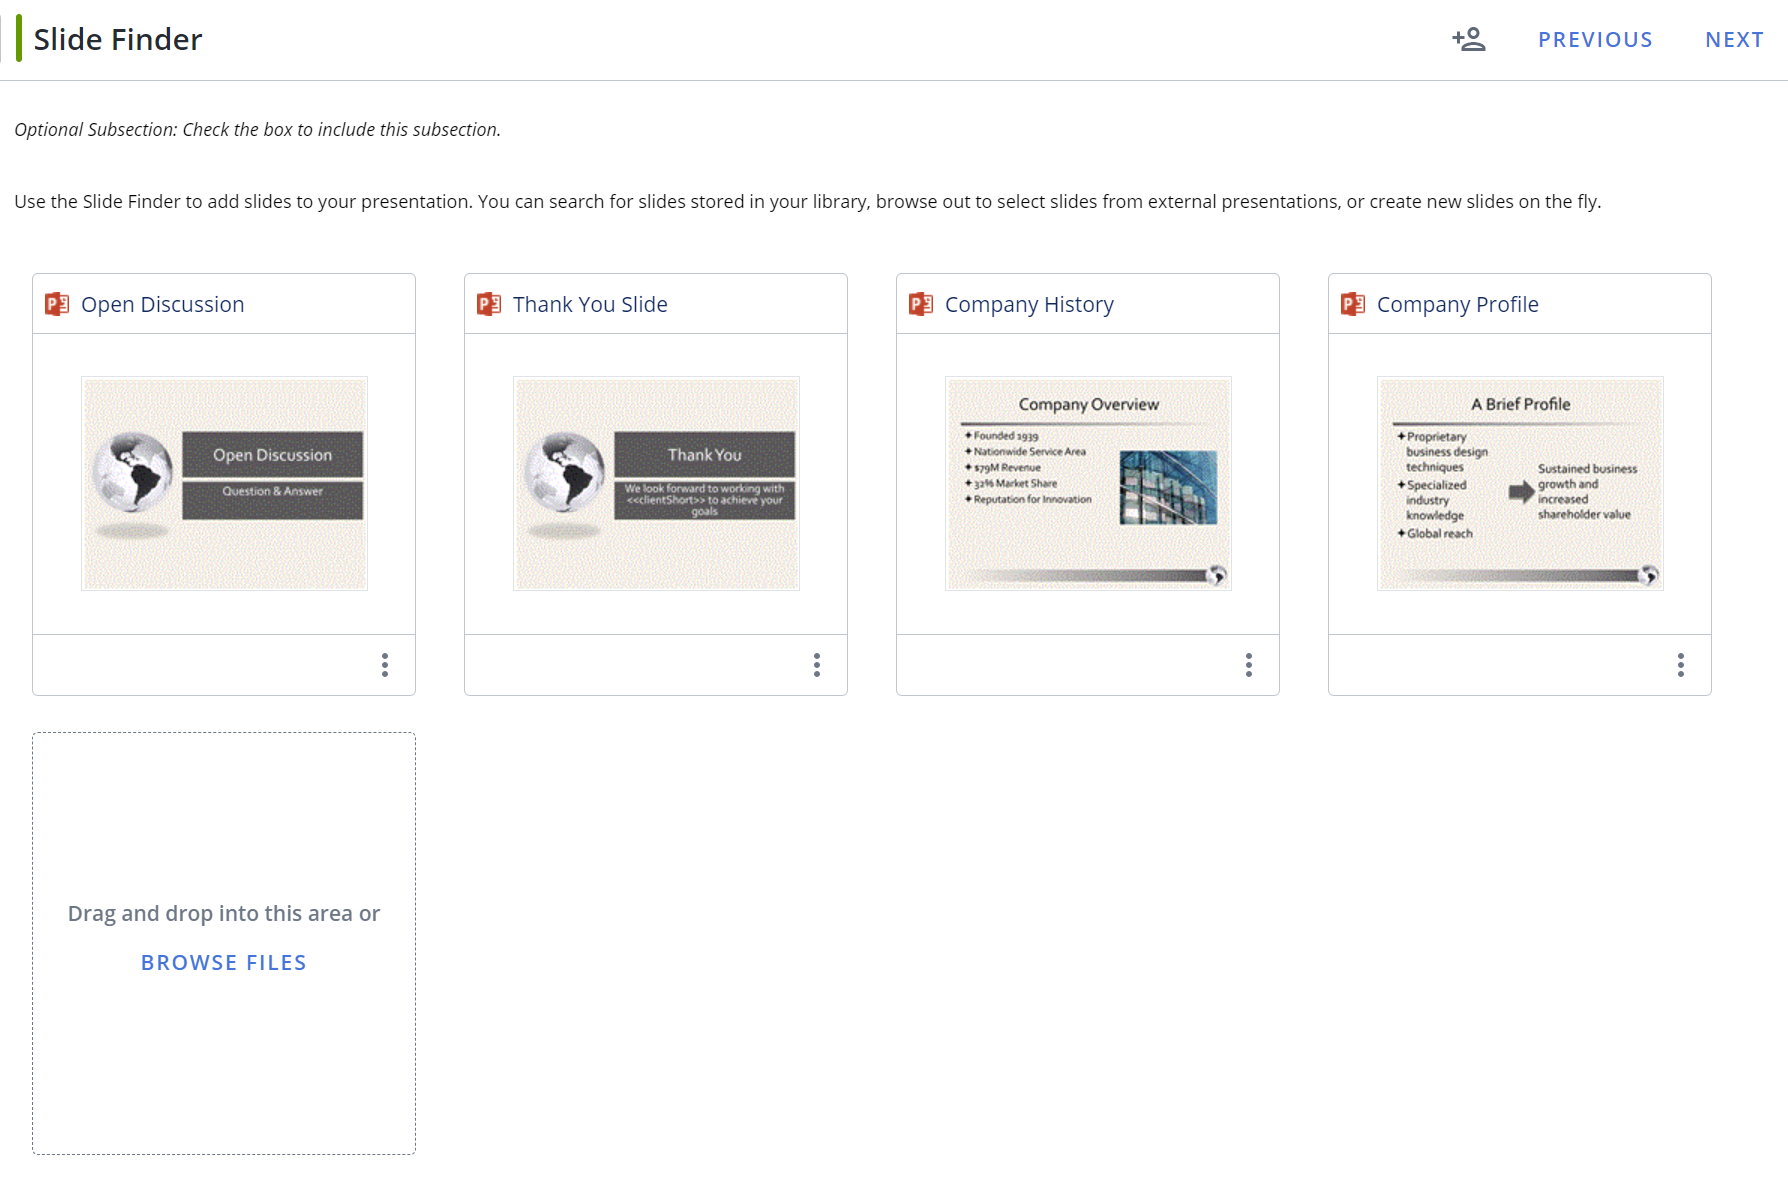
Example of an optional File List Subsection with one assigned and one unassigned File List file (left). Example of an optional File List Subsection containing PowerPoint slides (right). Click to enlarge.
Note: The following PowerPoint File List actions can only be performed in Created Documents: submit from the File List and refresh.
File List subsection
The owner of the File List Subsection can perform any of the tasks below, as well as manage any File List file assignments they have created.
Note: When working with PowerPoint File List subsections, participants can collaborate by being assigned to Project assignments, the File List subsection itself, or the File List file itself.
You can upload files of any file type, up to 300MB, in the project that you have in your library to a File List subsection by doing one of the following:
- Drag and drop a file from your computer or the library to the drop target on the workspace.
- Click the Browse Files button to add files from your computer.
Note: If you want imported PowerPoint slides to be split up individually, right click the uploaded file and select the Split presentation into individual slidescheck box. This only applies when the File List component is being used in a presentation document type.
- Right-click the file in the workspace or click the More
 menu.
menu. - Select one of the following, as applicable:
- Edit in Word
- Edit in Excel
- Edit in PowerPoint
- Edit as desired.
- Click the Save icon in the upper left corner of the Microsoft Office application to save the file back to the project, and then close the file.
If you have a Microsoft 365 online account and the "EnableOffice365" global setting is turned on, you can edit a Word or PowerPoint file in Office for the Web.
- Right-click the file in the workspace or click the More menu.
- Select Edit in Office for the Web.
- Edit as desired, and then close the browser tab when finished. Changes are automatically saved.
You can download a file in the project
- Right-click the file in the workspace or click the More menu.
- Select Download.
Note: If you are using Qvidian for Microsoft Office, your past versions will be available for download in the Versions tab (accessed by right-clicking your RFP file and selecting View Details).
If you have opened a file for editing, you can cancel the edit to allow others to work on the file.
- Right-click the file in the workspace or click the More menu.
- Select Cancel Checkout.
If your project has a data entry screen, you can enter values for custom fields to replace corresponding merge codes in the file. You can preview the file in the workspace with these custom fields populated.
- Do one of the following:
- Double-click the thumbnail.
- Click the More menu and select View Full Preview.
- Right-click the file and select View Full Preview.
- Slide the Preview Custom Fields toggle to On. This setting will be remembered for this and any other projects you open.
- Right-click the file in the workspace or click the More menu.
- Select Delete. You will be asked to confirm the deletion.
If you can choose more than one item, you can change the order in which the items will print as part of the package.
- Click and hold a file in the workspace and drag it to a new location.
- Assignments can be created anywhere in the project, file list file, or RFP. Do one of the following:
- Participants Tab
- Drag and drop participant(s) onto the desired location in the workspace. Dragging and dropping a participant into the file list title bar automatically makes that participant the file list section owner.
- Click the Add Participants
 icon in the project header.
- Sections Tab
- Click the Project Assignments
 icon to create assignments in a file list file.
 - Right-click the title bar, question slice, question, and/or answer cells and select Assignments from the More Actions menu
- Click the Project Assignments
- Participants Tab
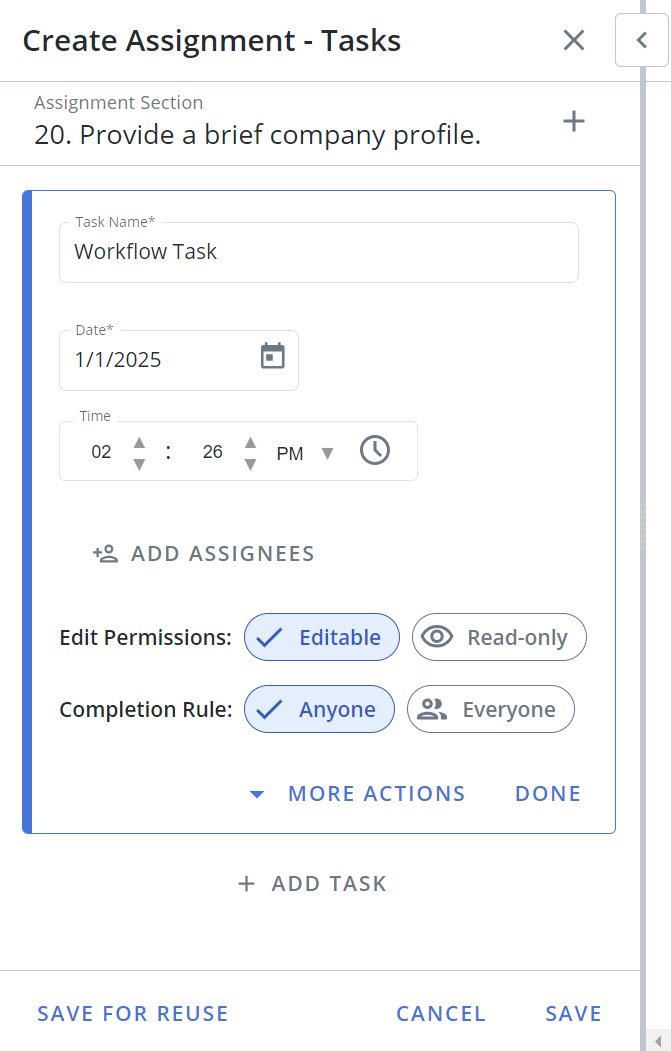
- (Optional) Enter a Task Name. By default, the system will name new workflow tasks “Workflow Task,” allowing users to leave the default workflow task name unchanged to create workflows faster when there’s no need to replace the default name with something more descriptive. Admins can change this default to the name they prefer via the “DefaultWorkflowTask” Global Setting.
-
 Set the due Date and Time ˅
- Click the calendar icon to open the calendar.
- Browse to the required month and year and click on a date to set the date. Use the left and right arrows on the top right to move to the previous or next month. Use the drop-down to select the year.
- Set the time using one of the methods below:
- Click the clock icon to open the clock.
- Click in the hours and minutes fields and enter a new time.
- Click the up or down arrows on the hours, minutes.
- Use the drop-down to select AM or PM.
Note: This will be the task's due date. The default date is the due date of the project.
- Click the Add Assignees button to add assignees to that task. The "Add Assignees" dialog appears.
- Narrow down the list by selecting: Users, Participants, or Teams from the dropdown menu. Once a user outside the project is assigned, they are automatically added as a project Participant.
- Enter two or more letters into the search bar to locate a specific user. Results begin populating below the search bar once text is entered.
- Click the X icon to exit out of the "Add Assignees" dialog and save any changes.
Note: Once selected, a blue checkmark appears to the left of the participants' initials. To remove an assignee, click the participant name again so that the blue checkmark is no longer visible.
- Select the desired Edit Permissions:
- Editable: These participants can answer and edit their slices or edit their file, and mark their workflow task as complete. By default, tasks are in "Editable" mode.
- Read-only: These participants only have permission to approve or reject answers by marking their workflow task complete or reopening a previous participant’s workflow task.
- Select the desired Completion Rule:
- Anyone: Requires all participants to complete their task before the workflow can move to the next task. By default, all tasks are set to "Anyone."
- Everyone: Only requires one participant to complete the assigned task.
- (Optional) Click the More Actions menu to complete or delete the task; or when there are multiple tasks, move the task up/down or to the top/bottom of the workflow.
- Click Done.
- (Optional) Click Add task to add more tasks to your workflow.
- (Optional) Drag and drop the tasks to rearrange the order of the workflow or select one of the following options from the More menu: Complete Task, Move Up, Move to Top, Move Down, Move to Bottom, Delete.
- (Optional) To save this assignment workflow for future use, click Save for Reuse. This eliminates the need for commonly used workflows to be recreated manually every time they're needed.
- Enter a Workflow Name.
- (Optional) Unselect the Save participants to workflow checkbox to save the tasks in your workflow without including its participants. By default, this checkbox is selected so Upland Qvidian will remember the participants associated with saved workflows.
- (Optional) Update your Share Settings. By default, a saved workflow is "Private" and therefore only visible to the project owner that created it. To make a saved workflow available to all permissioned users, select "Global."
- Click Save.
- Click Save.
Example: You may want to require only one of the participants to complete the task if you have assigned it to a team, but any member of the group can answer it. You may want to require all the participants to complete the task if the question contains multiple parts, or requires approval from all participants.
Note: For information on editing existing assignments, see Project assignments.
The Settings menu option allows you to take the following actions within your File List and RFP subsections: rename Project files, maintain Word file section formatting, and build files separately.
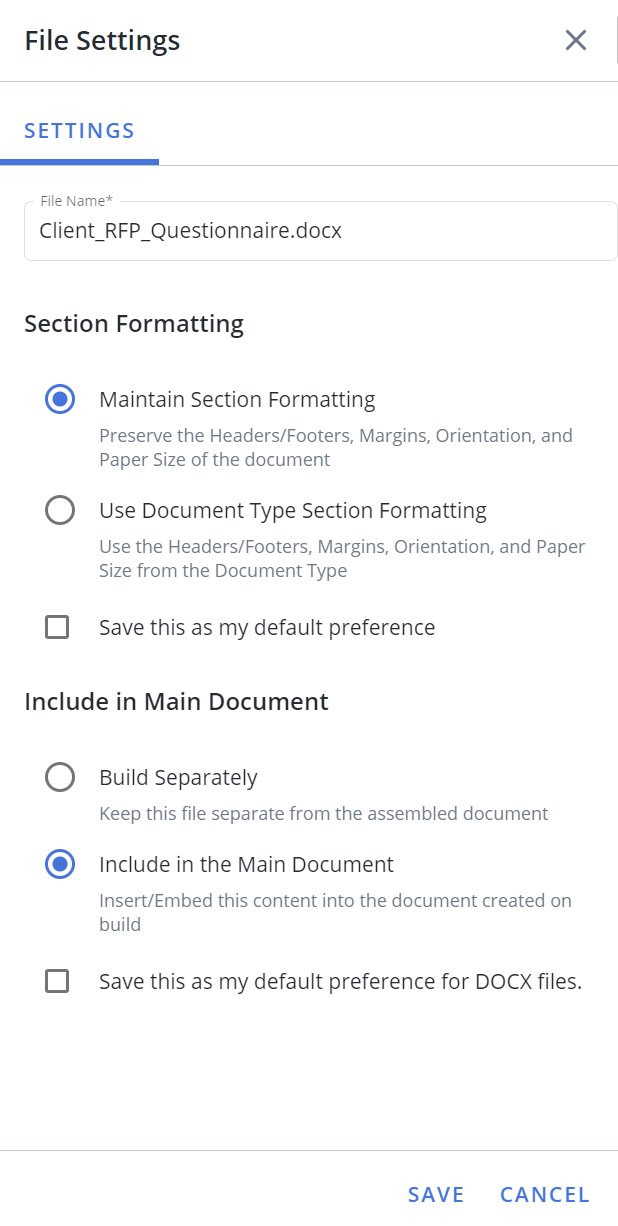
Example of the File Settings panel in a project RFP.
Rename files
Rename files in File List and RFP Project subsections.
Example: This can be helpful when many files are being added to the same subsection and you want to provide more meaningful file names to keep everything organized.
- Right-click the file in the workspace or click the More menu.
- Select Settings. The "Settings" panel will appear to the left of the workspace.
- Update the File Name.
- Click Save.
Note: This will not change the file name in the Qvidian Library.
Section formatting
Formatting, such as margins, headers/footers, paper size, and orientation can be maintained in File List and RFP Project subsections when built.
Example: When the Document Type section breaks are configured in portrait orientation, but the RFP questionnaire or File List file are in landscape orientation, you can maintain the landscape orientation for the file without reconfiguring anything in Architecture.
- Right-click the file in the workspace or click the More menu.
- Select Settings. The "Settings" panel will appear to the left of the workspace.
- Choose one of the following options:
- Maintain Section Formatting: This option preserves the headers/footers, margins, orientation, and paper size of the document.
- Use Document Type Section Formatting: This option uses the headers/footers, margins, orientation, and paper size from the document type.
- (Optional) Select the Save this as my default preference for X files checkbox, where "X" refers to the type of file loaded in the project (e.g. DOCX, JPG, PNG).
- Click Save.
Note: This setting is not applied retroactively to existing files and only saves as a user preference for each unique file type.
Build preferences
All files within Project File List and RFP subsections can be included in the main assembled document/presentation (as content or as an embedded object, depending on the file type), or be built separately from the main document/presentation.
Example: When answering an Excel RFP, you may choose to build the Excel file as an embedded object in the larger Word file that is being produced. When adding PDF files to a File List screen, you may choose to have them built as an embedded object in the larger Word file.
- Right-click the file in the workspace or click the More menu.
- Select Settings. The "Settings" panel will appear to the left of the workspace.
- Choose one of the following options:
- Build Separately: This option keeps the file separate from the assembled document.
- Include in the Main Document: This option inserts/embeds the content into the document created on build.
- (Optional) Select the Save this as my default preference for X files checkbox, where "X" refers to the type of file loaded in the project (e.g. DOCX, JPG, PNG).
- Click Save.
Note: This setting is not applied retroactively to existing files and only saves as a user preference for each unique file type.
File List files
File List file "Editable" and "Read-only" task mode assignees are responsible for editing and verifying their assigned files. "Editable" mode assignees have permission to download and edit files. "Read-only" mode assignees have permission to approve the file or reject it and send it back to the "Editable" mode assignee(s). The workflow task may require all assigned participants to complete the task before the workflow can move forward.
- Locate your assignment task:
- Navigate to My Tasks.
- Right click the file, select More Actions > Assignments.
- Locate your assignment task.
- If a "Editable" mode task assignee, right-click the file in the workspace or in the navigation panel, and then select one of the following:
- Edit in Word, Edit in Excel, Edit in PowerPoint:The content opens in Word, Excel or PowerPoint. Edit as needed and then click the Save button in the upper left corner.
- Edit in Office for the Web: The content opens in Office for the Web. You may be prompted to log into Microsoft 365. Edit as needed close the Office for the Web browser window or tab. Changes to the file are saved automatically.
- Download: Downloads the file without checking it out.
- Upload Revision: Click to upload a new file to replace the existing one. This option is only available for PDF and image files.
- If a "Read-only" mode task assignee, review the assigned file.
- Depending on how you navigated to your task, click the Complete Task
 icon or select the Complete Task option from the More menu.
 - The assignment workflow will move to the next task. For more information on completing assignments, see Complete your project assignments.
Note: If the "Read-only" mode assignee does not approve the content, they can change your assignment task's status from complete back to incomplete. If this occurs, you will receive an email notification with the reviewer’s reasons for sending back the answer and a link to the project.
Note: If marked "Everyone", the workflow task requires all assigned participants to complete the task before the workflow can move forward. If marked "Anyone", the workflow task only requires one of the assigned participants to complete the task before the workflow can move forward.
Using Search Mode
Activate Search Mode and search directly in your workspace. You can preview, filter, and insert answers without opening a separate library window.
Note: In order to access Search Mode, you must enable the "EnableProjectSearchPanel" Global settings and the "Allow user to use Search Mode in Projects" Application Setting for each permissioned user. These settings are off by default.
Note: You must add the file extensions that will be filtered during a search via the "FileListFileExtensionsFilter" Global settings.
- Open your desired Project RFP. The Search Mode
 icon will appear in the workspace header when an RFP is opened.
 - Click the Search Mode
 icon to open the Search Mode panel. The Search Mode will open in the panel to the left of your RFP workspace and the Search Mode icon will have a blue background.
 - Left-click anywhere on a slice or cell with content in it. Qvidian automatically searches the library for the slice’s text and displays the most relevant answers in the Search Panel.
- Refine results by adjusting the folder and filter criteria.
- Found content can be dragged and dropped directly from the Search Mode panel onto the RFP to add the answer, or the insert icon can be clicked.
Tip: To close the Search Mode panel, click the X in the upper left-hand corner or click the Search Mode icon again.
Note: After completing a search, the top content results appear in the Search Mode panel, sorted by relevance. When searched content is added to the File List, Qvidian will remember the search terms that were entered.