Project participants can be assigned to work on a files within a file list, static, or selection driven content section, questions in an RFP, and the entire project. More than one participant can be assigned to each workflow task. Participants can be assigned to either "Read-only" or "Editable" mode tasks. "Editable" mode assignees have permission to answer and edit their slices or edit their file, and mark their workflow task as complete. "Read-only" mode assignees only have permission to approve or reject answers by marking their workflow task complete or reopening a previous participant’s workflow task.
There are three main tasks to completing your assignment:
- Find your assignment.
- Complete your task.
- Mark your assignment task as complete, re-open, or reassign your task.
Find your assignment
When you are assigned to a task in a project, you will receive an email notification from the project’s owner, which includes the assignment title and a link to the project. You will also see the project listed as a link under the Assigned to Me (Projects) Item on your Home page. Click either link to open the project. The Sections tab of the navigation displays when a you open an RFP project. To view your assignments, click the Assignments tab. If you are a project participant, you will see the all of your assignments listed under the My Tasks view. Click Project to view all assignments. Project owners will see the Project view of the assignment panel. Click My Tasks to switch to My Tasks view.
My Tasks displays by default for participants (non-project owners/managers) and reflects the progress of only your assignments. The bars display the percentage of assignments in each status as indicated by color. Hover over the colored status sections on the bars to display the number of assignments in that status.
My Tasks status bar colors:
- Yellow: In progress
- Red: Past due
- Green: Complete

In the example above, there are 4 total tasks, 1 is past due, 1 is in progress, and 2 are complete.
Assignment Filters & Sorting:
A list of your assigned tasks, found below the status bar are grouped in order of due date (e.g., due next 30 days, due after 30 days, etc.).
- To sort tasks:
- Click the Sort
 icon.
icon. - Select one of the following:
- Sort By Date: This is the default sort order. Tasks are listed and grouped in order of due date (e.g., due next 30 days, due after 30 days, etc.).
- Sort By Display Order: Tasks are displayed in the order they appear in the assignment.
- Click the Sort
- To add a filter:
- Click the Filter
 icon.
icon. - Select the check box(es) next to any the following status(es) or you wish to display:
- My Turn: This filter includes tasks where it is currently your turn in the workflow to complete an action.
- Upcoming: This filter includes tasks where your turn in the workflow to complete an action is in the future.
- On Time: This filter includes your tasks that are not past their due dates.
- Past Due: This filter includes your tasks that are past their due dates.
- Completed: This filter includes your completed tasks.
- Click the Filter icon again to hide the filter options.
Note: Upland Qvidian remembers any “Assignment Status” filters you apply. Filters will remain active between log-ins and across projects.
- Click the Filter
- To remove a filter:
- Click the Filter icon.
- Clear the check box(es) next to the status(es) or participant(s) filter to remove.
- Click the Filter icon again to hide the filter options.
- Click the Filter
Assignment information export:
You can export assignments into a spreadsheet by clicking the Export  icon.
icon.
Task status & workflow:
- To view a particular task, click the task card. The assignment will open in the workspace.
- Click the More Options
 menu to view the workflow, complete, or re-open your tasks.
 - Tasks are grouped into sections: Past Due, Due After 30 Days, Completed. View the participant's task status:
- Past Due: Tasks that are future and "Past Due" will be displayed in this section. Any tasks that are current and "Past Due" will have a red line on the left side and a red "Overdue" icon will appear on the task card.
- Due After 30 Days: Tasks that are future and "Due After 30 Days" will be displayed in this section. Any tasks that are current and "Due After 30 Days" will have a yellow line on the left side and a yellow "In progress" icon will appear on the task card.
- Completed: Tasks that are future and "Completed" will be displayed in this section. Any tasks that are current and "Completed" will have a green line on the left side and a green "Completed" icon will appear on the task card.
Note: To complete several tasks at once, select the desired tasks and click Bulk Complete.
Note: Hover over any of the assignment task icons for status, participant, completion requirements, and read-only/editable mode details for that task.
You can also identify your assignments by the section status indicators, which display next to the section, subsection, and files that you own or to which you are assigned a task. Project owners see all indicators. The status indicators signify the following:
 For participants: It is your turn in an assignment. For project owners: The section is not complete.
 For participants and project owners: The section is complete.
 For participants and project owners: The section is past due. This also displays on Data Entry sections if any required fields are blank.
Note: When a user misses an assignment deadline, Upland Qvidian can send a copy of the late notification email to their manager automatically. To send an automatic manager escalations for late assignments email, enable the “Include user's manager on late assignment notification” setting found on the Permissions tab of the Users page in addition to the "Your Project Task In Workflow Has Expired" and "Your Review Job Task In Workflow Has Expired" Email Notification Triggers. Ensure that the Manager Name and Manager Email fields in the desired user profile have been completed; if these fields remain blank no email will be sent.
Switch between the Full and Simplified Doc Structure views any time using the Section Display Mode toggle. The Full Doc Structure view displays all Project sections and subsections. The Simplified Doc Structure view displays only the subsections you own or can change.


An example of Full Doc Structure (left) and Simplified Doc Structure (right). Click to enlarge.
- Open the Sections tab of your Project.
- Select a display mode using the toggle:
- Full: Display all sections, subsections, and content are visible, including those you cannot change.
- Simplified: Displays only the subsections you own or can change. For selection-driven content sections, only the first occurrence of relevant selections is visible, and any automatically driven selections are hidden. Relevant optional sections are visible but unchecked by default. The Overview, section headings, and static content are all hidden.
Note: By default, everyone initially sees the Full Doc Structure view, unless the “Show Simplified Doc Structure in Projects on First Use” system permission has been enabled. When enabled, the first time a user opens a Project, their view will default to Simplified Mode. After opening a Project, the user can change their view and the system will remember their preferences the next time they create or open a Project.
Note: Upland Qvidian will remember the doc structure view you selected last, so your preferred doc structure view will remain active across projects and between log-ins.
Caution: In some instances, the same Selection Driven Content Section can have different names in the Full and Simplified Doc Structure views. This occurs because you can have multiple subsections that use the same component. The subsection name is populated by the "Name" Document Type field, and the component name is populated by the "Display Title" Document Type field. For example, if a component is titled, “Business Issues,” but the subsections are titled for each distinct location in the document, such as “Business Issues Intro,” “Business Issues Body,” and/or “Business Issues Summary.”
Complete your assigned task
You may be assigned as a participant in a task in a Project Overview, File List file or RFP question assignment. The actions available for each assignment depend on the type of assignment and your role.
Note: While you are working on your assignments, you can also view and add comments related to the project or an RFP slice assignment. Comment  icons appear to the left of the first slice in any assignment with assignment comments. New project comments are indicated on the Comments panel on the dashboard.
-
Project Overview: You can be assigned to a "Editable" or "Read-only" mode task in a Project Overview assignment to review and approve project content.
- Project Overview "Editable" mode task participants can do the following:
- View all project content.
- Add, edit, download, delete, and reorder files in RFP Project or File List subsections.
- Answer and edit RFP file questions in Word or Excel.
- Makes selections in Selection List subsections.
- Project Overview "Read-only" mode task participants can do the following:
- View included project content. Reviewers cannot see unselected Selection Screen content.
- Download current and original RFP files.
- Approve or reject a reviewer's task.
- Project Overview "Editable" mode task participants can do the following:
-
File List subsection: You can be assigned as an owner of a File List subsection, which grants you the permission to upload files from your computer or retrieve content records from the library to include in the package. Files added to the File List subsection will display in the navigation panel under the subsection. File List subsection owners are also responsible for creating File List file assignments.
-
File List file: You can be assigned to a task in a File List file assignment workflow in either "Editable" or "Read-only" mode. "Editable" mode assignees can upload, download and edit files. "Read-only" mode assignees can download, and approve or reject the file.
-
Question(s) in an RFP file: You can be assigned to a task in an RFP File slice assignment workflow in either "Editable" or "Read-only" mode. "Editable" mode assignees can answer and edit RFP file questions. "Read-only" mode assignees can approve or reject the answers.
- Selection Driven Content subsection: You can be assigned to a task in the assignment workflow in either "Editable" or "Read-only" mode. "Editable" mode assignees can download and edit files. "Read-only" mode assignees can download, and approve or reject the file.
- Static Content subsection: You can be assigned to a task in the assignment workflow in either "Editable" or "Read-only" mode. "Editable" mode assignees can download and edit files. "Read-only" mode assignees can download, and approve or reject the file.
Note: Additional project sections are available to project owners.
Mark your assignment task as complete or re-open your task
If you answered or edited an RFP question as part of a "Editable" mode assignment task, you must mark your assignment task as complete to let the other participants know you have finished your work. You can re-open a previously closed task as long as the entire workflow is not complete. If you are assigned to a "Read-only" mode assignment task, you must verify the answer's accuracy and then either approve the answer or reject it. Reviewers can also add assignment level comments if they want to approve a task, but still provide feedback.
- Locate your assignment task:
- Navigate to My Tasks and click the Complete Task
 icon or select the Complete Task option from the More menu.
 - Right click the slice, select Assignments, and click the Complete Task icon or select the Complete Task option from the More menu.
- Navigate to My Tasks and click the Complete Task
- Depending on how you navigated to your task, click Complete Task / Complete My Task.
- The assignment workflow will move to the next task.
Note: If the "Read-only" mode assignee does not approve the content, they can change your assignment task's status from complete back to incomplete. If this occurs, you will receive an email notification with the reviewer’s reasons for sending back the answer and a link to the project.
Note: If marked "All Complete", the workflow task requires all assigned participants to complete the task before the workflow can move forward. If marked "Any Complete", the workflow task only requires one of the assigned participants to complete the task before the workflow can move forward.
Save time and clicks by marking more than one task complete at a time. This can be used when you have several outstanding tasks that must be marked complete.
- Navigate to My Tasks.
- Select all the tasks you would like to mark complete using one of the following methods:
- Select the checkboxes of the desired tasks.
- To select all tasks, click the Select All option from the More menu.
- Hold down the CTRL key on a PC or the CMD key on a Mac, click each task.
- While holding down the Shift key, click one task, and then click another task below it to select all tasks in between.
- Click the Bulk Complete
 icon.
icon.
You can re-open a previously closed task as long as the entire workflow is not complete. This can be used if you mistakenly marked a task completed that requires additional work. Upland Qvidian also re-opens any subsequent closed tasks in the workflow, and emails impacted participants as well as the project owner.
- Navigate to My Tasks.
- Click the More menu of a completed task.
- Select Re-open Task.
- Enter a comment in the Incomplete Task Notification dialog box.
- Click OK.
Note: Administrators can disable the “Re-Open Task” option for all users via the Global Setting: “AllowReopenWorkflowTask.”
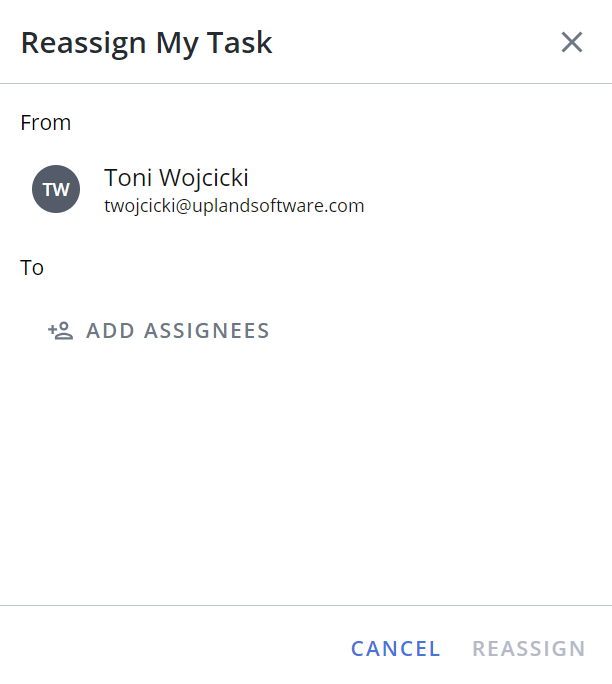
You can select another participant to whom you will reassign your tasks.
- Locate your assignment task:
- Navigate to My Tasks and select the Reassign My Task option from the More menu.
- Right click the slice, select Assignments, and select the Reassign My Task option from the More menu.
- Navigate to My Tasks and select the Reassign My Task option from the More
- Select Reassign My Task. The Reassign My Task panel appears.
- Click the Add Assignees button. The Add Assignees dialog appears.
- Narrow down the list by selecting: Users, Participants, or Teams from the dropdown menu.
- Select the user(s) you wish to reassign your tasks. Once selected, a blue checkmark appears next to the reassigned participants name.
- Click Reassign.
Note: The Users option is only displayed if the "Allow users to assign tasks to users outside of the project" user permission has been enabled. Once a user outside the project is assigned, they are automatically added as a project Participant.
Note: After reassigning tasks, Qvidian automatically emails the new assignees and the project owner.
You can view the complete workflow associated with the assignment to better understand the context of your tasks.
- Navigate to My Tasks.
- Click the More Options menu and select View Workflow.
Note: If you are a project owner, you can click the Edit ![]() icon to edit the existing assignment. For more information, see Create and edit project assignments .
icon to edit the existing assignment. For more information, see Create and edit project assignments .
Next tasks:
- If you have assignments in other projects, you can switch to another project by clicking the My Work
 icon and then clicking the project title.
 - If you have a review jobs assignment, you can open it by clicking the My Work icon and then clicking the review job title.