Resource Schedule Sheet Report
The Resource Schedule Sheet report displays data on Resource assignments over a select set of Projects.
The report is organized by each Resource included in the report. Each Resource will have their own dedicated page (or sheet in Excel reports) on the report; this page will list all of the Resource's assignments on the included Projects, broken down by the Tasks they are assigned to. Each row in the table will represent a Task that the Resource is assigned to.

Tip: For a similar report that exports this data in a way that is more suitable for importing it into other systems, consider the Resource Time report.
The following columns will be available on each Resource's page:
-
Project Name: The name of the Project that contains the Task the Resource is assigned to. Selecting the Project Name will open up the Project in Eclipse PPM.
-
Resource: The name of the assigned Resource. This name should be the same for each row on the page.
-
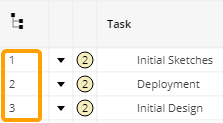
Task #: The sequence number of the Task the Resource is assigned to. Sequence numbers represent where the Task is listed on the Work Plan.
-
WBS: The WBS (work breakdown structure) number of the Task the Resource is assigned to.
Note: Unlike sequence numbers, WBS numbers take subtasks into account. For example, take a look at this Task and its subtasks:
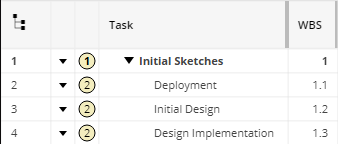
The sequence numbers of the subtasks are 2-4. However, the WBS numbers of the subtasks use decimals to indicate that they belong under the main "Initial Sketches" Task. -
Task Name: The name of the Task the Resource is assigned to.
-
Days: The total number of working days that make up the Task's duration.
Note: This is the total number of working days dedicated to the Task, not just the Resource's share of it. For example, if the Resource is assigned to 50% of a 10-day Task and another Resource is assigned to the other 50% (5 full days each), the "Days" column will still display "10.00" for the Task.
-
Planned Start: The current planned Start Date of the Task.
-
Planned End: The current planned End Date of the Task.
-
% Complete: The current percent complete of the Task.
-
Status: The current Status of the Task.
Note: Keep in mind that Task Statuses are based on the Task's planned dates and percent complete.
-
Resource(s): The names of every Resource assigned to the Task.
-
Units: The full time equivalent (FTE) percentage of the Resource's time that is allocated to the Task. In other words, the percentage of the Resource's total workday that is allocated to the Task.
Example: A value of "100" indicates that a Resource's entire workday should be dedicated toward the Task. A value of "50" indicates that only 50% of the Resource's workday should be dedicated toward the Task.
-
Allocated Effort: The Resource's allocated (scheduled) effort toward the Task, in hours.
-
Actual Effort: The Resource's actual effort toward the Task, in hours.
Note: Actual effort is calculated by Timesheet entries.
-
Task Description: A description of the Task, if one has been added.
Note: This column can be excluded while configuring the report.
-
Comments: Comments that have been added to the Task.
Note: This column can be excluded while configuring the report. Also, the user running the report can specify which Comment(s) should be included.
To run the Resource Schedule Sheet report:
Before You Start: Users will require the "Resource Reports - Allow" permission from an Application Policy to run this report. Additionally, users will require the "Profile Details - View" permission and the "Project Schedule - View" permission on at least one a Project's Policies in order to view the Project's data in the report.
-
Select the Reports icon
 from the Navigation Menu.
-
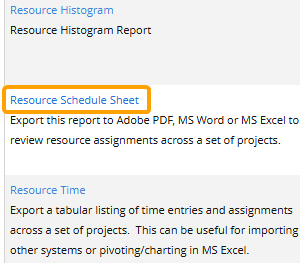
Select Resource Schedule Sheet from the list of Eclipse Reports.
-
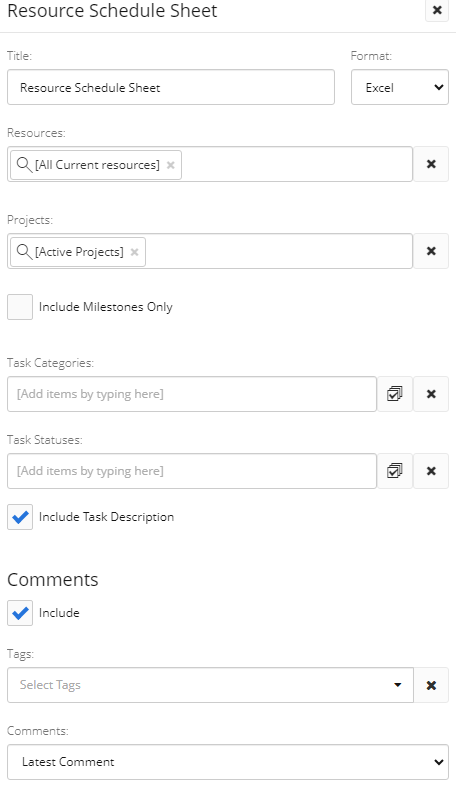
Use the "Resource Schedule Sheet" window to customize your Resource Schedule Sheet report.
-
Title: Enter a custom name for your Resource Schedule Sheet report. This title will appear at the top of the report.
-
Format: Determine whether the report will be downloaded as a PDF file, a Microsoft Excel file, or a Microsoft Word document.
-
Resources: Select which Resources will be included in the report by typing in the name of a Resource or Resource filter and selecting it from the drop-down menu. Repeat this until all of your desired Resources and filters have been added. Each included Resource will have its own dedicated page/sheet on the report.
Note: These are the same Resource filters that can be found on the Resource Search page. From here, users can create their own custom Resource filters that can be used in the report.
Note: Selected Resources that do not have any assignments on any of the selected Projects (below) will be excluded from the report.
-
Projects: Select which Projects will be included in the report by typing in the name of a Project or Project filter and selecting it from the drop-down menu. Repeat this until all of your desired Projects and filters have been added.
Note: Projects without any of the selected Resources assigned to them will be excluded from the report.
Note: These are the same Project filters that can be found on the Project Search page. From here, users can create their own custom Project filters that can be used in the report.
Note: A message will appear if the selected filter(s) will result in no Projects being included in the report.
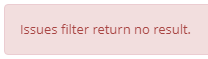
This could be the result of selecting a filter (or multiple) that does not include any Projects. It could also occur if the user running the report does not have permission to view any of them. -
Include Milestones only: Select the checkbox to only include Milestone Tasks in the report. Tasks that are not Milestones (as well as any Projects that do not contain Milestone Tasks) will be filtered out of the report.
-
Task Categories: Use the drop-down menu to filter Tasks based on their Task Categories. Only Tasks that belong to the selected Categories will be included in the report. If the field is left empty, the Tasks will not be filtered by Categories.
-
Task Statuses: Use the drop-down menu to filter Tasks based on their Task Statuses. Only Tasks that currently have one of the selected Statuses will be included in the report. If the field is left empty, the Tasks will not be filtered by Statuses.
Note: Keep in mind that Task Statuses are based on the Task's planned dates and percent complete.
-
Include Task Description: Select this checkbox to include the "Task Description" column on the report.
-
Include (under "Comments"): Select this checkbox to include the "Comments" column on the report.
-
Tags: Use the drop-down menu to filter Task Comments by their Tags. Only Comments that contain the selected Tags will be included in the report. If the field is left empty, Comments will not be filtered by Tags.
-
Comments: Use the drop-down menu to determine which Task Comment(s) will be displayed in the "Comments" column.
-
-
Select the Run button.
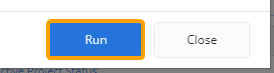
After selecting Run, the report will automatically download onto your device in the selected format.After selecting Run, the report will automatically download onto your device in the selected format.