Update Considerations
This page details any changes in configuration for new or existing features with the latest version of InGenius. If you are coming from a previous installation to InGenius 2024 R1.2, refer to the list below to view a list of configuration steps that may require revisiting, as well as additional steps to enable new features.
For users updating from InGenius 2024 R1.2 and below, proceed with the following steps:
Add Custom Component to VCR Page
In order to accommodate the Auto-Decline enhancement, an error banner must be added to your VCR page in the lightning app builder. Follow the instructions here.
For users updating from InGenius 2024 R1.1 and below, proceed with the following steps:
Download the New Contact Center
In order for the new authentication improvements to come into effect, a new version of the InGenius contact center must be downloaded from the Admin App and imported into Salesforce. Follow the instructions here.
Import the New Solution File
In order for the new authentication improvements to come into effect, a new version of the Microsoft solution file must be downloaded and imported into Dynamics 365. Follow the instructions here.
Note: Contact InGenius Support if you have not been provided with a new solution file.
Configure InGenius Authenticator
After importing the new solution file, an InGenius key must be generated for your environment. Follow the steps here.
Configure Personal Voicemail
To enable the new personal voicemail feature for agents, your contact center settings must be updated. Refer to the pre-deployment steps here.
For users updating from InGenius 2024 R1.0 and below, proceed with the following steps:
There are no additional update considerations for Microsoft Dynamics environments.
Configure the InGenius Telephony Popup App
In order to ensure compatibility with Google's third-party storage changes, InGenius has introduced a new component app that must be configured as described in the Assign Users to Connected Apps section here. Configure the app for your users as instructed in the linked page.
For users updating from InGenius for SCV 2023 R1.0 and below, then proceed with the following steps:
Uninstall the ACW Component
As part of the upgrade to InGenius 2024 R1.0, two new Apex packages must be installed. Attempting to install them before first removing the existing ACW (After Call Work) lightning component will result in an error:
-
Log into your Salesforce org.
-
Navigate to your Voice Call record page.
-
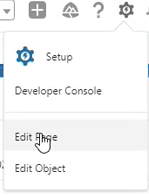
Click the gear icon in the top right corner of the page and select Edit Page.
-
In the Lightning App Builder, right-click on your placed ACW component and select Delete Object.
-
Click Save on the top right corner.
Install New Apex Packages
There is now a unified "InGenius" apex package, and a dependent "InGenius for Service Cloud Voice" package. When upgrading, an upland team member will provide you with a download link to two managed package installations for the new version of InGenius. Be sure to follow the process in the following order:
-
Uninstall the the old ACW component as described in the steps above
-
Uninstall the previous SCV apex Package, this package will no longer be used with 2024 R1.0 or later releases.
-
Install the new "InGenius" apex package.
-
Install the new "InGenius for Service Cloud Voice" dependent apex package.
-
Install the new ACW component as described below.
Note: Ensure that the "Install for all users" option is selected when installing the managed package.
Install New ACW Component
With InGenius 2024 R1.0, a new ACW component has been added to accommodate easier updates in the future that will not require the component to be reinstalled. A new ACW component will be added with the apex packages above, called 'InGeniusACW', this will need to be added back in the Lightning App Builder in Salesforce.
The steps can be found in the installation section After Call Work.
Manage Workflow Integrations
If you have Workflow Integrations (WIs) from a previous installation of InGenius, these old integrations will not be visible or available to apply to new managed groups created post-upgrade. You can remove these old WIs and apply new ones by editing the Managed Group in the Admin App.
Note: Previous WIs will only remain visible while connected to a profile, and will become unavailable if not connected or if they are unassigned.
Localization Profiles
With the addition of localization support in InGenius, a default profile will automatically be created and applied to all existing Managed Groups, meaning no additional steps need to be taken to continue working with the same Managed Groups for deployments upgrading to the InGenius 2024 R1.0.
Update Advanced Telephony Settings
In order to enable multiline support for users in Genesys Engage, an additional parameter must be added to the advanced telephony settings in the Admin App. Refer to the steps in Configure Telephony Profile page for more information.
For users updating from InGenius for SCV 2022 R1.1 and below, read the sections below to understand the upgrade process:
Install the Apex Package
When upgrading from a previous installation of InGenius, an Upland team member will provide you with a download link to the managed package installation for the new version of InGenius.
Note: Ensure that the "Install for all users" option is selected when installing the managed package.
Re-assign Users to Connected Apps
Users will have to be re-assigned to the InGenius Admin App and the InGenius Connected App as described in the installation section here.
Additional Configuration
Some instructions have been added or modified and additional configuration may be required to enable new features or functionality in InGenius. Review the topics below:
-
-
Other Permissions
-
The permission
'conversation:call:monitor'is required for users to access the Omni Supervisor listen in & coach features through the Conference button. -
The permission
'conversation:callback:create'is required for users to be able to start and end callbacks. -
Salesforce permission sets must also be configured to allow the user access to listen in & coach.
-
-
Create Genesys OAuth Client Credentials Integration
-
An OAuth Client Credentials integration must be created in Genesys to allow for presence statuses to be imported into the admin app. The steps in this section walk through its creation and configuration.
-
-
Create Queued Callback Action in Genesys Architect
-
A data action must be created in Genesys for queued callbacks to function. The table in this section details how the fields should be set for this data action, and references the official Genesys documentation for its implementation.
-
-
-
-
Configure Genesys Cloud OAuth Connection
-
The steps to configure the OAuth connection from the telephony profile page in the admin app has been updated for the new layout of the page, and the addition of the Client Secret field.
-
-
-
-
Import Telephony Agent States
-
Details the presence configuration page of the admin app and the steps for importing presence statuses from the CRM and the telephony profile.
-
If presence statuses fail to populate, ensure you have updated your telephony profile page with all of the required fields, and that you have created a client credentials integration for your telephony.
-
-
-
-
Add Custom Component in Lightning App
-
Details the configuration necessary to enable use of your telephony system's ACW from within the SCV UI.
-
In Salesforce, a custom component must be added to the voice call record page.
-
-