Edit a User Profile
User Profiles contain basic information on PowerSteering users and their relationship to the organization. They can also be used to configure a user's Role(s) and availability for Projects.
Note: To edit User Profile's, PowerSteering users will require the "Edit" User permission.
This page covers the following topics:
Navigating to a User Profile's Edit Page
Before making any changes to a User's Profile, you must first navigate to the user's edit page.
To access a User Profile's edit page:
Before You Start: PowerSteering users will require the "View Profile" User permission on the user's profile to access it. Also, they will require the "Edit" User permission to edit the user's profile.
-
Select the Search icon from the Header:

Note: See PowerSteering Search Logic to see how the results are calculated.
-
Type a user's a name into the Search bar.
-
Select the user from the list of results under "People":
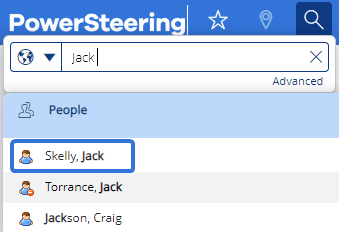
Note: If you cannot find what you are looking for within the immediate results, try an Advanced Search.
-
Select the Edit User tab from the User Profile page:

After selecting Edit User, you can begin editing the user's details. See below for more information on the editable sections.
Editing User Information
After accessing the User Profile's edit page, you can start editing the following information:
Before You Start: PowerSteering users require the "Edit" User permission on the user's profile in order to edit it.
Basic Information
A user's Basic Information consists of information relevant to the user's account in PowerSteering:
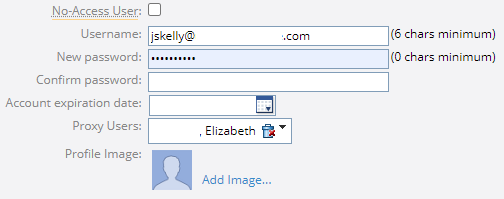
Edit any of the following fields:
-
No-Access User: Select this checkbox to designate the user as a "No-Access" user. See the No-Access User Overview for more information.
-
Username: Edit the user's username. This will allow the user to sign in to PowerSteering.
Note: If your PowerSteering site uses single-sign on (SSO), you will not be able to change a username on this page.
-
New password: Enter a new password for the user. This will allow the user to sign in to PowerSteering.
Note: The user's password will populate (in hidden characters) in this field upon opening the page. If you make any edits to the page and click the Save button without erasing this field, the page will assume that you are trying to change the password to its current value. This will cause an error message to appear and your changes will not be saved:

If you do not wish to change the user's password while editing their details, be sure to erase the hidden characters from the "New password" field before clicking Save.Note: If your PowerSteering site uses single-sign on (SSO), you will not be able to change the password on this page unless the user has been given API-related permissions (i.e. the "REST API - Read", "REST API - Write", and "REST API - Delete" Context permissions). If the user has been given any API permissions, they can have a password set for them:

This password will not be used to sign them into PowerSteering. It can only be used along with the username to authenticate the user while running API commands. -
Confirm password: Re-enter the new password that you have entered for the user in the "New password" field.
-
Account expiration date: If the user should only have temporary access to PowerSteering, click on the calendar to select a date for the user's account to expire. The user will no longer have access to PowerSteering when this date arrives.
-
Proxy Users: Select the downwards arrow
 to add Proxy users for the user. In the window that appears, search for a user in the "Find" textbox and click on any of the results to add them as a Proxy user:
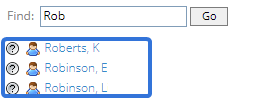
Alternatively, select the Trash icon
 to delete any existing proxy users.
 -
Profile Image: Select "Add Image..." to add a Profile Image for the user. This will open up your computer's File Explorer, allowing you to select any image saved on your device.
If you are finished editing the user after filling in these fields, click the Save button at the top or the bottom of the screen. If not, proceed to another section.
Profile Information
A user's Profile Information consists of personal and contact information:
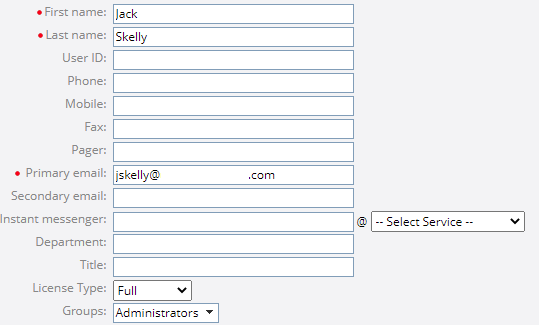
Edit any of the following fields:
-
First Name: The user's first name.
-
Last Name: The user's last name.
-
User ID: The user's User ID within the organization.
Note: This has no function in PowerSteering; it is simply to be used for reference.
-
Phone: The user's phone number.
-
Mobile: The user's mobile phone number.
-
Fax: The user's fax number.
-
Pager: The user's pager number.
-
Primary email: The user's email primary PowerSteering email address.
Note: This email address is where users will receive any PowerSteering notifications.
-
Secondary email: Any other email the user can be reached at.
-
Instant messenger: Any instant messenger address the user might have.
-
Department: The department that the user works for in the organization.
-
Title: The user's job title within the organization.
-
License Type: The user's PowerSteering License Type. It can either be Full, Team, Limited, or View Only.
Note: This field is strictly informational; it will not affect the PowerSteering permissions for any users. However, it should be used to generally reflect the user's permissions.
-
Groups: Select which Groups the user will belong to.
If you are finished editing the user after filling in these fields, click the Save button at the top or the bottom of the screen. If not, proceed to another section.
Business Information
A user's Business Information consists of information that pertains to the company:

-
Company name: The name of the organization that the user works for.
-
Address: The street address of the organization.
-
City: The city that the organization resides in.
-
State/Province: The state or province that the organization resides in.
-
Zip/Postal code: The organization's zip code or postal code.
-
Country: The country that the organization resides in.
If you are finished editing the user after filling in these fields, click the Save button at the top or the bottom of the screen. If not, proceed to another section.
Project Availability
A user's Project Availability outlines the available hours that the user can work.
Note: This section will only appear if Resource Management has been enabled for your site. Speak to your PowerSteering representative for more information.

-
Calendar: Select which Resource Calendar the user will follow.
Note: Resource Calendars can be created and configured by PowerSteering administrators.
Note: When a Resource Calendar is changed for a user, the Days Off section will populate with the Holidays from that Calendar. However, this will not occur until after the page is saved.
For example, if you change a user's Calendar from the "US Calendar" to the "Canada Calendar", the Holidays from the "Canada Calendar" will not be displayed until you click the Save button at the top or the bottom of the page.Caution: If the user's Calendar is different from the Calendar used on a Project, availability issues might arise while assigning the user as a resource on a Project. For example, if a user's Resource Calendar has a day off during a Project Task's duration that does not exist on the Project's calendar, it could push back the duration of the Task by an extra day. Because of this, Project Managers should be wary of a resource's availability while assigning them to work in Project Central.
-
Start Date / End Date: Enter the user's start and end dates with the organization. When these dates are set, the user will not have any available hours set outside of them.
Tip: Filling in these values ensures that inactive resources are not assigned to work.
-
Overall % available: Enter the overall percentage of available hours that the user will be able to work.
Example: If a user has 8 hours set for each weekday (which can be configured directly below), setting the "Overall % available" to 50% means that she will only have 4 available hours each weekday.
Note: The default value (which can be seen in parentheses next to the field) is based on the Resource Calendar chosen in the "Calendar" field. Leaving the field empty will cause it to automatically inherit the default amount.
-
Monday - Sunday: Enter in the how many available hours the user can work each day.
Note: The default values (which can be seen in parentheses next to each day) are based on the Resource Calendar chosen in the "Calendar" field. Leaving the fields empty will cause them to automatically inherit the default amount.
If you are finished editing the user after filling in these fields, click the Save button at the top or the bottom of the screen. If not, proceed to another section.
Days Off
The Days Off section lists all of the days the user will not be available to work based on the "Calendar" selection from the Project Availability section. It also allows additional days off to be added that might not exist within the selected Resource Calendar.
Note: This section will only appear if Resource Management has been enabled for your site. Speak to your PowerSteering representative for more information.
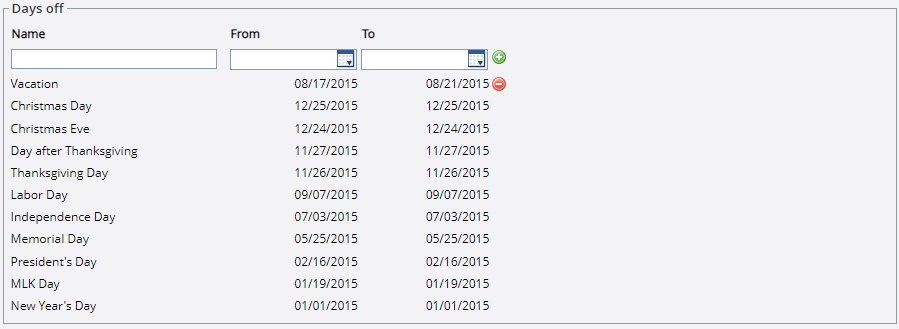
Note: Days off with the red Remove icon  next to them are additional days off that have been added to the specific user. They are not part of the user's Resource Calendar and they can be removed by clicking on the icon.
To add additional days off, simply enter in a name for the days off, use the "From" and "To" calendars to choose a date range, and click the green Plus icon  to add it to the list (just like "Vacation" pictured above).
Caution: If the user has days off that do not exist on the Calendar used on a Project, availability issues might arise while assigning the user as a resource on a Project. For example, if a user has a day off during a Project Task's duration that does not exist on the Project's calendar, it could push back the duration of the Task by an extra day. Because of this, Project Managers should be wary of a resource's availability while assigning them to work in Project Central.
If you are finished editing the user after filling in these dates, click the Save button at the top or the bottom of the screen. If not, proceed to another section.
Roles
The Roles section allows configured Roles to be designated to the user. PowerSteering Roles will assume a custom set of permissions configured by administrators. They can also assist in assigning users to roles on Projects. For example, Project Managers can search for users of a certain Role while assigning users to work in Project Central. See the Roles Overview for more information on Roles.
Note: This section will only appear if Resource Management has been enabled for your site. Speak to your PowerSteering representative for more information.
Tip: PowerSteering can restrict Resources to only be assigned to work in the Roles outlined on their Profile. If this interests you, please reach out to your PowerSteering representative to enable it.

To add a Role to the user's profile:
-
Select Add Role:

-
Select a Role from the "Role" drop-down menu.
-
Enter a number into the "Max Capacity %" field.
Note: The "Max Capacity %" is useful when the user has multiple Roles. This will indicate how much of the user's total available time can be consumed with tasks in that Role.
Example: Imagine Jack has two roles in the company: Analyst and Developer. To ensure that he does not get overworked in one position, he has a "Max Capacity %" of 50 for each role (pictured above). This means that 50% of his total working time can be allocated towards Analyst work and the other 50% can be allocated towards Developer work.
Now imagine that a Project Manager is currently looking for a Developer to assign to a Task in Project Central. This task will require a Developer to work on it for 8 hours a day across a 10-day period (80 hours total). She uses the "Best Matches" method to look for Developers, and she scrolls past Jack on the list. However, she sees that Jack only has 4 available hours each day (40 hours total) to work on this Task: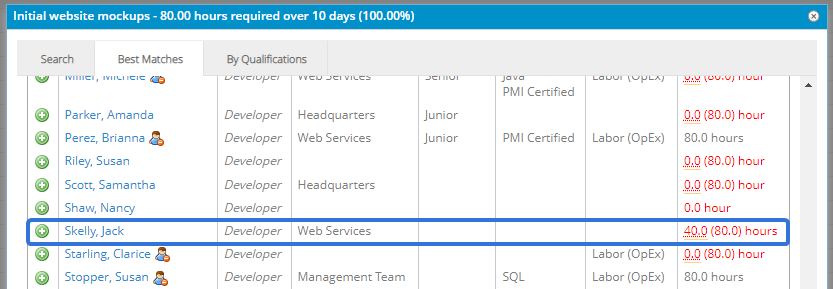
This is because Jack's "Max Capacity %" as a Developer has been set to 50% of his time.Note: Leaving any of these fields empty will cause them to automatically default to 100%.
-
(Optional) Use the "Pool" drop-down menu to select any Resource Pools that the user should belong to under that Role.
-
Return to Step 1 and repeat all steps until all of the user's Roles are filled.
-
Select which Role will be the user's default Role by selecting the "Default" checkbox next to it:

Note: When the "Search" method is used to assign a user to work in Project Central, the user's default Role will always display in the results grid. This will occur even when the Role of the work has been set to another one of the user's Roles.
-
Select the Save button if you are finished editing the user.
Note: To delete any roles, simply select the Remove icon  next to them.
Specialized Information
The Specialized Information section contains a combination of Tags and Custom Fields that have been configured to users by administrators. Fill out any of the fields for the user.

Note: The Specialized Information will most likely look much different for you. If you would like to see other fields included, speak to a PowerSteering administrator.
If you are finished editing the user after filling in these fields, click the Save button at the top or the bottom of the screen. If not, proceed to another section.