General application settings such as preferred language, as well as setting up the Logon Name format and Task Name Preferences can also be performed.
The articles details how to access the System Setup page and the available options to you.
Accessing the System Setup
- From the Icon Bar click Setup
 .
. - From the Navigation Menu click Organization.
- From the menu click System.
- From the System page click the System Setup button to access the System Setup page.
Available options from the System Setup page
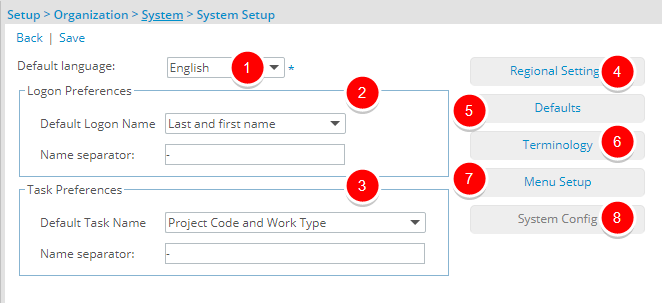
- Default Language: Select the language you want to use throughout the application.
- In the Logon Preferences section, the style determines the default Logon name for a user.
- For Default Logon Name select one of the following options:
- None: When None is chosen, the Logon Name field for a new User will remain empty until manually edited.
Note: Selecting None clears and locks the Name Separator box.
- Email: When selected, upon creating a User, if an Email is entered within the General tab of the User edit page, it will be used as the default Logon Name.
Note: Selecting Email clears and locks the Name Separator box.
- First and Last name: If you have set default logon style to First and Last Name, then the user must login using the same format. Example: ShirleySmith (when no Name separator is defined)
- Last and First name: If you have set default logon style to Last and First name, then the user must login using the same format. Example: SmithShirley (when no Name separator is defined)
Note: Last and First name is selected by default.
- None: When None is chosen, the Logon Name field for a new User will remain empty until manually edited.
- The Name separator box is editable when you choose either the First and Last name or the Last and First name. Enter the characters that will link the user's first and last name. Example: A dash separator as in Shirley-Smith.
Tip: By default the Name separator field is empty.
- For Default Logon Name select one of the following options:
- In the Task Preferences section, the style determines the How Task Names are auto-generated.
- Task Name: Choose from the following options:
- Client Name, Project Code and Work Type
- Client Name, Work Type and Project Code
- Project Code and Work Type
Note: Project Code and Work Type is selected by default.
- Work Type and Project Code
- In the Name separator box, enter the characters linking the item names. Even though there are tasks that exist prior to this preference being set up, the new settings for the task only apply to tasks that are newly created. Existing tasks are not edited.
Note: The hyphen (-) is used as the default name separator by the application.
- Task Name: Choose from the following options:
- Regional Settings: Click to access the Regional Settings at the system level where you can define settings such as the Number of decimal places, Date operator, Thousand respirator, Decimal separator and the Date Format.
- Defaults: Click to access the OBS Defaults page where you can define settings such as the default Site, Group, Team, User, User Resource Type, Title, Class, Business Unit and Role.
- Terminology: Click to access the Terminology Setup page. The Terminology setup enables you to change the terms used within PSA to terms more suitable or relevant to your organization.
- Menu Setup: Click to access the Menu Setup page. Menu setup allows you to configure a global application menu. By default, the menu is setup with PSA’s default menu configuration.
- System Config: Click to access the System Configuration page. The System Configuration page is available only to the Master Administrator Security profile.