Create a New Resource
Resources represent individuals who can be assigned to work in Eclipse PPM. They can be added to Projects and assigned to Tasks that they will be responsible for.
Note: Resources do not need to be users in Eclipse PPM. Non-user Resources can still be assigned to Projects and Tasks in Eclipse PPM.
Tip: If you are trying to create a new Resource from an existing user, see Creating Resources from Users instead.
To create a new Resource:
Before You Start: Eclipse PPM users require the "Resource Administration" permission from an Application Policy to add new Resources.
-
Select the Create icon:

-
Select Resource:

-
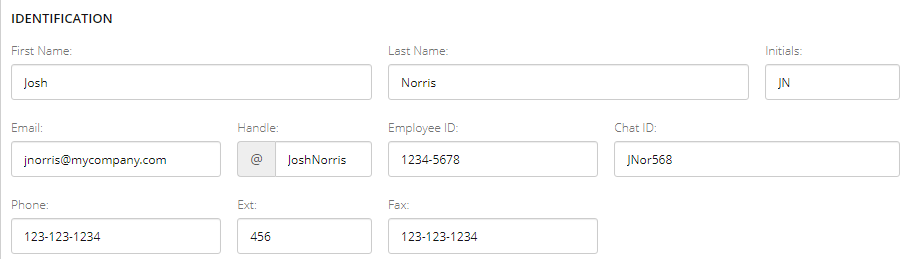
Enter the "Identification" settings for the new Resource:
-
First Name (required): The first name of the new Resource.
-
Last Name (required): The last name of the new Resource.
-
Initials (required): The new Resource's initials.
-
Email: The new Resource's email address.
-
Handle (required): Enter a unique handle that can be used to identify the Resource. Although multiple Resources might have the same name, no users can share the same handle.
Example: Chris wants to mention Josh Norris on a Comment, but there are two users with that name in his organization. He can look at the handle below the name to identify the correct one:

-
Employee ID: The Resource's employee ID within the organization.
Note: This field is only for identification purposes. Employee IDs are not used in Eclipse PPM.
-
Chat ID: An ID that can be used to reach the Resource on an instant chat program.
Note: This field is only for identification purposes. Chat IDs are not used in Eclipse PPM.
-
Phone: A work phone number that the Resource can be reached at.
-
Ext: The phone extension that the Resource can be reached at.
-
Fax: A fax number that the user can be reached at.
-
-
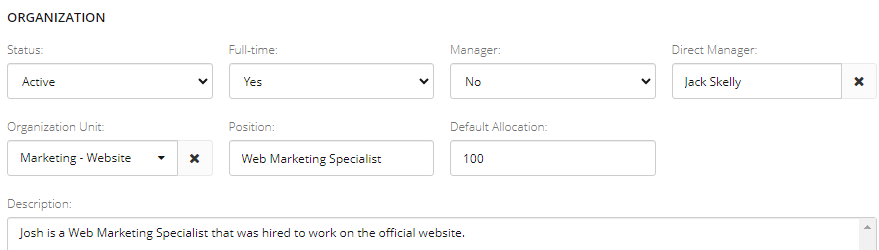
Enter the "Organization" details for the Resource:
-
Status: Choose the Resource Status the Resource will have upon creation.
Note: Administrators can create and edit Resource Statuses.
-
Full-time: Determine whether the Resource is considered "Full-time". The Resource will be considered "Full-time" if Yes is selected or "Variable" if No is selected.
Note: This selection might affect whether the Resource's allocated effort or time entries are used to calculate Budget or Actual Expenditures on a Project's Financial Worksheet. While editing a Project's Financial Worksheet Settings, users can choose to include or exclude Resources from these calculations based on their "Full-time" status.
-
Manager: Determine whether the Resource is considered a Manager in Eclipse PPM. If Yes is selected, the Resource can be selected as a "Direct Manager" for other Resources (or themselves, if desired).
-
Direct Manager: Type the name of a Manager into the textbox and select it from the drop-down list that appears.
Note: Only Resources with Yes selected in the "Manager" field can be assigned as a Direct Manager.
-
Organization Unit: Select which Organization Unit the Resource will belong to.
Note: Administrators can create and edit Organization Units through the Structure page.
-
Position: Enter the Resource's job title.
Note: This is separate from any Roles the Resource may be assigned to on a Work Plan.
-
Default Allocation: Enter the default percentage of the Resource's time that will be allocated to Tasks when the Resource is added to a Work Plan.
Example: Josh's Default Allocation is 100% and he is added to a Work Plan that uses a Calendar with 8 hour days. He is assigned to a Task that lasts two days (16 hours total). He will be assigned to the entire Task (16 hours over two days) by default.
If his Default Allocation is 50%, he will only be assigned to half of the Task, which is 4 hours on each of the two days (8 hours total).Note: This is just the default value. Users can change Resource allocations after assigning them to Tasks and Work Plans.
Note: Administrators can determine the default value that appears in this field while editing Resource Settings.
-
Description: Write a quick description of the Resource.
Tip: This field can contain any Resource information that is relevant to your organization.
-
-
Enter the "Time Entry Approver" settings for the Resource:

Tip: Select "@DirectManager" for either field if you would like the Resource's Direct Manager to approve their time. If the Resource does not have a Direct Manager, this value will not be saved.
Note: Projects can be configured to override Resource-level time approvers through Time Entry Settings.
-
Operational Projects: Type in and select the name of a user that will be responsible for approving the Resource's Timesheets for Operational Projects.
-
Projects: Type in and select the name of a user that will be responsible for approving the Resource's Timesheets for non-Operational Projects.
-
-
Select the Save button:

After selecting Save, the new Resource will be saved to Eclipse PPM. It can be assigned to Projects and Tasks within the application.
If you would like the Resource to be an Eclipse PPM user as well, see Create and Manage Users from the Resource Page.
Note: Resource Types and Rates cannot be associated to the Resource during creation. If you would like to add any Resource Types to your new Resource, see Manage Resources.